Table of Contents
Advertisement
Quick Links
Advertisement
Table of Contents

Related Manuals for Ranger design C12-FTL


Summary of Contents for Ranger design C12-FTL
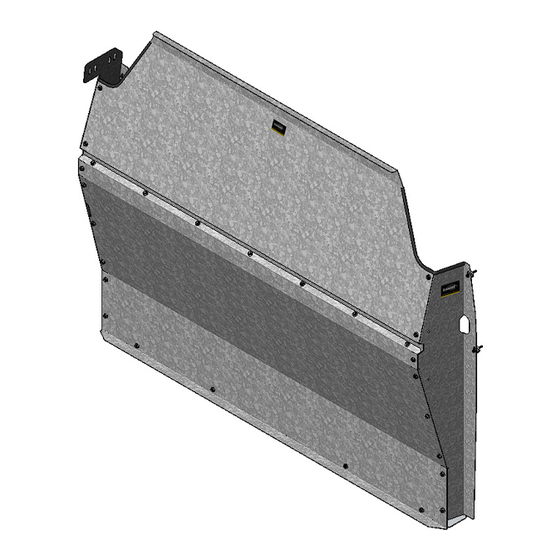
- Page 1 INSTALLATION GUIDE C12-FTL CONTOURED PARTITION Transit Partition ( Steel )
-
Page 2: Table Of Contents
3/8" Drill Bit q 7/16" Socket q 1/2" Socket q 9/16" Wrench q 1" Hole Saw PERSONS q 10mm Socket q 13mm Socket C12-FTL Installation Guide | REV. E1 | Page 2 For technical support, contact us at 1-800-565-5321... -
Page 3: Phase 1 - Assembly
Driver Side Wing 30-041 Lower Panel 30-500 Edge Trim ( QTY in Inches ) 79-907 Warning Label 94-3012 Assembly Fastener Bag 96-3005 Installation Fastener Bag C12-FTL Installation Guide | REV. E1 | Page 3 For technical support, contact us at 1-800-565-5321... -
Page 4: Q 1.1.3 Identify The Assembly And Installation Fastener Bags
# 98-157 0.375" ID, × 1.0" OD × 0.25" LONG 2× NYLON #98-141 Square Flat Washer Retaining Washer 4× # 98-158 M16 ( 1/4") NYLON C12-FTL Installation Guide | REV. E1 | Page 4 For technical support, contact us at 1-800-565-5321... -
Page 5: Q 1.2 Partition Assembly
1.2.2 Attach both wings to the upper and lower panels. TOOLS q Cordless Impact q 1/2" Socket HARDWARE USED 16× #90-200 Hex Bolt 5/16" × 1/2" #98-116 Flat Washer #94-116 Serrated Nut C12-FTL Installation Guide | REV. E1 | Page 5 For technical support, contact us at 1-800-565-5321... -
Page 6: Q 1.2.3 Attach The Edge Trims On These Locations
TIPS: Put the plusnut on the plusnut gun, then attach the plusnut in the hole by turning the gun forward until the plusnut locks, then remove the gun by turning in reverse. FORWARD REVERSE C12-FTL Installation Guide | REV. E1 | Page 6 For technical support, contact us at 1-800-565-5321... -
Page 7: Q 2.1.2 Attach Plusnut Using 6490 Plusnut Tool
7/16" socket until the plusnut locks, then remove the bolt by turning the impact in reverse. FORWARD REVERSE C12-FTL Installation Guide | REV. E1 | Page 7 For technical support, contact us at 1-800-565-5321... -
Page 8: Q 2.2 Vehicle Preparation
(Use caution not to damage the threaded holes). q Plusnut Tool TOOLS HARDWARE USED q 1" Hole Saw 2× q Cordless Drill # 94-130 Plusnut .250 C12-FTL Installation Guide | REV. E1 | Page 8 For technical support, contact us at 1-800-565-5321... -
Page 9: Q 2.2.2 Floor Preparation
2 D-ring bolts with the addition of the square washers, in between the D-rings and floor bracket. TOOLS q Socket Wrench q 13mm Socket HARDWARE USED 2× C12-FTL Installation Guide | REV. E1 | Page 9 For technical support, contact us at 1-800-565-5321... -
Page 10: Q 2.3.2 Attach The Passenger Side Wing To The Van
#98-158 Retaining washer Attach the passenger side wing using the 2 metric bolts into the 2 threaded holes. TOOLS q Cordless Impact q 10mm Socket C12-FTL Installation Guide | REV. E1 | Page 10 For technical support, contact us at 1-800-565-5321... -
Page 11: Q 2.3.3 Attach The Driver Side Wing To The Van
#98-157 Spacers ( 2 ) #98-158 Retaining Washer Attach the driver side wing using the hex bolts into the 2 plusnuts. TOOLS q Socket Wrench q 7/16" Socket C12-FTL Installation Guide | REV. E1 | Page 11 For technical support, contact us at 1-800-565-5321... -
Page 12: Q 2.3.4 Attach The Lower Panel To The Floor Bracket
2.3.4 Attach the lower panel to the floor bracket. TOOLS q Cordless Impact q 1/2" Socket HARDWARE USED 4× #90-200 Hex Bolt 5/16" × 1/2" #98-116 Flat Washer #94-116 Serrated Nut C12-FTL Installation Guide | REV. E1 | Page 12 For technical support, contact us at 1-800-565-5321... -
Page 13: Q 2.3.5 Apply The Warning Label On The Passenger Side Wing
2.3.5 Apply the warning label on the passenger side wing. NOTE: Put the warning label in a place where it’s easy to see. C12-FTL Installation Guide | REV. E1 | Page 13 For technical support, contact us at 1-800-565-5321... - Page 14 “Congratulations, you have successfully installed your Contoured Partition! Thank you for doing business with us.” C12-FTL Installation Guide | REV. E1 | Page 14 For technical support, contact us at 1-800-565-5321...
Need help?
Do you have a question about the C12-FTL and is the answer not in the manual?
Questions and answers