Avaya CU360 Manual
- Installing and administering (235 pages) ,
- Release notes (141 pages) ,
- Manual (98 pages)
Advertisement
INTRODUCTION
The CU360 uses unique Avaya next-generation technology to give fluid, on-the-go access to cloud applications and video capability — to ensure collaboration is more meaningful and effective than ever before.
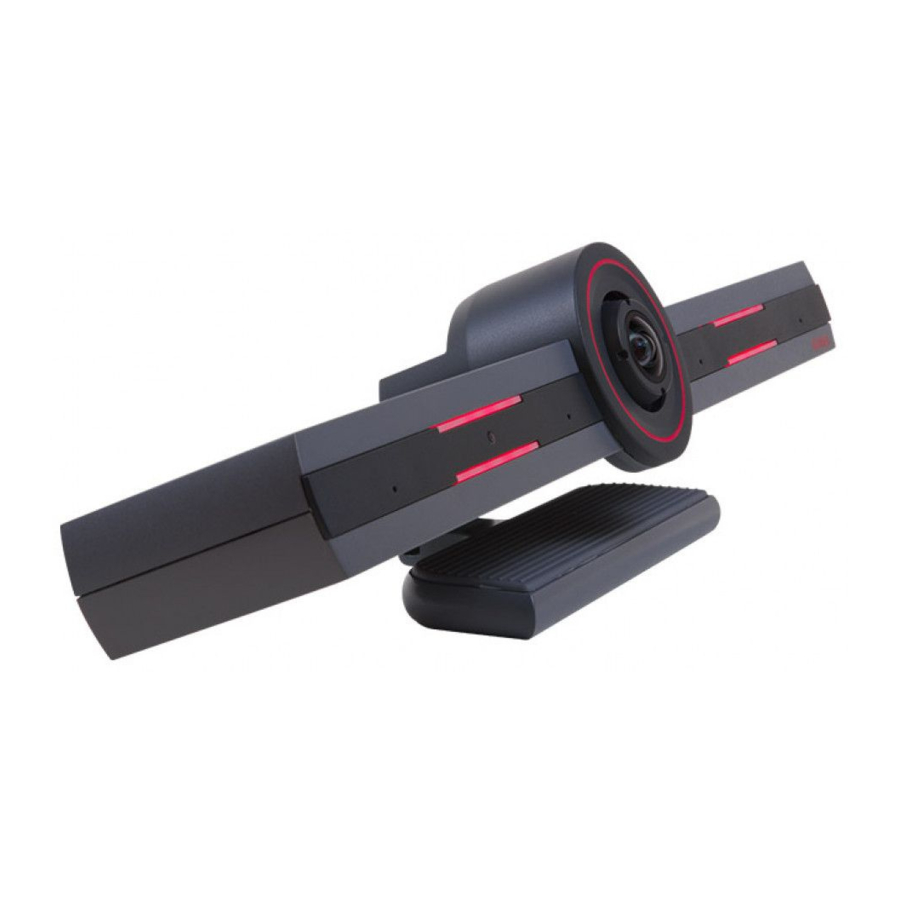
WHAT'S IN THE BOX


CONNECTIONS

SETTING UP THE DEVICE
- Place the CU360 above your TV, and use the hinge to secure it.
- Plug the HDMI cable into the TV and CU360.
- Plug in the power adapter.
Video Privacy: Use the rubber cap to cover the camera for privacy.
Note: If you are not using WiFi, make sure to connect a LAN / Ethernet cable.
Note: To connect a second display to CU360, please use a qualified USB-C to HDMI cable.
Qualified cables are described in the User Guide and in the Third Party Accessories list that can be downloaded from the Support Website. Using a non-qualified cable may result in unstable operation of the CU360.
CONTROLLING THE DEVICE
USING THE WEB
- When the CU360 is connected to the TV and your Network, the IP address (X.X.X.X) is displayed in the top left corner of the screen.
- Using a device connected to the same network, type http://[IP address] into the web browser.
- Enter the default user name of Admin and the password 1234.
- A Configuration Wizard is initiated (only if the system is not configured).
More details about system configuration can be found in the CU360 User Guide.
USING THE REMOTE CONTROL


Use The Remote Control
The remote control provided is ready to use.
If this is the first time you are using this remote, just insert the batteries included in the box.
PAIRING THE REMOTE CONTROL
The remote control included is already-paired with your CU360 unit. If you use a different wireless remote control, or your remote control is not paired, please follow the procedure below.

- Check that there are 2 charged AAA batteries inside the remote control.
- Unplug the codec unit from power.
- Press the "Back" key and the "OK" key together until the small blue LED on top of the remote quickly flashes a few times.
- While the LED light is still flashing, plug the power into the device.
Note: You must keep the remote control close to the unit. If the pairing is successful, the LED stops flashing. If the pairing fails, disconnect all the cables from the CU, including USB, and repeat steps 2-4.
MONITOR SETTINGS
In case the device output image does not fit with the Monitor screen, check the OS menu. You can activate the Standard Android (OS) Menu bar by moving the mouse pointer at the bottom of the screen.

Note: The mouse pointer can be activated by pressing the Mouse button on the remote control.
- Press the circle on the Navigation bar or the Home button on the remote control.
- Swipe-up the little white arrow under Apps Provider icon.
![]()
- Click on the Settings icon.
![]()
- Browse into Display > Advanced > HDMI > MAIN SCREEN > Screen Zoom and calibrate the device output image within the Monitor screen.
![]()


Note: If an additional monitor is connected, you can calibrate also it.
B100 SERIES SETUP
To add the optional Avaya B100 Series device as a Bluetooth microphone, please follow these steps:
- On your Avaya CU360 screen:
- Configure > General > Show Advanced Settings = Yes
- Configure > Advanced (default PIN is 1234)
- System > Security > Settings > Bluetooth
- Turn on the Bluetooth
- Hold
![]() down for two seconds on the Avaya B100 Series device. This makes the B100 Series device visible to CU360. The
down for two seconds on the Avaya B100 Series device. This makes the B100 Series device visible to CU360. The ![]() icon is displayed on your B100 Series device, and the LEDs flash blue.
icon is displayed on your B100 Series device, and the LEDs flash blue. - In the selected Bluetooth settings window of the CU360, the Avaya B100 Series device appears in the available devices list. Select the Avaya B100 Series device from the list of devices and select pairing. After 60 seconds in pairing mode, the B100 Series device returns to normal mode if pairing is unsuccessful.
 down for two seconds on the Avaya B100 Series device. This makes the B100 Series device visible to CU360. The
 Note: It can take some time for your CU360 to find the B100 Series device. If the pairing is successful, the icon ![]() is displayed on the B100 Series device, and it is listed as "Connected" under the CU360 Bluetooth Paired Devices.
is displayed on the B100 Series device, and it is listed as "Connected" under the CU360 Bluetooth Paired Devices.
Note: Pairing and reconnecting an Avaya B100 Series device as a Bluetooth audio in/out peripheral can also be achieved using NFC (B199 model is excluded)
BUILT-IN SPEAKERS SETUP
When an HDMI monitor is connected you can specify if the audio output from the CU360 should route to the HDMI monitor's speakers, which is the default, or to the CU360's built-in speakers.
This is useful if your HDMI monitor requires external speakers, or headsets, to hear the audio.
The audio routing policy of the CU360 device automatically selects mics and speakers in this order:
- USB connected speakerphone (if available).
- Bluetooth connected speakerphone (if available).
- CU360's built-in microphones and HDMI monitor's speakers (or CU360's built-in speakers if configured as below), if HDMI monitor is connected.
- CU360's built-in microphones and built-in speakers (if DVI monitor is connected, or there is no monitor).
To change the default audio routing for the HDMI monitor, browse to:
[GUI] Configure > Advanced (default PIN is 1234) > I/O Connections > Audio - Outputs
[WEB] [ADMIN LOGIN] Administrator Settings > I/O Connections > Audio - Outputs > General
- Audio on HD Monitor: Yes*/No
This preference is applied also for third party apps and when using the CU360 device in USB Bar mode.

POWER OVER ETHERNET
If PoE is needed to power the device, please order a CU360 PoE splitter (700514935) and follow the instructions in the quick setup guide.
Documents / Resources
References
Download manual
Here you can download full pdf version of manual, it may contain additional safety instructions, warranty information, FCC rules, etc.
Advertisement


Need help?
Do you have a question about the CU360 and is the answer not in the manual?
Questions and answers