Advertisement
- 1 INTRODUCTION
- 2 LOCATION OF CONTROLS
- 3 POWER SOURCE
- 4 CLOCK SETTING
- 5 LISTENING TO THE RADIO
- 6 BLUETOOTH OPERATION
- 7 USING JWM-160 AS A HANDS-FREE SPEAKERPHONE
- 8 CONNECTING YOUR BLUETOOTH DEVICE USING NFC
- 9 ALARM OPERATION
- 10 SLEEP OPERATION
- 11 DISPLAY BACKLIGHT CONTROL
- 12 RESETTING THE UNIT
- 13 CARE AND MAINTENANCE
- 14 TROUBLESHOOTING GUIDE
- 15 SPECIFICATION
- 16 Documents / Resources
INTRODUCTION

SPLASH RESISTANCE
This unit has been constructed to resist mild steam and light splashed from the shower bath only. It should not be operated under running water and under no circumstances should it be fully immersed in water.
Selecting fine audio equipment such as the unit you've just purchased is only the start of your musical enjoyment. Now it's time to consider how you can maximize the fun and excitement your equipment offers. This manufacturer and the Electronic Industries Association's Consumer Electronics Group want you to get the most out of your equipment by playing it at a safe level. One that lets the sound come through loud and clear without annoying blaring or distortion and, most importantly, without affecting your sensitive hearing. Sound can be deceiving. Over time your hearing "comfort level" adapts to higher volumes of sound. So what sounds "normal" can actually be loud and harmful to your hearing. Guard against this by setting your equipment at a safe level BEFORE your hearing adapts.
To establish a safe level:
- Start your volume control at a low setting.
- Slowly increase the sound until you can hear it comfortably and clearly, and without distortion.
- Once you have established a comfortable sound level: Set the dial and leave it there.
Taking a minute to do this now will help to prevent hearing damage or loss in the future. After all, we want you listening for a lifetime.
We Want You Listening For a Lifetime
Used wisely, your new sound equipment will provide a lifetime of fun and enjoyment. Since hearing damage from loud noise is often undetectable until it is too late, this manufacturer and the Electronic Industries Association's Consumer Electronics Group recommend you avoid prolonged exposure to excessive noise.

Customer's Record:
The serial number of this product is found on its bottom cover. You should note the serial number of this unit in the space provided as a permanent record of your purchase to aid in identification in the event of theft of loss.
Model Number: JWM-160
Serial Number:
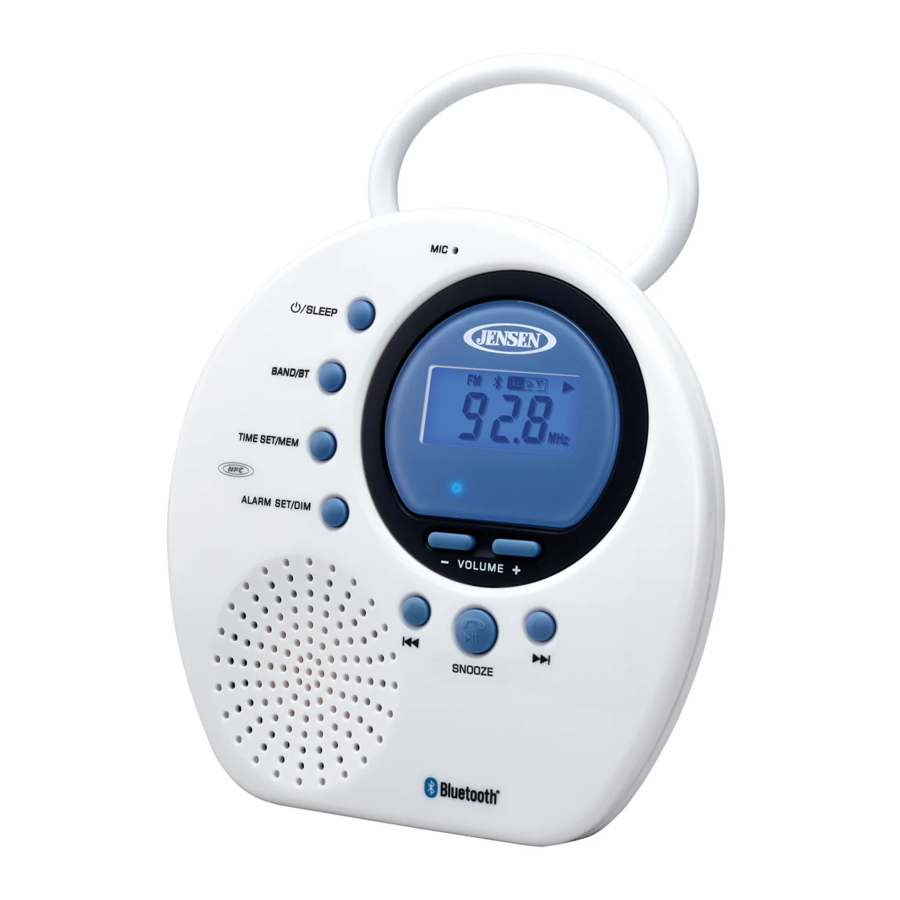
LOCATION OF CONTROLS

- POWER
![]() / SLEEP
/ SLEEP - BAND/BT
- TIME SET/MEM
- ALARM SET/DIM
![]()
![]() /SNOOZE
/SNOOZE![]()
 / SLEEP
 /SNOOZE
- VOLUME -
- VOLUME +
- BLUETOOTH INDICATOR
- LCD DISPLAY
- MIC
- NFC LINKING POINT
- BATTERY COMPARTMENT
POWER SOURCE
The JWM-160 operates on 4 'AA' (UM-3) batteries.
Tap the POWER ![]() / SLEEP Button (#1) button to turn ON the unit, tap the POWER
/ SLEEP Button (#1) button to turn ON the unit, tap the POWER ![]() / SLEEP Button (#1) button again to turn the unit OFF.
/ SLEEP Button (#1) button again to turn the unit OFF.
For better performance and longer operating time, we recommend using alkaline-type batteries.
- Remove the Battery Door of BATTERY COMPARTMENT (#14) on the back of the unit.
- Following the polarity diagram on the back cabinet, insert 4 'AA' (UM-3) batteries (not included) and close the BATTERY DOOR.
Notes:
- LOW BATTERY NOTIFICATION: When the battery voltage drops to a low level, the display back light will flash for 30 seconds and then turn off.
- Turn off the JWM-160 before change the batteries.
- When changing batteries, don't press any button.
BATTERY WARNING
- Be sure the batteries are installed correctly. Wrong polarity may damage the unit.
- Use only the size and type of batteries specified.
- Do not mix old and new batteries.
- Do not mix alkaline, standard (carbon-zinc) or rechargeable (nickel-cadmium) batteries.
- If the unit is not to be used for an extended period of time, remove the batteries. Old or leaking batteries can cause damage to the unit and may void the warranty.
- Do not try to recharge batteries not intended to be recharged; they can overheat and rupture. (Follow battery manufacturer's directions).
- Do not dispose of batteries in fire, batteries may leak or explode.
CLOCK SETTING
Note: When you turn the unit on for the first time, 12:00 AM will show on the LCD display and flashing.
- With the unit OFF, press and hold the TIME SET/MEM button (#3), the hour digits will flash.
- Tap the
![]() button (#5) or
button (#5) or ![]() button (#7) to adjust hour. Press and hold the
button (#7) to adjust hour. Press and hold the ![]() button (#5) or
button (#5) or ![]() button (#7) for fast reverse/advance setting.
button (#7) for fast reverse/advance setting.
Note: Make sure the hour is set so that PM indicator is displayed correctly. - Tap the TIME SET/MEM button (#3) to confirm the hour setting, the minute digits will flash to prompt for input.
- Tap the
![]() button (#5) or
button (#5) or ![]() button (#7) to adjust minute. Press and hold the
button (#7) to adjust minute. Press and hold the ![]() button (#5) or
button (#5) or ![]() button (#7) for fast reverse/advance setting.
button (#7) for fast reverse/advance setting. - Tap the TIME SET/MEM button (#3) to complete the setting.
 button (#5) or
  button (#7) for fast reverse/advance setting.
LISTENING TO THE RADIO
- Tap the POWER
![]() / SLEEP button (#1) to turn ON the JWM-160.
/ SLEEP button (#1) to turn ON the JWM-160. - Tap the BAND/BT button (#2) to select FM or AM mode, the radio frequency will show on LCD Display (#11).
- Press and hold the
![]() button (#5) or
button (#5) or ![]() button (#7) to search for the next / previous available station. If the reception is poor, try Manual Tuning to fine-tune the station.
button (#7) to search for the next / previous available station. If the reception is poor, try Manual Tuning to fine-tune the station. - Press the
![]() button (#5) or
button (#5) or ![]() button (#7) briefly to manually tune through the frequency band.
button (#7) briefly to manually tune through the frequency band. - Adjust the VOLUME + button (#9) or VOLUME – button (#8) to the desired volume level.
- If no button is pressed for 5 seconds in radio mode, the display will change to show current time. You can tap the
![]() button (#5) or
button (#5) or ![]() button (#7) to check the tuned frequency.
button (#7) to check the tuned frequency. - Tap the POWER
![]() / SLEEP button (#1) to turn the unit into Standby mode after listening.
/ SLEEP button (#1) to turn the unit into Standby mode after listening.
TIPS FOR BEST RADIO RECEPTION
The AM and FM antenna are located inside the cabinet of the unit. If reception is weak, change the position of the unit until the internal antenna picks up the strongest signal.
SETTING THE RADIO STATION PRESETS
The JWM-160 allows you to store up to 10 FM stations and 10 AM stations for easy recall at any time.
- Tap the POWER
![]() / SLEEP button (#1) to turn on the JWM-160.
/ SLEEP button (#1) to turn on the JWM-160. - Tap the BAND/BT button (#2) to select FM or AM mode, the radio frequency will show on LCD Display (#11).
- Tune to the radio station you want to store in memory.
- Press and hold the TIME SET/MEM button (#3). The preset channel number "P01" will be flashing on display.
- Tap the
![]() button (#5) or
button (#5) or ![]() button (#7) to select the preset number (P01-P10).
button (#7) to select the preset number (P01-P10). - Tap the TIME SET/MEM button (#3) to confirm.
- To store up to 10 station presets, repeat steps 3 to 6 above.
RECALLING PRESET MEMORY CHANNELS
To recall a preset station,
- In radio mode, tap the PRESET TIME SET/MEM button (#3), the preset number will appear on display.
- Tap the TIME SET/MEM button (#3) repeatedly to select the preset channel.
BLUETOOTH OPERATION
Pairing a Bluetooth enabled device with the JWM-160.
- Tap the POWER
![]() / SLEEP button (#1) to turn the unit ON.
/ SLEEP button (#1) to turn the unit ON. - Tap the BAND/BT button (#2) to select Bluetooth mode, "bt" will show on the LCD Display. The BLUETOOTH INDICATOR (#10) will begin flashing slowly.
- Turn on the Bluetooth function for the device you want to link to, and enable the search or scan function to find the JWM-160.
- Select "JWM-160" from the device list when it appears on your device screen. If required, enter the pass code "0000" to pair (link) JWM-160 with your device.
- If you are pairing (linking) your computer to the speaker using Bluetooth, you may need to set the JWM-160 as your computer's default sound device.
- After successfully pairing the JWM-160 with your Bluetooth device, The BLUETOOTH INDICATOR (#10) will flash twice per 4 seconds.
- If you want to pair (link) the JWM-160 with another Bluetooth device, press and hold
![]() /SNOOZE Button (#6) a few seconds. The BLUETOOTH INDICATOR (#10) will flash slowly. The JWM-160 will go into Pairing/Discoverable mode. Repeat steps 3 & 4.
/SNOOZE Button (#6) a few seconds. The BLUETOOTH INDICATOR (#10) will flash slowly. The JWM-160 will go into Pairing/Discoverable mode. Repeat steps 3 & 4.
 /SNOOZE Button (#6) a few seconds. The BLUETOOTH INDICATOR (#10) will flash slowly. The JWM-160 will go into Pairing/Discoverable mode. Repeat steps 3 & 4.
Now you can play music from your Bluetooth device wirelessly to the JWM-160.
- Selecting your favorite song, press the Play Button on your Bluetooth device or the
![]() /SNOOZE Button (#6) on the JWM-160 to play or pause the song from your Bluetooth device.
/SNOOZE Button (#6) on the JWM-160 to play or pause the song from your Bluetooth device. - Press
![]() button (#5) or
button (#5) or ![]() button (#7) to select the Previous or Next track.
button (#7) to select the Previous or Next track. - Press VOLUME +/- buttons (#9/8) of your JWM-160 and your Bluetooth device until you reach a comfortable listening level.
 /SNOOZE Button (#6) on the JWM-160 to play or pause the song from your Bluetooth device.
Notes:
- Refer to the manual of your cell phone, tablet PC, computer or other Bluetooth enabled devices for Bluetooth operation since it may vary from model to model.
- If your Bluetooth enabled device does not support A2DP profile, it will not play the music through the speaker, even if paired (linked).
- Remember to turn off the JWM-160 when you have finished listening.
- Don't forget to switch off the power of your external audio device as well.
- The music playback will automatically be paused when you have an incoming call. When the call is ended the JWM-160 will start playing again.
USING JWM-160 AS A HANDS-FREE SPEAKERPHONE
To use your Bluetooth speaker as a speakerphone for receiving a phone call from a Bluetooth enabled phone.
- Follow the "BLUETOOTH OPERATION" section to set up the Bluetooth connection with your smartphone.
- When a call is received while music is playing, the music will be replaced by a tone. Press the Play/Pause
![]() /SNOOZE Button (#6) once to answer the call.
/SNOOZE Button (#6) once to answer the call. - Use the VOLUME +/- buttons (#9/#8) to adjust the desired volume level.
- To ignore an incoming call, simply press and hold the Play/Pause
![]() /SNOOZE Button (#6) for about 3 to 4 seconds, a beep sound will be heard and the call was ignored.
/SNOOZE Button (#6) for about 3 to 4 seconds, a beep sound will be heard and the call was ignored. - When the call is completed, press the Play/Pause
![]() /SNOOZE Button (#6) once to end the call. If you were playing music from the JWM-160 before answering the call, the music will automatically resume playing when you hang up.
/SNOOZE Button (#6) once to end the call. If you were playing music from the JWM-160 before answering the call, the music will automatically resume playing when you hang up.
 /SNOOZE Button (#6) once to answer the call.
 /SNOOZE Button (#6) for about 3 to 4 seconds, a beep sound will be heard and the call was ignored.
 /SNOOZE Button (#6) once to end the call. If you were playing music from the JWM-160 before answering the call, the music will automatically resume playing when you hang up.
CONNECTING YOUR BLUETOOTH DEVICE USING NFC
ABOUT NFC
NFC (Near Field Communication) is a technology enabling short-range wireless communication between various devices, such as mobile phones and IC tags Thanks to the NFC function, data communication can be achieved easily just by touching the relevant symbol or designated location on NFC compatible devices.
- Make sure your Smartphone or Bluetooth device has the NFC feature, and it is turned ON (enabled).
- Touch the back of your smartphone to the NFC LINKING POINT (#13) located on the front of the JWM-160. Check the owner's manual of your Bluetooth device to locate the NFC touch point if you are not sure where it is.
- Turn on the JWM-160 and switch to Bluetooth mode, it will automatically and pair with your smartphone.
- Some smartphones may ask you to confirm the pairing if they are not paired before.
NOTE: If you have multiple NFC compatible devices to link, just touch the smartphone to a different device to switch the connection to that device. For example, when your smartphone is connected to NFC compatible headphones, just touch the smartphone to the system to change the Bluetooth connection to the system (one touch connection switching).
ALARM OPERATION
SETTING THE ALARM TIME
You can set the alarm time and select wake to RADIO ![]() / ALARM
/ ALARM ![]() sound.
sound.
- In standby mode, press and hold the ALARM SET/DIM button (#4) until the AL icon and hour digits on the LCD display blink.
- Tap the
![]() button (#5) or
button (#5) or ![]() button (#7) to set the hour.
button (#7) to set the hour. - Tap ALARM SET/DIM button (#4) to confirm. The minute digits on the LCD display will blink.
- Tap ALARM SET/DIM button (#4) to confirm.
- Tap
![]() button (#5) or
button (#5) or ![]() button (#7) repeatedly to select wake to alarm, radio or off.
button (#7) repeatedly to select wake to alarm, radio or off. - Tap ALARM SET/DIM button (#4) to confirm.
- Alarm setting completed and LCD display return to show current time.
Note : When the alarm is set (RADIO icon![]() or ALARM icon
or ALARM icon ![]() showing on the display), the chosen alarm will sound at the pre-set wake time regardless if the unit is On or Off.
showing on the display), the chosen alarm will sound at the pre-set wake time regardless if the unit is On or Off.
SETTING WAKE TO ALARM OR RADIO
- In standby mode, press and hold the ALARM SET/DIM button (#4) to set alarm.
- Wake to Alarm,
![]() (wake to alarm) icon will show on the display.
(wake to alarm) icon will show on the display. - Wake to Radio,
![]() (wake to radio) icon will show on the display.
(wake to radio) icon will show on the display. - Alarm Off, both
![]() and
and ![]() icons will be off and not showing on the display.
icons will be off and not showing on the display.
- Wake to Alarm,
- When alarm sounds, press any buttons once to stop the alarm and it will repeat next day same time.
- When alarm sounding after one hour, the sound will auto off and repeat next day.
 (wake to alarm) icon will show on the display.
 (wake to radio) icon will show on the display.
Notes:
- If you select wake to radio (
![]() icon showing), and are in RADIO mode when you turn the unit OFF, the unit will begin playing the last AM or FM station you were listening to once the wake time is reached.
icon showing), and are in RADIO mode when you turn the unit OFF, the unit will begin playing the last AM or FM station you were listening to once the wake time is reached. - If you select wake to radio (
![]() icon showing), but are in BLUETOOTH mode when you turn the unit OFF, the unit will begin playing the last AM station you were listening to once the wake time is reached.
icon showing), but are in BLUETOOTH mode when you turn the unit OFF, the unit will begin playing the last AM station you were listening to once the wake time is reached.
SNOOZE ALARM
After the radio or alarm sounds, you may press the  /SNOOZE button (#6) for a few more minutes sleep. The alarm will stop for approximately 9 minutes and then turn on again.
CHECKING THE ALARM TIME
When the unit is OFF, Press and hold the ALARM SET/DIM button (#4) repeatedly to check the Alarm Sound settings.
SLEEP OPERATION
The sleep timer allows the unit to turn off automatically after a designated time has elapsed.
- Press and hold the
![]() /SLEEP button (#1) to turn on the sleep timer.
/SLEEP button (#1) to turn on the sleep timer. - Keep pressing the
![]() /SLEEP button (#1), the time in minutes 120 – 110 – 100 – 90 – 80 – 70 – 60 – 50 – 40 – 30 – 20 – 10 – 1 - OFF shifting slowly on the LCD display. Or tap the
/SLEEP button (#1), the time in minutes 120 – 110 – 100 – 90 – 80 – 70 – 60 – 50 – 40 – 30 – 20 – 10 – 1 - OFF shifting slowly on the LCD display. Or tap the ![]() /SLEEP button (#1) repeatedly to select the time before the LCD display return to show the current time.
/SLEEP button (#1) repeatedly to select the time before the LCD display return to show the current time. - Release the
![]() /SLEEP button (#1) until the desired time appear on the LCD display. (Or tap the /SLEEP button (#1) repeatedly to select the time before the LCD display return to show the current time.)
/SLEEP button (#1) until the desired time appear on the LCD display. (Or tap the /SLEEP button (#1) repeatedly to select the time before the LCD display return to show the current time.) - To turn off the sleep timer, press and hold the
![]() /SLEEP button (#1). Release the button when OFF show on the LCD display.
/SLEEP button (#1). Release the button when OFF show on the LCD display. - To turn the unit "OFF" before the selected length of time, tap the
![]() /SLEEP button (#1) at any time.
/SLEEP button (#1) at any time.
Note: To check the remaining sleep time, press and hold the![]() /SLEEP button (#1).
/SLEEP button (#1).
 /SLEEP button (#1) to turn on the sleep timer.
 /SLEEP button (#1) until the desired time appear on the LCD display. (Or tap the /SLEEP button (#1) repeatedly to select the time before the LCD display return to show the current time.)
DISPLAY BACKLIGHT CONTROL
Tap the ALARM SET/DIM button (#4) to turn ON the backlight. Tap the ALARM SET/DIM button (#4) again to turn OFF the backlight.
RESETTING THE UNIT
In case of malfunction due to electrostatic discharge, press the RESET button inside the battery compartment.

All the settings will be lost after you press the RESET button. Follow the procedures in the manual to reset the clock, alarm time and radio presets once again.
CARE AND MAINTENANCE
- Clean the unit with soft cloth. Solvent or detergent should never be used.
- Avoid operating your unit under direct sunlight.
- Keep your unit away from heating appliances and sources of electrical noise such as fluorescent lamps or motors.
- For better Clock Display clarity, avoid operating the unit under direct sunlight or in strong room illumination.
TROUBLESHOOTING GUIDE
If you experience difficulties in the use of this clock radio, please check the following or call 1-800-777-5331 for Customer Service and support
| SYMPTOM | POSSIBLE CAUSE | POSSIBLE SOLUTION |
No sound | VOLUME control at minimum position. | Increase Volume |
Radio noise or sound distortedBluetooth no operation |
Bluetooth connect unstable No music file in mobile |
|
SPECIFICATION
| Power Supply: | DC 6V  4 x AA (UM3) Batteries (not included) 4 x AA (UM3) Batteries (not included) |
| Frequency: | FM 87.5 - 108 MHz AM 520 -1710 KHz |
Documents / ResourcesDownload manual
Here you can download full pdf version of manual, it may contain additional safety instructions, warranty information, FCC rules, etc.
Advertisement


Need help?
Do you have a question about the JWM-160 and is the answer not in the manual?
Questions and answers