Yealink T58W Manual
- Manual (10 pages) ,
- Quick reference manual (2 pages) ,
- User manual (27 pages)
Advertisement
- 1 Overview
- 2 Using your phone
- 3 Ring Tone
- 4 Ring Volume
- 5 Attended Transfer (transfer call, but talk to the person you will transfer to first)
- 6 Setting up a conference call
- 7 Place a call on hold
- 8 Muting a call
- 9 Using the Park Button While on a Call
- 10 Asterisk Voicemail Guide
- 11 Record your Temporary Greeting
- 12 Changing or Erasing your Existing Temporary Greeting
- 13 Phone System Access Codes
- 14 Documents / Resources
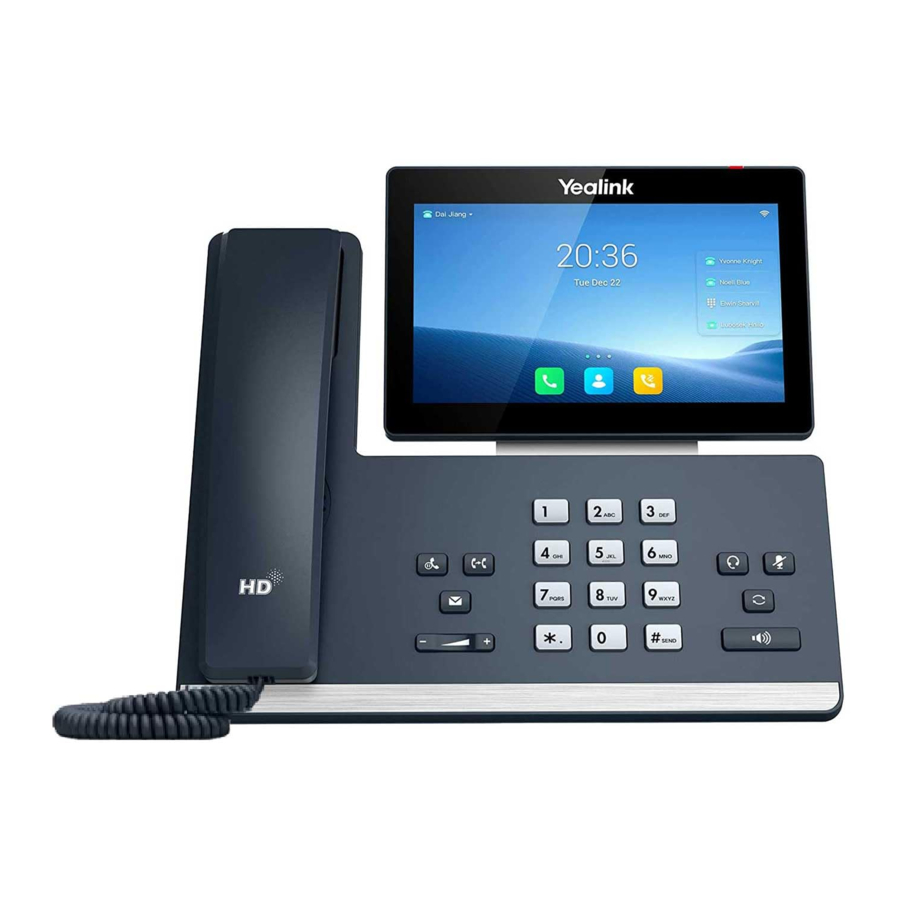
Overview

- Powder LED Indicator ‐ Indicates call status, message status and phone's system status.
- Touch Screen ‐ 7 inch (1024 x 600) capacitive (5 point) touch screen. Tap to select and highlight screen items.
- HEADSET Key ‐ Toggles the headset on or off. The LED indicator glows green when the headset is activated.
- MUTE Key ‐ Toggles the microphone on or off. The LED indicator glows green when the mute feature is activated.
- REDIAL Key ‐ Redials a previously dialed number.
- Speakerphone Key ‐ Toggles the speakerphone (hands‐free) mode or not. The LED indicator glows green when the speakerphone is activated.
- TRANSFER Key ‐ Transfers a call.
- HOLD Key ‐ Places a call on hold or resumes a held call.
- MESSAGE Key ‐ Accesses your voice messages.
- Volume Key ‐ Adjust the volume of handset, headset, speaker, ringer, or media.
- Keypad Keys ‐ Enable you to enter numbers, letters, and special characters.
- Speaker ‐ Provide the digits and special characters in contextsensitive applications.
- Reversible Tab ‐ Secures the handset in the handset cradle when the Phone is mounted vertically.
- Hookswitch ‐ Connects or disconnects the phone from the phone line. The hookswitch is automatically activated when a user lifts the handset from the cradle to get a dial tone.
Class of Service Feature Codes:
Directed Call Pickup **
Find Me, Follow Me Toggle *81
Call Forward No Answer/Unavailable Deactivate *53
Call Forward All Activate *72
Call Forward All Deactivate *73
Pickup Parked Call *85
My Voicemail *97
Call Another Voicemail *98
To Transfer Directly to Someone's Voicemail, hit transfer then *(extension number)
Using your phone
https://wiki.freepbx.org/display/PHON/Using+your+Phone
Ring Tone
- Slide over to the second screen on your phone.
- Select the Settings icon.


- Scroll down to Basic Settings, and select Sound


- While in Sound Settings you can change the tone for other applications, as well as incoming calls. Select Ring Tones to change the tone of incoming calls.

- Select Common.

- Then select a Ring Tone from the various options.


- Once you've made your Ring Tone selection, press the check mark in the upper right corner to save it.


Ring Volume
- While phone is idle; use the volume button at the bottom of the phone to change the volume of the ring tone
Transferring a call
https://wiki.freepbx.org/display/PHON/Transferring+Calls
- While on a call press the
![]() transfer button or to use the transfer soft key. Press more on the options at the bottom, of the screen.
transfer button or to use the transfer soft key. Press more on the options at the bottom, of the screen.

- Then press the Transfer button, and the caller will be placed on hold.


- Enter the number you'd like to transfer the call to.

- Press the
![]() transfer button or the transfer softkey again to complete the transfer.
transfer button or the transfer softkey again to complete the transfer.
![]()

 transfer button or the transfer softkey again to complete the transfer.
Attended Transfer (transfer call, but talk to the person you will transfer to first)
- Press the transfer button
![]() or the transfer soft key during a call. The caller is placed on hold
or the transfer soft key during a call. The caller is placed on hold
![]()
- Enter the number to transfer the call to. In the next step, you will be placing a call to this recipient while the caller is still on hold.
- Press the Attending Button, the bottom green button.
- Speak with the recipient, if able, then either complete the transfer or cancel it:
- To complete the transfer: Press the transfer button or the transfer soft key.
- To cancel the transfer: Press the Cancel soft key.
- You will be taken to a screen showing that the
![]() inbound call is still on hold. At this point, you can either press the transfer soft key to keep the caller on hold and dial a new recipient, or press the Resume key to speak to the caller.
inbound call is still on hold. At this point, you can either press the transfer soft key to keep the caller on hold and dial a new recipient, or press the Resume key to speak to the caller.
- You will be taken to a screen showing that the

To Transfer Direct to Voicemail, press the Transfer button on your phone, then star *, the extension, then send.
Setting up a conference call
https://wiki.freepbx.org/display/PHON/Conference+Calling
- While already on a call with person A. Press the screen of your phone until the call menu shows up at the bottom of the screen.

- To add another person to the call, press the Invite button in the lower left corner. Person A will be put on hold.
- At the next screen, enter in the number of person B.

- Once you've entered the number for person B, press the green Call button in the lower right corner of the screen.

- After you press the Call button, the screen will split into 3 different screens reflecting Person A, Person B, and yourself.
- Repeat steps 1‐5 to add additional callers to your conference call.


To view your entire Speed Dial list:
- Main Screen
- Select the Expand All button, bottom right
![]()
- From here, you can easily rearrange your speed dial numbers, by touching and dragging the Display Name
- Or, you can touch and drag a Display name to the top and either delete it or edit it
- To return to the main screen select the Close All button, top right
Place a call on hold
- Press the hold
![]() button or press the Hold soft key.
button or press the Hold soft key. - To resume the call: Press the (hold) button again or press the Resume soft key.
Muting a call
- During a call, press the mute
![]() button. The button will turn red and a red microphone will show up on the phone's screen.
button. The button will turn red and a red microphone will show up on the phone's screen.
Forwarding All Incoming Calls on a Specific Line
- Dial *72, then press the green call button on the screen.
- Listen to the prompt. It will ask you to dial an extension, or number to forward you calls to, and then press pound (#).
- To Remove Call Forwarding, dial *73
- You will hear the prompt say "Call Forward Unconditional Deactivated"
Switching among the Handset, Speakerphone and Headset Modes: You can place and answer calls on your phone using the handset, headset, or speakerphone, and you can alternate among this three modes during calls, if available.
Do one of the following:
- Pick up the handset to use the handset mode.
- Press the Speakerphone key to use the speakerphone mode. The key LED glows green.
- Press the HEADSET key to use the headset mode. The key LED glows green.
Voicemail:
Accessing the Message Center
You can access the message center, and then follow the voice prompts to listen to your voicemails. The default security code is your extension. To avoiding setting up your voicemail box repeatedly, you will need to change your security code to something new.
Listening to the Voicemail
You can listen to a voicemail directly.
- Press Voice Mail key
- Follow the prompts
Marking Message as Read or Unread
You can choose to mark unread messages that you do not want to listen to as read, and you can choose to mark read messages that you want to listen to again as unread.
- Navigate to Voice Mail.
- Select the desired voicemail.
- Tap Mark as Read or Mark as Unread.
Deleting Voicemail Messages
After you listen to a message, you can delete them.
- Navigate to Voice Mail.
- Select the desired voicemail.
- Tap Delete.
To customize your Mailbox:
- Press 0
- Press 1 to record your Unavailable message
- Press 2 to record your Busy message
- Press 3 to Record your Name
- Press 4 to record your Temporary Greeting
- Press 5 to change your Password
- Press * to return to the Main Menu
Using the Park Button While on a Call
Park is a feature with a similar function to using the Hold button. The difference between traditional Hold and Park is when you use the Hold button, you can only retrieve that call from the same phone where it was put on "hold". With Park, you can put a call on "hold" at one phone and then pick up the conversation from another phone. Placing a call on Park also allows you to put the call on "hold" for a longer amount of time, than using traditional Hold.
- While on a call you will see this menu on the display. If the menu is not displayed, touch the screen.
- Press the Dsskey button featured below. This will take you to another menu.

- The next menu will show the speed dial buttons on your phone. You'll select the Park button with a phone icon. (As shown below)

- After placing the call on Park, you won't hear anything on your side of the call. The person you placed on Park will hear "hold" music. After the call is placed on Park this will enable you to call another person to have them pick up the Parked call, or for you to go to another phone to pick up the call.
- You'll see from the menu below that the Park button will be lit up red and say "Park(#) Talking" this is where the call was parked. When you're ready to pick the call back up from Park, press the button that is red and says "Talking". You will be immediately connected back to the call.

- As you can see from the diagram you have four park buttons. The first one is to place the call on hold, and the other three are called "parking lots" these are the spaces where the calls can be parked.
If more than one call has been placed on park, you'll need to remember which "parking lot" you place the call on, in order to retrieve it again.


Asterisk Voicemail Guide
If you have any questions, please email: helpdesk.phone@imesd.k12.or.us
From your phone press the icon that has an envelope on it, or dial *97. You can also get into your voicemail box from a separate phone. Dial *98, then enter in the extension. Enter in your password. The default password is set to 1234. (Be sure to change your password during setup). You can hit # after each entry, or you can wait for the system to accept each entry.
The First Time You Log In
The first time that you log into your mailbox, you should configure your personal mailbox options. These include:
- Recording your name.
- Recording your unavailable greeting.
- Recording your busy greeting, if desired.
- Changing your password. Please see the instructions below on these steps.
Main Menu
The main menu will be the first menu you hear when you have logged in. Here are the main menu options:
- Listen to new messages (the default) or listen to old messages if there are no new messages (see below).
- Change folders (see below).
- Advanced options (see below).
0 Mailbox options (see below).
* Help (repeat the menu options).
# Exit from the voice mail system.
Advanced Options in Main Menu
This menu will include various less-used advanced options. In a typical installation, it will have no options other than pressing * to return to the main menu.
Mailbox Options in the Main Menu
Pressing 0 from the main menu will present the mailbox options menu.
- Record your unavailable message.
- Record your busy message.
- Record your name.
- Record your temporary greeting.
- Change your password.
* Return to the main menu.
Record your Unavailable Greeting
- Log into your mailbox, then press0, 1 (for your unavailable greeting, the default), and press # to end the recording. If you want to record just one greeting, record the unavailable greeting, as it is used most often.
- After a recording, press1 to Accept, 2 to Review, or 3 to Re-record.
Record your Busy Greeting
- Log into your mailbox, then press0, 2 (for the busy greeting played when you are already on the phone), then record your greeting, and press # to end the recording.
- After a recording, press1 to Accept, 2 to Review, or 3 to Re-record.
Record your Name
- Log into your mailbox, then press0, 3, speak your name, and press # to end the recording.
- After a recording, press1 to Accept, 2 to Review, or 3 to Re-record.
Change your Password
- Log into your mailbox, then press 0, 5, enter your numeric password, and press # to save the password.
Listening to Messages
Press 1 to listen to the first new message waiting or, if there are no new messages, the first saved old message.
The Message Envelope
If configured to do so, the voice mail system will initially play back the message envelope, which is a recording listing details about the message. Depending on how the voice mail system has been configured, the message envelope may consist of the following items:
- The position of the message in your list of messages
- The date and time that the message was received
- Caller ID information
- The duration of the message Press1 at any time during the playback of the message envelope to skip to the message itself.
The voice mail system will then play back the message.
During Message Playback
During the playback of the message, any of the following buttons may be pressed:
* Rewind the message by 3 seconds.
# Fast-forward the message by 3 seconds
0 Pause the message playback. Press any other button to resume playback.
1, 4-9 Pressing any of these buttons will halt the playback of the message and perform the corresponding action from the post-message playback options (below).
After Message Playback
After the message has been played back, the system will play a prompt and wait for you to press a button:
- Go to the first message in the current folder.
- Change folders (see below).
- Advanced options (see below).
- Go to the previous message in the folder.
- Repeat the current message.
- Go to the next message in the folder (this will only be offered if there is another message).
- Delete or undelete the message (only if it was just deleted in the current session).
- Forward the message to another user (see below).
- Save this message in another folder (you will be asked which folder to use).
0 Mailbox options (see "Mailbox Options in the Main Menu", above).
* Help (repeat the menu options)
# Exit the voice mail system. This prompt will repeat after a short pause if no key is pressed.
Advanced Options
The following buttons may be pressed in the "Advanced Options" menu:
- Record a reply message and send it directly to the mailbox of the person that sent you the current message (this is only available if the caller was calling from an internal phone).
- Play the message envelope
* Return to the main menu.
Forward a Message to Another User
Users arrive at this menu when forwarding an existing message to another user's mailbox. After entering the mailbox number to which the message will be forwarded and pressing #, select from the following options:
- Record an introductory message to play before the forwarded message. After the beep, speak your introductory message and then press # to save it and complete the forward.
- Forward the message without recording an introductory message.
* Cancel and return to the main menu.
Record your Temporary Greeting
If you do not currently have a temporary greeting set (used when you will be temporary away from the office), follow these steps to create one:
- Log into your mailbox, then press 0, 4 for the temporary greeting, then record your greeting, and press # to end the recording. Note that a temporary greeting overrides the normal unavailable and busy greetings as long as it is active.
- After a recording, press 1 to Accept, 2 to Review, or 3 to Re-record. You will hear a confirmation that the temporary message is in place.
Changing or Erasing your Existing Temporary Greeting
After you return to the office, the temporary greeting should be erased. The voice mail system will tell you through out that the temporary greeting is in place. The voice mail system presents different menu options when a temporary greeting is set. Log into your mailbox, then press 0, 4 for the temporary greeting menu.
- (Re)-record your temporary message (see the procedure above).
- Erase your temporary greeting.
Voicemail to Email
The system is set up for all your voicemails to go to your email.
Phone System Access Codes
| Customer Site | Access Code |
| Athena-Weston SD | 35 |
| Echo SD | 51 |
| Elgin SD | 41 |
| Helix SD | 34 |
| Imbler SD | 42 |
| InterMountain ESD | 50 |
| Ione SD | 80 |
| Milton-Freewater SD | 33 |
| Morrow County SD | 82 |
| North Powder SD | 43 |
| Pendleton SD | 52 |
| Pilot Rock SD | 53 |
| Stanfield SD | 54 |
| Umatilla SD | 81 |
| Union SD | 44 |
Documents / Resources
References
Download manual
Here you can download full pdf version of manual, it may contain additional safety instructions, warranty information, FCC rules, etc.
Advertisement


Need help?
Do you have a question about the T58W and is the answer not in the manual?
Questions and answers