Ambient Weather WS-5000 - Wireless Weather Station Manual
- User manual (60 pages) ,
- User manual (24 pages)
Advertisement
- 1 Introduction
- 2 Quick Start Guide
- 3 Pre-Installation Checkout and Site Survey
- 4 Getting Started
-
5
Cellular Gateway Setup
- 5.1 Download Ambient Weather Cellular Gateway Software
- 5.2 Connect Cellular Gateway to your PC
- 5.3 Select Units of Measure, Set Time Zone and Sensor Configuration
- 5.4 Check for and apply firmware updates
- 5.5 Connect Cellular Gateway to Solar Panel
- 5.6 Mount the solar panel and cellular gateway
- 5.7 SD Card slot use and functions
- 6 Registering device on AmbientWeather.net
- 7 Weather station sitting
- 8 Glossary of Terms
- 9 Specifications
- 10 Maintenance
- 11 Troubleshooting Guide
- 12 Accessories
- 13 Warnings and Cautions
- 14 Documents / Resources
Introduction
The following user guide provides step by step instructions for installation, operation and troubleshooting. To download the latest manual and additional troubleshooting tips, please visit:
https://ambientweather.com/ws-5000-cellular#faq.tab
Quick Start Guide
Although the manual is comprehensive, much of the information contained may be intuitive. In addition, the manual does not flow properly because the sections are organized by components.
The following Quick Start Guide provides the necessary steps to install and operate the weather station, and upload to the internet, along with references to the pertinent sections.
| Step | Description |
| Power Up | |
| 1 | Assemble and power up the ultrasonic sensor array |
| 2 | Assemble and power up the rain gauge |
| 4 | Cellular Gateway Setup |
| Mounting | |
| 5 | Mount the sensor array |
| 6 | Mount the rain gauge |
| AmbientWeather.net | |
| 11 | Registering device on AmbientWeather.net |
Pre-Installation Checkout and Site Survey
Pre Installation Checkout
Before installing your weather station in the permanent location, we recommend operating the weather station for one week in a temporary location with easy access. This will allow you to check out all the functions, ensure proper operation and familiarize you with the weather station and calibration procedures.
Site Survey
Perform a site survey before installing the weather station. Consider the following:
- You must clean the rain gauge every few months and change the batteries every 2-3 years. Provide easy access to the rain gauge and sensor array.
- Avoid radiant heat transfer from buildings and structures. In general, install the sensor array at least 5' from any building, structure, ground, or roof top.
- Avoid wind and rain obstructions. The rule-of-thumb is to install the sensor array at least four times the difference in the height of the sensor array and that of the tallest obstruction. For example, if the building is 20' tall and the mounting pole is 6' tall, install the sensor array 4 x (20 – 6)' = 56' away.
- Mount the sensor array in direct sunlight for accurate temperature readings.
- Installing the weather station over sprinkler systems or other unnatural vegetation may affect temperature and humidity readings. We suggest mounting the sensor array over natural vegetation.
- Wireless Range. Radio communication between receiver and transmitter in an open field can reach up to 1,000 feet, providing there are no interfering obstacles such as buildings, trees, vehicles and high voltage lines. Wireless signals will not penetrate metal buildings. Under most conditions, the maximum wireless range is 300'.
- Radio Interference. Computers, radios, televisions and other sources can interfere with radio communications between the sensor array and cellular gateway. Please take this into consideration when choosing the mounting locations. Make sure your display tablet is at least five feet away from any electronic device to avoid interference.
- Visit Ambient Weather Mounting Solutions for assistance and ideas for mounting your weather station:
https://ambientweather.com/weather-station-mounting
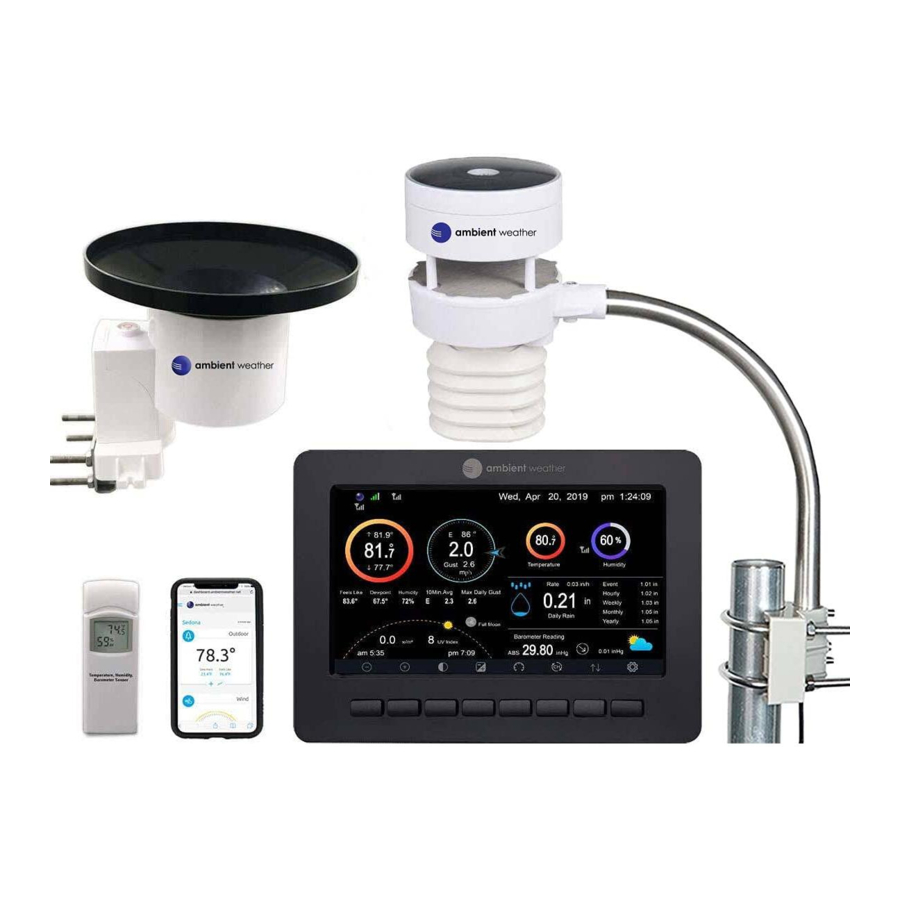
Getting Started
The Ambient Weather WS-5000 Cellular Ultrasonic Professional Weather Station consists of one ultrasonic sensor array, one rain gauge, one cellular gateway, and one user manual:
Parts List
| QTY | Item |
| Cellular Gateway | |
| 1 | Cellular Gateway and mounting bracket |
| 1 | Solar panel and mounting bracket |
| Ultrasonic Sensor Array Assembly (WS-5000-ARRAY) | |
| 1 | Ultrasonic sensor array with built-in: thermo-hygrometer / wind speed sensor/ wind direction sensor, light and UV sensor, solar panel |
| 1 | Mounting arm |
| 1 | Sensor array plastic mounting bracket |
| 1 | Mounting screw for connecting sensor array to the mounting pole |
| 4 | Threaded nuts for U-Bolts (M5 size) |
| 4 | Sensor array lock washers for threaded nuts |
| 2 | Sensor array metal mounting plate to be used with U-Bolts |
| 1 | Metal wrench for M5 U-Bolts, nuts and washers |
| Self Emptying Tipping Bucket Rain Gauge (WS-5000-RAIN) | |
| 1 | Rain Gauge |
| 4 | Threaded nuts for U-Bolts (M5 size) |
| 2 | Sensor array metal mounting plate to be used with U-Bolts |
| 1 | Metal wrench for M5 U-Bolts, nuts and washers |
| 1 | Funnel coil filter |
| User manual | |
Note: Batteries are not included. We recommend Lithium batteries (for operation to -40°F).
Recommend Tools
- Precision screwdriver (for small flat head screw connecting sensor array to the pole and bracket).
- Compass or GPS (for wind direction calibration).
Sensor Array Set Up

Figure 1
- Sonic wind sensor (wind speed and direction)
- Battery compartment
- Temperature and humidity sensor
- Light sensor, LED indicator
- Solar collector
- North alignment marker
- Mounting arm
- Mounting U-Bolt and bracket.
- Heater cable
- USB port (factory use only)
- Calibration button (factory use only)
- Reset button
Install the Batteries in the Sensor Array
Insert 2 x AA batteries into the battery compartment. Alkaline (> 4°F) or Lithium batteries for cold weather climates (> -40°F) are recommended.
The LED indicator on the top of the sensor array will turn on for 3 seconds and flash once every 4.75 seconds (the sensor transmission update period).

If the LED does no light up or flash, make sure the battery polarity is correct. Press the reset button.
Sensor Array Mounting
Install the sensor array plastic mounting bracket to your 1-1/4" to 2" diameter pole, as shown in Figure 3.

Figure 3
Install each MS nut in the order 1, 2, 3 then 4.
Do not tighten with an impact driver, Hand tighten, then half turn/180º.
No more. if your mounting pole is a soft material (wood, pvc, etc) you may need to retighten the (MS nuts when you perform your maintenance every 3 months.

If the optional ultrasonic heater was purchased, and the heater cable is required, untie and snake the heater cable through the mounting arm, as shown in Figure 4.

- Install each M5 nut in the order above. 1, 2, 3 then 4.
- Do not tighten with an impact driver. Hand tighten, then a half turn / 180 degrees. No more.
- If your mounting pole is a soft material (wood, pvc, etc.) you may need to retighten the M5 nuts when you perform your maintenance every 3 months.

Attach the mounting arm to the sensor array, as shown in Figure 5.

Pass the heater cable through the mounting bracket, as shown in Figure 6.
Insert the arm into the base. Align the hole in the base with the hole in the mounting arm and inset the machine screw.

If the optional ultrasonic heater is used, connect the heater cable to the heater, and connect to AC power.

Locate the North marker on the base of the senor array, as shown in Figure 8. Point this marker in the direction of North, according to your GPS or compass.
Rain Gauge Setup

Figure 9
- Rain collector and funnel
- LED indicator
- Bubble level
- Battery door
- Screw hole
- U-Bolt installation hole
Install the Batteries in the Rain Gauge

Insert 1 x AA battery into the battery compartment. Alkaline (> 4°F) or Lithium batteries for cold weather climates (> -40°F) are recommended.
The LED indicator on the top of the rain gauge will turn on for 3 seconds and flash once every 49 seconds (the sensor transmission update period).
If the LED does no light up or flash, make sure the battery polarity is correct. Press the reset button.
Rain Gauge Mounting

Install the sensor array plastic mounting bracket to your 1.25" to 2" diameter pole, as shown in Figure 11

To mount to a wooden post or flat surface, use the two included mounting screws, as shown in Figure 12.
Use the bubble level next to the rain sensor to make sure the sensor array is completely level.
 Note: If you cannot read the bubble level due to mounting constraints, place straddle a line or ruler level across the top of the rain gauge for easier viewing.
Install the Funnel Coil Filter
To install the funnel coil filter, press the coil until the hook is inside the hole at the bottom of the funnel, and locked in place. The spring tension will keep the filter sit tight on the funnel.

Best Practices for Wireless Communication
Wireless communication is susceptible to interference, distance, walls and metal barriers. We recommend the following best practices for trouble free wireless communication.
- Electro-Magnetic Interference (EMI). Keep the tablet several feet away from computer monitors and TVs.
- Radio Frequency Interference (RFI). If you have other 915 MHz devices and communication is intermittent, try turning off these other devices for troubleshooting purposes. You may need to relocate the transmitters or receivers to avoid intermittent communication.
- Line of Sight Rating. This device is rated at 1,000 feet line of sight (no interference, barriers or walls) but typically you will get 300 feet maximum under most real-world installations, which include passing through barriers or walls.
- Metal Barriers. Radio frequency will not pass through metal barriers such as aluminum siding. If you have metal siding, align the remote and tablet through a window to get a clear line of sight.
The following is a table of reception loss vs. the transmission medium. Each "wall" or obstruction decreases the transmission range by the factor shown below.
| Medium | RF Signal Strength Reduction |
| Glass (untreated) | 5-15% |
| Plastics | 10-15% |
| Wood | 10-40% |
| Brick | 10-40% |
| Concrete | 40-80% |
| Metal | 90-100% |
Cellular Gateway Setup
Download Ambient Weather Cellular Gateway Software
https://ambientweather.com/ws-5000-cellular#download.tab
Connect Cellular Gateway to your PC

Connect the Cellular Gateway to your PC using the provided USB cable
Select Units of Measure, Set Time Zone and Sensor Configuration
Under Setup, click Basic Settings then choose your preferred units of measure, time zone and sensor models
Make sure you press Save and wait for the Save Success window to pop-up
Check for and apply firmware updates
Each time the Ambient Weather Cellular Gateway Software is opened it checks to make sure it is up to date.
For cellular gateway firmware, check here: https://ambientweather.com/ws-5000-cellular#download.tab
Download the new firmware version to your computer (desktop or laptop) notate the location. Connect the gateway to your computer via the provided USB cable. Then, select Update Firmware in the Menu bar, browse to the firmware file you saved, press Select then Update. Do not disconnect the gateway until your

Connect Cellular Gateway to Solar Panel

Connect the waterproof connector on the cellular gateway to the waterproof connector on the solar panel
Mount the solar panel and cellular gateway
The solar panel should be facing South if your location is North of the equator and North if your location is South of the equator
SD Card slot use and functions
The micro SD / TF card slot is not required for cellular gateway functions. The optional micro SD card slot allows the user to install a micro SD card, up to 32GB, to create time stamped logs of the data collected by the cellular gateway.
In the Menu bard under Setup then Basic Settings input the desired Data Logger Interval from every 1-240 minutes (Figure 17). *Insert image of SD card slot location on gateway. The micro SD card must be in the device to collect the data for the time period you're wanting to back-up/record. The micro SD card can be removed from the device at anytime to retrieve the backup data.
The data is stored in comma separated value (csv) file format, which can be opened in Microsoft Excel. The micro SD card can be read by a computer with an SD card adaptor.
It may take several minutes to write the data to the SD Card.

Exporting Data File Format (Data Logging)*check the accuracy below

Plug the Micro SD Card into your computer and view the SD Card Drive. There are two files listed.
History_YYYYDD.csv: The history data file as shown in Figure 18.
YYYYDD.csv: The remaining data during the download. For example, if it takes three minutes to download, it the last three minutes of data.
The format of the data is csv (comma separated value) and can be opened in a spreadsheet program such as Microsoft
Excel for advanced data analysis, with the following headers:
Parameter
Figure 19
- No (data point number)
- Time
- Indoor Temperature (°F)
- Indoor Humidity (%)
- Outdoor Temperature (°F)
- Outdoor Humidity (%)
- Dew Point (°F)
- Feels Like (°F)
- Wind (mph)
- Gust (mph)
- Wind Direction (°)
- ABS Barometer (inHg)
- REL Barometer (inHg)
- Solar Rad. (lux)
- UV Index
- Rain Rate (in/h)
- Event Rain (in)
- Daily Rain (in)
- Weekly Rain (in)
- Monthly Rain (in)
- Yearly Rain (in)
Registering device on AmbientWeather.net
AmbientWeather.net
Note, this is best done on a computer desktop or laptop
Visit: www.AmbientWeather.net to create an account then select Add Device on the bottom left of the front page (next to Logout)
Enter the MAC address which can be found on the inside of the cellular gateway

Once registered, select the dashboard to view your data, as shown in Figure 16. This may take 30-45 minutes due to the cellular gateway update interval being every 15 minutes.

Ambient Weather Dashboard Apps
Android and iOS Ambient Weather Dashboard apps are available in addition to AmbientWeather.net. Search "Ambient Weather Dashboard" in the Google Play or iOS app store, or visit:
- Ambient Weather Dashboard for Android:
https://play.google.com/store/apps/details?id=net.ambientweather.dashboard
![play.google.com]()
- Ambient Weather Dashboard for iOS:
https://apps.apple.com/us/app/ambient-weather-dashboard/id1426025887
![www.apple.com]()


IFTTT
The AmbientWeather.net service connects to IFTTT, the platform that allows devices and services to work together seamlessly.
Here are a few things you can do with IFTTT:
- Turn off your Rachio sprinklers when it rains, there is too much wind, or below freezing.
- Close your Hunter blinds when the sun is too intense.
- Close your garage door when it is too windy.
- Blink your hue lights when it starts raining.
- Connect to other web services, such as Gmail, Facebook, Instagram, or Pinterest.
For more information on IFTTT and how it can work for you, visit:
https://ifttt.com/ambient_weather
Amazon Alexa
The Ambient Weather skill allows you to get real-time, and past weather information generated by the devices they have set up at AmbientWeather.net.
Enable the skill and get started: say "Alexa, ask Ambient Weather for a weather report.". This will provide you with your outdoor weather report, but you can ask for your indoor weather report as well by saying, "Alexa, ask Ambient Weather about the indoor conditions."
You can also ask for a report about a specific day, month, or year. Just say "Alexa, ask Ambient Weather about the weather yesterday." or "Alexa, ask Ambient Weather about the weather in May".
For more information on Amazon Alexa, visit:
https://www.amazon.com/dp/B074PGCM1D/
Works with Google Assistant
The Ambient Weather Google Assistant app provides Ambient Weather personal weather station owners with the ability to get real-time, and past weather information generated by the devices they have set up at AmbientWeather.net
Link your account to get started: say 'hey google, Ambient Weather... weather report.' This will provide you with your outdoor weather report. You can ask for your indoor weather report as well by saying, ' indoor conditions'.
You can also link the Ambient Weather app by downloading the Google Assistant.
Here are some sample commands:
- Weather Report
- Outdoor conditions
- Indoor conditions
- Yesterday's weather
- Conditions for October 15, 2019
- Conditions for September 2019
- Conditions for 2020
For more information and to enable this app, visit:
https://assistant.google.com/services/a/id/668e6f3369f27209/
APIs
API stands for Application Programming Interface, and allows programmers to easily develop programs and applications that communicate with weather stations at www.AmbientWeather.net
If you're working with a developer who has an API connected to www.AmbientWeather.com a Device Key is required to connect your weather station to the application created by the developer. To create a device key, login to your account at www.AmbientWeather.net and visit: https://ambientweather.net/account
Weather station sitting
Glossary of Terms
| Term | Definition |
| Absolute Barometric Pressure | Absolute pressure is the measured atmospheric pressure and is a function of altitude, and to a lesser extent, changes in weather conditions. Absolute pressure is not corrected to sea-level conditions. Refer to Relative Barometric Pressure. |
| Accuracy | Accuracy is defined as the ability of a measurement to match the actual value of the quantity being measured. |
| Barometer | A barometer is an instrument used to measure atmospheric pressure. |
| Calibration | Calibration is a comparison between measurements – one of known magnitude or correctness of one device (standard) and another measurement made in as similar a way as possible with a second device (instrument). |
| Dew Point | The dew point is the temperature at which a given parcel of humid air must be cooled, at constant barometric pressure, for water vapor to condense into water. The condensed water is called dew. The dew point is a saturation temperature. The dew point is associated with relative humidity. A high relative humidity indicates that the dew point is closer to the current air temperature. Relative humidity of 100% indicates the dew point is equal to the current temperature and the air is maximally saturated with water. When the dew point remains constant and temperature increases, relative humidity will decrease. |
| Feels Like | The Feels Like temperature is a combination of Heat Index when it is hot outside, and Wind Chill when it is cold outside. Wind Chill temperature is defined by the National Weather Service for temperatures at or below 40°F and wind speeds above 5.0 mph. Heat Index is not valid or calculated below 80 degF. Thus, when the outdoor temperature is between 40 degF and 80 degF, the feels like temperature is the same as the outdoor temperature. If the temperature is below 40 degF, the feels like temperature is the same as the outdoor temperature when the wind speed is less than 5 mph. |
| Hectopascals (hPa) | Pressure units in SI (international system) units of measurement. Same as millibars (1 hPa = 1 mbar) |
| Hygrometer | A hygrometer is a device that measures relative humidity. Relative humidity is a term used to describe the amount or percentage of water vapor that exists in air. |
| Inches of Mercury (inHg) | Pressure in Imperial units of measure. 1 inch of mercury = 33.86 millibars |
| Rain Gauge | A rain gauge is a device that measures liquid precipitation (rain), as opposed to solid precipitation (snow gauge) over a set period. All digital rain gauges are self-emptying or self-dumping (also referred to as tipping rain gauge). The precision of the rain gauge is based on the volume of rain per emptying cycle. |
| Range | Range is defined as the amount or extent a value can be measured. |
| Relative Barometric Pressure | Measured barometric pressure relative to your location or ambient conditions. |
| Resolution | Resolution is defined as the number of significant digits (decimal places) to which a value is being reliably measured. |
| Solar Radiation | A solar radiation sensor measures solar energy from the sun. Solar radiation is radiant energy emitted by the sun from a nuclear fusion reaction that creates electromagnetic energy. The spectrum of solar radiation is close to that of a black object with a temperature of about 5800 K. About half of the radiation is in the visible short-wave part of the electromagnetic spectrum. The other half is mostly in the near-infrared part, with some in the ultraviolet part of the spectrum. |
| Thermometer | A thermometer is a device that measures temperature. Most digital thermometers are resistive thermal devices (RTD). RTDs measure changes in temperature as a function of electrical resistance. |
| Wind Vane | A wind vane is a device that measures the direction of the wind. The wind vane is usually combined with the anemometer. Wind direction is the direction from which the wind is blowing. |
Specifications
Wireless Specifications
- Line of sight wireless sensor array RF transmission (in open air): 1,000' (300M), 300' (100M) under most conditions
- Update Interval: Ultrasonic Anemometer: 4.9 seconds, Rain Sensor: 49 seconds
- Sensor RF Frequency: 915 MHz
- Cellular Gateway update interval to AmbientWeather.net: 15 minutes
Measurement Specifications
The following table provides the specifications for the measured parameters.
| Measurement | Range | Accuracy | Resolution |
| Outdoor Temperature | -40 to 149°F (lithium batteries) -23 to 140°F (alkaline batteries) | ± 2°F | 0.1°F |
| Outdoor Humidity | 10 to 99% | ± 5% | 1% |
| Light | 0 to 300,000 Lux | ± 15% | 1 Lux |
| Rain | 0 to 236 in. | ± 5% | 0.004 in |
| Wind Direction | 0 - 360 º | ± 5º | 1º |
| Wind Speed | 0 to 89 mph (operational) | < 22 mph, +/- 1 mph ≥ 22 mph, +/-5% | 1 mph |
Transmission distance in open field: 300m (1,000 ft)
Sensor reporting interval: 4.75 seconds (wind speed/direction), 49 seconds (rain)
RF Frequency: 915 MHz
Cellular: 4G Zone A, B. Zone C is available, but not included.
Power Consumption
- Cellular gateway: 3.7V 1 x 18650 battery (included)
- Solar panel: 6.2V 500mA output
- Outdoor sensor array: 2 x AA batteries (not included). The primary power source is the solar panel. The batteries provide backup power when there is limited solar energy.
- Optional Indoor sensor (not included): 2 x AA batteries (not included).
- Rain Gauge: 1 x AA battery
Maintenance
- Clean the rain gauge once every 3 months. Rotate the funnel counterclockwise and lift to expose the rain gauge mechanism, and clean with a damp cloth. Remove any dirt, debris and insects. If bug infestation is an issue, spray the array lightly with insecticide.

- Clean the solar radiation sensor and solar panel every 3 months with damp cloth.
- Replace batteries every 1-2 years. If left in too long, the batteries may leak due to environmental challenges. In harsh environments, inspect the batteries every 3 months (when cleaning the solar panel).
- When replacing the batteries, apply a corrosion preventive compound on the battery terminals, available at Amazon and most hardware stores.
- In snowy environments, spray the top of the weather station with anti-icing silicon spray to prevent snow build up.

Troubleshooting Guide
If your question is not answered here, you can contact us as follows:
- Online Support:https://ambientweather.com/ws-5000-cellular
- Email Support:support@ambientweather.com
- Technical Support: 480-346-3380 (M-F 8am to 3pm Arizona Time)
| Problem | Solution |
| Outdoor sensor array does not communicate to the display tablet. | Reset the sensor array. Press the reset button as described in Error! Reference source not found., #12. With an open-ended paperclip, press the reset button for 3 seconds to completely discharge the voltage. Take out the batteries and wait one minute, while covering the solar panel to drain the voltage. Put batteries back in and resync the tablet with the sensor array about 10 feet away. The LED next to the battery compartment will flash every 5 seconds. If the LED is not flashing every 5 seconds... Replace the batteries in the outside sensor array. If the batteries were recently replaced, check the polarity. If the sensor is flashing every 5 seconds, proceed to the next step. There may be a temporary loss of communication due to reception loss related to interference or other location factors, or the batteries may have been changed in the sensor array and the tablet has not been reset. The solution may be as simple as powering down and up the tablet (remove AC power, wait 10 seconds, and reinsert AC power). |
Temperature sensor reads too high in the daytime | Make certain that the sensor array is not too close to heat generating sources or strictures, such as buildings, pavement, walls or air conditioning units. Use the calibration feature to offset installation issues related to radiant heat sources. Reference Section Error! Reference source not found.. |
| Relative pressure does not agree with official reporting station | You may be viewing the absolute pressure, not the relative pressure. Select the relative pressure. Make sure you properly calibrate the sensor to an official local weather station. Reference Section Error! Reference source not found... |
Rain gauge reports rain when it is not raining | An unstable mounting solution (sway in the mounting pole) may result in the tipping bucket incorrectly incrementing rainfall. Make sure you have a stable, level mounting solution. |
Data not reporting to Wunderground.com |
|
No Wi-Fi connection |
|
Exclamation point! next to the Wi-Fi icon | If there is an exclamation point! next to the Wi-Fi icon on the WS-5000 display, it means the display is connected to Wi-Fi but the Wi-Fi is not connected to the Internet Make sure the 2.4 GHz band on your router is connected to the Internet. If the problem persists, try rebooting your router. |
| Wind Vane does not spin as freely as the wind cups. | This is by design. The dampening prevents the wind vane from spinning with the slightest breeze, which will result in variable wind all the time. The added resistance allows the wind vane to change direction with 2 – 3 mph, providing a much better wind direction tracking. |
| Time off by increments of an hour, or date is off by one day. | The time zone is entered incorrectly. Reference Section Error! Reference source not found.. |
 will be displayed in the time field.
Accessories
The following software and hardware accessories are available for this weather station at www.AmbientWeather.com .
| Accessory | Description |
| Ambient Weather Mounting Solutions | Ambient Weather provides the most comprehensive mounting solutions for weather stations, including tripods, pole extensions, pole mounting kits, ground stakes and more. |
| WS-2000-CONSOLE-AC | Add as many displays/consoles as you like to your weather station w/ 1,000' transmission distance. |
Warnings and Cautions

Any metal object may attract a lightning strike, including your weather station mounting pole. Never install the weather station in a storm.
If you are mounting the weather station to a house or structure, consult a licensed electrician for proper grounding. A direct lightning strike to a metal pole can damage or destroy your home.
Installing your weather station in a high location may result in injury or death. Perform as much of the initial check out and operation on the ground and inside a building or home. Only install the weather station on a clear, dry, day.
Documents / Resources
References
![ambientweather.net]() Ambient Weather
Ambient Weather![ambientweather.com]() Best Weather Station Mounting Solutions - Ambient Weather
Best Weather Station Mounting Solutions - Ambient Weather![www.ambientweather.net]() Ambient Weather
Ambient Weather![play.google.com]() Google Play
Google Play![play.google.com]() Google Play
Google Play![apps.apple.com]() Ambient Weather Network on the App Store
Ambient Weather Network on the App Store![www.apple.com]() App Store - Apple
App Store - Apple![ifttt.com]() Ambient Weather Integrations - Connect Your Apps with IFTTT
Ambient Weather Integrations - Connect Your Apps with IFTTTAmazon.com: Ambient Weather : Alexa Skills
![www.ambientweather.com]() Highest Rated Personal Weather Stations - Ambient Weather
Highest Rated Personal Weather Stations - Ambient Weather
Download manual
Here you can download full pdf version of manual, it may contain additional safety instructions, warranty information, FCC rules, etc.
Download Ambient Weather WS-5000 - Wireless Weather Station Manual
Advertisement


Need help?
Do you have a question about the WS-5000 and is the answer not in the manual?
Questions and answers