RUKO U11 PRO - Drone Manual
- User manual (34 pages) ,
- Quick start manual (14 pages) ,
- Quick start manual (2 pages)
Advertisement
Package Contents

DRONE PRESEBTATION
Please read all instructions and warnings carefully before operating. Please also keep this instruction manual for future reference and maintenance.

- Drone Ull Pro is NOT a toy and is not suitable for people under the age of 14. It requires correct assembly and debugging to avoid any accident before every flight. Inappropriate use of the product could result in personal injury or property damages.
- This product is suitable for experienced drone pilots no less than 14 years of age.
- In the event of a problem during using.operating, or maintenance, please contact the local sales agent or retailer or keep in touch with the responsible staff of our company.
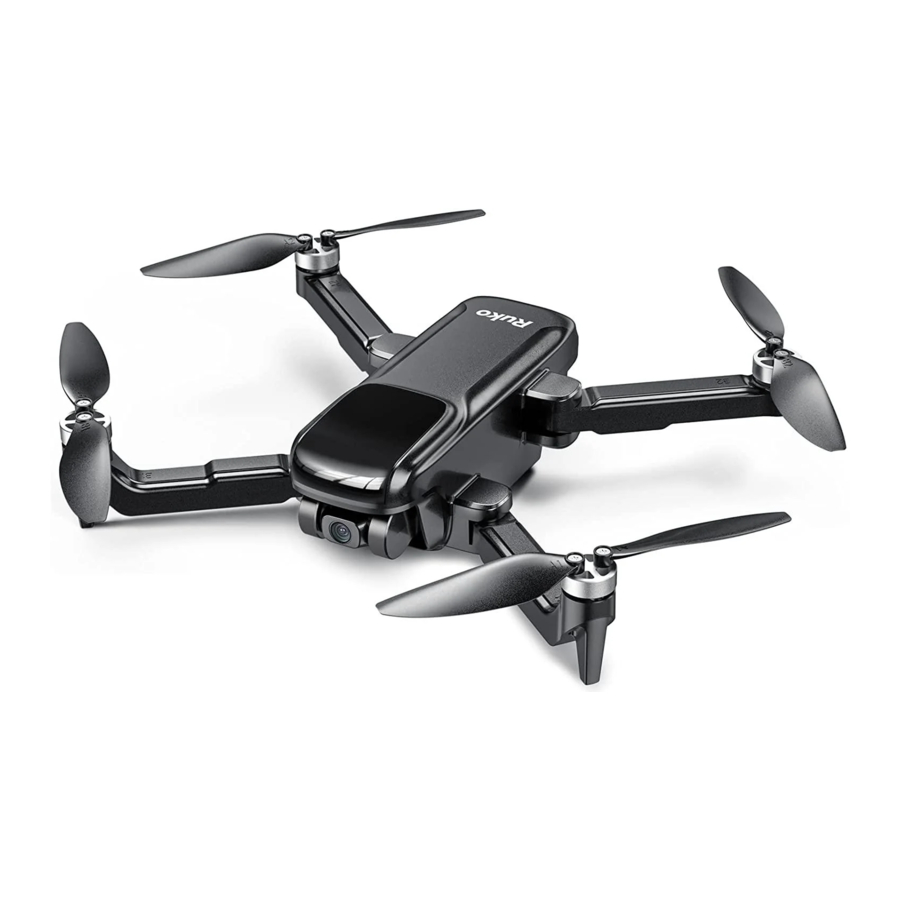
Ull Pro Drone Diagram
This drone is equipped with Optical Flow Positioning and GPS positioning systems. It can fly stably indoors and outdoors and has functions such as Return To Home, Route Planning, Follow Me, and Circle Flight.

How To Replace the Propeller

Loose the screw and remove the propeller.

Replace the propeller and tighten the screws.

Make sure the marks of the propeller are same as the arm.
 Notice:
- Please install carefully to avoid injury
- If the propeller is installed incorrectly, the drone can't fly normally and may cause damage.
- Please use the propeller accessories provided by Ruko.
Drone Indicator
Please refer to the table below to understand the status of the flight indicated by different flashing modes.

| Indicator status | Meaning |
| Red Light flashes slowy, Green Light often light up | Ready to do Calibration |
| Green Light flashes, Red Light often lights up. | Ready to Vertical Calibration |
| Green Light often light up, Red lights flash slowly in turn | Indoor flight in progress |
| All lights flash alternately | Low Battery Return to Home |
| The Green Light changes from fast flashing to slow flashing, Red Light flashes slowly | Gyroscope calibration is successful |
| All LED indicate flash slowly alternately | Searching for GPS indoors( Please close GPS mode during indoor flight) |
| All LED Lights often light up | Searching GPS signal is successful |
Intelligent Flight Batte
Please read Disclaimer and Safety Guidelines and the User Manual before use battery. Users take full responsibility for all usage and operations.
- Battery Diagram


- Installation & Disassemble Battery
Please read Disclaimer and Safety Guidelines and the User Manual before use battery. Users take full responsibility for all usage and operations.


Notice: Make sure that the battery is installed correctly, otherwise, the battery may drop off during flight.
- Precautions for Charging


Notice:
- Mini USB 5V/2A—3A wall charger recommended. Do not use any charger stronger than 5V/2A—3A, or the battery may be damaged, reduce performance, and cause a fire.

- Please remove the battery in time after fully charged to avoid damage due to overcharge. Charging time is about 2.5 hours.

- DO NOT use non-Ruko poor quality batteries or chargers. Ruko takes no responsibility for any damage caused by non-Ruko batteries or chargers.

- After flying, DO NOT charge battery immediately until the battery gets cool to avoid malfunctions due to excessive temperature. The batteries should be used at temperatures between 20ºC and 40ºC (68º and 104ºF).

- Please remove the battery in time after the drone has landed on the low electricity to avoid battery damage caused by battery over-discharge.
- Lithium batteries should be charged with 50%— 80% of electricity if they are not used for a long time, and they should be taken out of the instrument and stored in a dry and cool environment, and the batteries should be changed every month to avoid excessive storage time and battery self-discharge. Too low, causing irreversible capacity loss.
![]()


- Daily Maintenance Of The Battery
Please use the battery according to the following introduction to ensure the safety of your and a third party.
- DO NOT allow battery to touch with any kind of liquid, or put it under sun exposure, severely squeezed, and dropped from high altitude.

- Keep the batteries out of the reach of children and animals.
- DO NOT disassemble or pierce a battery in any way or it may leak, catch fire, or explode.
- DO NOT touch the electrolytes in damaged batteries, it may injure your skin or eyes

Install SD Card

- There is a socket on the back of the camera, you can insert an SD card (not included).
- When the SD card is not inserted, the photos and videos will be automatically saved in the phone album. After the SD card is inserted, the photos and videos will be automatically saved in the SD card and the phone album at the same time. You can click
![]() to view and download.
to view and download.
 to view and download.
- We recommend inserting an SD card because it helps to increase the resolution of the video.
| Storage Mode | Photo Resolution | Video Resolution |
| Mobile Phone | 3840x2160P | 1280x720P |
| SD Card | 2048x1152P | 2048x1152P |
Notice: Click the SD card icon  to format the SD card and select FAT 32 as the file system at the same time.
Tips: the SD card memory is 32G or less selected, and the speed rating is over Class 10.
Remote Control Diagram
This R/C aircraft can be dangerous when in use, please make sure you keep it far away from any persons or spectators when flying. In-correct installation, poor conditions, or users not familiar with operation may cause damage to the aircraft or injure people or may cause an unexpected accident.

Default Setting

Charge the Remote Control
This remote control is built-in 3.7 V 1200mAh lithium polymer battery.
 Tips: Refer to the Precautions for Charging( the same as charging of drone' s battery).
FLIGHT
Fly Safety Guidelines
- Wi-Fi transmission area requirements:

- Make sure to correctly open the remote control antenna.
- Make surely in the open area without any interference and obstacle.
- Wi-Fi transmission distance is 300-500 meters.
![]()


- DO NOT fly under obstacles, crowds, high voltage power lines, trees, tall structures and high levels of electromagnetism areas, otherwise there is no GPS signal or it may crash.


- DO NOT use the drone in adverse weather conditions such as rain, snow, fog and gale.


Tips:
- Make sure to correctly open the remote control antenna.
- Don' t forget to read the Disclaimer & Safety Guidelines before flight
How To Fly Outdoor
Unfold the Drone Wings and Power on the Drone
- Horizontal Ground
![]()
- Unfold the wings
![]()
- Turn On the Power
![]()


- Unfold the drone wings and put the drone on the horizontal ground.
- Long press the power button
![]() for 3 seconds to turn on the machine.
for 3 seconds to turn on the machine. - The front navigation light keep blinking and the rear navigation light off which means the drone is waiting for paring. When the remote control is turn on, the drone will automatically link to the remote control.
 for 3 seconds to turn on the machine.
Power On The Remote Control

- Unfold the remote control antenna and install mobile phone holder.
- Turn on the remote control power, the transmitter indicator light flashes and sounds "Beeps"
- Push the left stick down to the 6 o'clock position and let go, the indicator lights of controller flash slowly.
Installation

Dissemble

Tips:
- Make sure the remote control antennas unfold correctly before operation.
- It takes about 30 seconds for the drone to connect to the remote control
How is the pairing frequency between the remote control and the drone successful?
- The red lights of the drone flash slowly and the green light solid.
- The remote control will emit a "Beeps" sound.
Connect the Wi-Fi and Enter App
Download on the App Store


Android


Scan the QR code And download APP

- If you haven't downloaded the APP, please download the APP first. For how to download. For the APP, please refer to the APP function description.
- Open the mobile phone Wi-Fi signal list, find and connect the Wi-Fi signal named "Ruko-Ull Pro-XXXXXX"
- Then you can enter the APP which is named "Ruko GPS".
Tips:
- The phone WLAN compatible with this drone must support dual-band Wi-Fi (2.4G & 5G).
- For android phones, after connecting with the drone' s Wi-Fi "Ruko-U11 Pro-XXXXXX" please wait for about 10-30 seconds, note if there is any option popping up about internet settings, make sure connected, otherwise, there is no picture after entering APP.
- Connecting to the drone APP is to allows the drone to observe the pictures taken by the camera in real-time during the flight. There are many functions that can be used on App, such as route planning and so on.
If you have any questions about this product, please contact Ruko by sending a message to Rukofunnytoys@gmail.com
 +86 19925221959 ( Available from 9 pm to 6 am)
Documents / Resources
References
Download manual
Here you can download full pdf version of manual, it may contain additional safety instructions, warranty information, FCC rules, etc.
Advertisement


Need help?
Do you have a question about the U11 PRO and is the answer not in the manual?
Questions and answers