Advertisement
- 1 What's in the Box?
- 2 Controls & Functions
- 3 Getting Started - Product Set-Up
- 4 Connecting to Network
- 5 Presets
- 6 Using Undok App - Net remote
- 7 Internet Radio & Podcasts
- 8 Spotify Connect
- 9 USB Playback
- 10 DAB Radio
- 11 FM Radio
- 12 Bluetooth & AUX In Mode
- 13 Dual Alarm & Sleep timer
- 14 System Settings
- 15 Troubleshooting
- 16 Product Specification
- 17 Support
- 18 Safety Information
- 19 Documents / Resources
What's in the Box?

- Bard Music System
- Power adaptor
- Remote control
- 3.5mm audio cable
- User manual
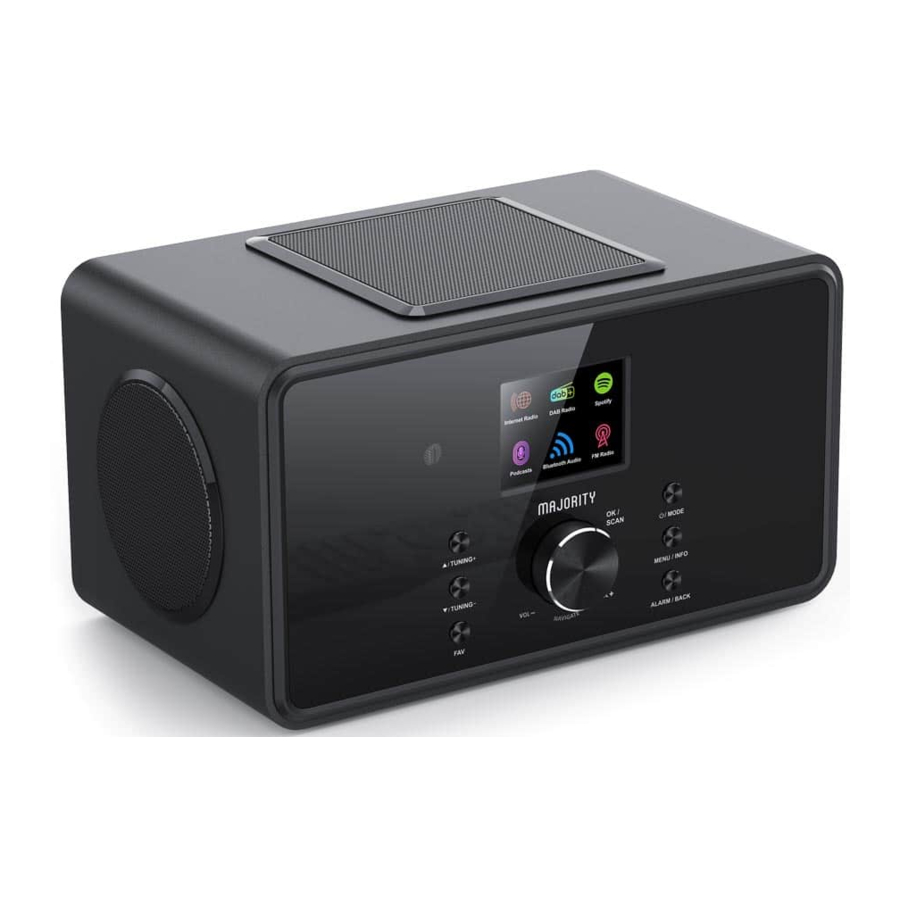
Controls & Functions
Bard Radio - Front View

- 2.4" screen – Colour TFT display
- Remote Control sensor – Receive remote control signal
- UP / TUNING UP button
- DOWN / TUNING DOWN button -
Move up or right; FM: Set frequency
Move down or left / FM: Set frequency - FAV button - Select favourite stations; Press and hold to BT discoverable under BT mode
- Volume knob / OK / SCAN button
- ON / Standby / MODE button -
Rotate to adjust volume;
Press to OK;
Press to scan on FM mode.
Switch on/Standby or change mode. - MENU / INFO button - Enter the menu; View the information of the station or track
- ALARM / BACK button - Set alarm clock; Return one step under the menu
Bard Radio – Back View

- DAB+/FM antenna - Antenna for enhancing DAB/FM reception
- ON/OFF switch - Switch on/off the device
- DC IN - Plug for power support
- USB port - USB drive music playback
- Headphone jack - 3.5mm headphone output
- AUX jack - 3.5mm audio input
Remote Control
Operating your remote control
Press and slide the back cover to open the battery compartment of the remote control.
Insert two AAA size batteries. Make sure the (+) and (-) ends of the batteries match the (+) and (-) ends indicated in the battery compartment. Close the battery compartment cover.

- Device power on/off; alarm off
![]()
- MODE - Open, close, change the radio Mode in between FM, DAB,BT,USB, AUX, Spotify, Internet Radio & Podcasts
- MENU - Press to open, close menu
- Select previous track, hold down to seek
![]()
- Start playback, pause
![]()
- EQ - Select equalizer preset
- Move up; FM: Set frequency
![]()
- Move left, step back
![]()
- OK SCAN - Confirm entry, FM: Scan; Playing: album in full screen
- Move right, step next
![]()
- Move down; FM: Set frequency
![]()
- Zzz - Sleep setting
- SHUFFLE REPEAT - Music: random and repeat selection
- ALARM - Set Alarm1, Alarm2
- BT PAIR - Press and hold to BT discoverable under BT mode
- Select next track, hold down to seek
![]()
- Increase volume
![]()
- Decrease volume
![]()
- Mute, Unmute
![]()
- 1-10/0 - Number buttons: retrieve saved favourite station, hold down to save station
- INFO - Display FM mode info (Name, PTY, RT, frequency) Display DAB mode info (Station, track, artist etc.)
- FAV - Select favourite stations, hold down to save favourite


Getting Started - Product Set-Up
*Please note that the instructions within this manual will refer to the remote button number e.g. (Rem*number*) or radio buttons e.g. (Ref* number*) in accordance with the diagrams in "Controls & Functions" section.
Connection and Preparation
Remove all packaging and prepare your Majority Bard radio for use. Insert the power adaptor to the back of device into its port (Ref.12) and plug the other end into power socket.
Connecting the network
- A broadband connection in combination with a wireless access point, router, or similar network device.
- The network device needs to support Wi-Fi (802.11 a/b/g/n) wireless connection.
- Make sure your wireless network is set and you have the WEP, WPA or WPA2 security password to activate the connection with Majority Bard radio. You may also use the WPS (Wi-Fi Protected Setup) function for easy pairing between the network device and the radio. Check if the light indicators on the network device are in appropriate status.
Antenna
Plug the antenna into the F-connector port (Ref.10) at the back of the radio. To get good reception for DAB/FM broadcasting, always extend the antenna to its full length.
First Time Setup
When powering the device on for the first time, you will be appointed to change the language. Rotate the knob to select the menu language you want from the list and press the OK button (Rem.9), to confirm your selection. Right after the privacy policy will be displayed. Press OK button to continue (Rem.9). A setup wizard guide will be automatically launched to guide you through the process.
Select 'YES' and confirm and launch the setup wizard. If you select 'NO', the next window will ask you choose if you want to start the setup wizard again the next time you power the device on.
Setting date and time
Select the clock format such as: '12' for 12-hour display format or '24' for 24-hour display format. If you select the 12-hour format, the display shows 'AM' in the morning or 'PM' in the afternoon after the time.
 Note: 'AM'/ 'PM' displays only if you have chosen the 12-hour time format. Select 'AM' for the morning hours or 'PM' for the afternoon hours.
Once selected, the following options will be displayed on the radio screen to choose from for the time and date to be updated such as Update from DAB, Update from FM, Update from Network or No update.
Note: If you choose 'Update from Network' you must indicate your time zone in the next window.
Next choose daylight saving to 'ON' for summertime, otherwise select 'OFF.' If you choose 'No update,' you will have to enter the date and time manually.
Connecting to Network
Connecting Majority Bard with your network
Firstly, the device asks to keep network connected. To control the device in all operating modes via the app, select 'YES' to confirm. If choosing 'NO,' while in Standby Mode it is not possible to control the device from the app you can only do so in AUX IN, FM, DAB operating modes.
Note: The power consumption in Standby Mode will be higher when the network connection is On.
Once you confirmed your selection, a list of WIFI networks found available at your location will then be displayed on the radio screen. Select from the list your network to connect Majority Bard radio with it using one of the following methods:
- Push button: The radio prompts you to press the connect button on your internet router. Once activated, Bard radio scans for a ready Push Button network available and connects.
- Pin button: The radio generates an 8-digit code number which you enter into your wireless router, access point, or an external registrar.
- Skip WPS: Enter key as for a standard encrypted network. To enter the network key, use the dial knob (Ref.6) or the direction buttons on the remote control to move the cursor through the characters and press OK to confirm. As each character is selected, the key is built up near the top of the display.
There are three options accessible by tuning the navigate dial knob (Ref.6) back before the first characters – Backspace, OK and Cancel.
Note: For more information on setting up a WPS encrypted network, see your WPS router's instructions.
Once the key has been entered Bard radio will search and connect to your network. Bard radio will on its screen the status connected if the set-up has been successfully completed. If connecting with your network using this method fails, it returns to the previous screen to try again. Once completed, press OK to quit the setup wizard.
Presets
Storing & Recalling Presets
Presets are stored on the radio and cannot be accessed from other devices.
The number of presets for each mode are DAB- 40; FM- 40, Spotify- 10 and 40 in total for the internet radios and podcasts all together.
While playing a radio station / podcast to store as a preset, press and hold the FAV button for 2-3 seconds (Rem.22). The display shows the 'Store preset screen.' Using the arrow buttons find an empty preset space, select one and confirm. The radio display will show stored.
To recall a preset, press FAV button on the remote (Rem.22). Using the arrow buttons, search for the one you wish to play from your list and confirm. The radio will then start playing.
When a preset station is playing, it shows a star icon  (1, 2 etc.) at the bottom of the screen.
For 1-9 preset stations, you can use shortcut buttons on the remote-control keypad. Press and hold for 2-3 seconds a number button on remote keypad, between 1-9, to store a radio station. Alternatively, press FAV button to select the corresponding number of presets.
To save a preset from 10 onwards, you can only store or recall via 'Presets list'.
Using Undok App - Net remote
UNDOK
The Majority Bard radio has a feature of network remote for smartphone or tablet with IOS or Android operational system. Having this feature will allow you to control the radio using the network remote on your device. To be able to activate and use this Net-remote, you must download on your phone / tablet the UNDOK app from Google Play or Apple Store then install it on your device or scan any of these codes for quick download.
For Android system (Google Play)


For iOS system (Apple Store)


Before using the UNDOK app, make sure that Bard radio and your phone or tablet are connected to the same WIFI network.
Launch the app. The app initializes and scans for Internet Radio in the network, find Majority Brad radio and select the radio to connect with.
When prompted, enter the current PIN code. The default PIN is '1234'.
You can view and edit the current PIN on the Internet Radio menu. Select your desired mode on the main page. Once connected you can control the selected mode on your smartphone / tablet and on the display of the device simultaneously.
Tap 'Standby' icon to go to standby mode. Tap 'Wake up' to go to operation mode.
Tap 'Browse' to view the details. Tap to view the saved preset stations, and tap '+' to add the playing station to the desired preset station number.
NOTE: Be aware that if another smartphone / tablet with the app in the same networks have access with the device, the original connection will be cut off.
Internet Radio & Podcasts
Majority Bard can play thousands of internet radio stations and podcasts from around the world through a broadband Internet connection. When you select Internet radio or Podcasts mode, the device directly contacts the Frontier Smart Technologies portal to get radio stations or podcasts.

The list menu is provided by the portal and is only accessible when the device is connected to the Internet Network.
Please note: The contents and sub-menus may change from time to time.
Choose required category and search for the radio station or podcast you would like to play on your Bard radio.
Now playing information
While the stream is playing, the screen shows its name and description. To view further information, press 'INFO'.
Each time you press 'INFO', another set of information will be displayed, cycle through name/description, genre/location, reliability, codec/sampling rate, playback buffer and today's date.
Press OK to view the station album in full screen.
Presets
40 presets available, see "Storing & Recalling Presets".
Spotify Connect
Use your smartphone, tablet, or computer as a remote control for Spotify.
Go to spotify.com/connect to learn how.
The Spotify Software is subject to third party licenses found here: https://www.spotify.com/connect/third-partylicenses
Start playing Spotify on your smartphone as per usual. The 'devices icons' are displayed on your phone bottom page. Open the devices icon list to see the ones available on your network, then select 'Majority Bard.' Once successfully connected the radio icon will turn green and you can start playback via Bard radio.
While playing you can Play / Pause (Rem.5) or use the Previous or Next track to skip (Rem 4. and Rem.17), which you can press and hold for a few seconds to fast forward or rewind.
USB Playback
USB Music Player
This feature is only to be used to play audio files from a USB stick. Insert the USB stick on its port on the back of the radio (Ref.13).
The USB stick specifications that you can use with Bard radio are:
- Supported USB file systems: FAT16, FAT32 -Maximum device capacity: 128 GB.
- Maximum number of items (files/sub directories) including any directory is: 5000.
- Maximum depth of file system tree: 8 directory levels.
While in USB mode the menus are generated based on the content of the USB stick (folders, audio files). Browse through the files using the navigation knob (Ref.6) and BACK button (Ref.9), or the arrow buttons on the remote control.

The radio display shows folders and file names (not necessarily track names). Once you have found a track you want to play, press OK. A short press plays the track immediately.
In USB mode you can use the Previous (Rem.4) or Next track (Rem.16), to skip to the next or previous track. Press and hold for few seconds Previous or Next buttons to fast forward or fast rewind. Use PLAY/Pause button (Rem.5).
My playlist
The files/ audio tracks can be added to My playlist by browsing your available tracks through the USB playback menu. Highlight the track you wish to add, then press, and hold for 2 seconds the OK button to save. The playlist is preserved during standby mode. The device holds a queue of up to 200 tracks in My playlist.
Clear My playlist - To clear the entire 'My playlist.'
Repeat/shuffle
You can set these options to repeat tracks or play them in random order. To activate Repeat/ Shuffle press the corresponding button on remote control (Rem.13).
Now playing information
While a track is playing, the screen shows the file and artist. There is also a progress bar with figures for elapsed and total track time. At the bottom of the screen, an icon indicates USB depending on the source.
To view further information, press INFO. Each time you press INFO, another set of information will be displayed, cycling through the information: artist, album, codec/sampling rate, playback buffer and today's date.
Note: In USB mode the album cover is not supported.
DAB Radio
DAB mode receives DAB/DAB+ digital radio and displays information about the station, stream and track playing.

Scanning for stations
The first time you select DAB radio mode, or if the station list is empty, the radio automatically performs a full scan for the available radio stations.
To start a scan manually, choose 'Full scan.' To scan only stations with good signal strength, select 'Local' scan.
Once the scan is complete, the radio shows a list of available stations.
To remove stations that are listed but not available, choose Prune invalid. Rotate the navigation dial (Ref.6) to scroll through the list of DAB radio stations found, highlight the one you would like to play then press OK to confirm. Once selected, the radio station starts to play. While playing on the radio screen will be displayed, information about the radio station, audio track or broadcast info.
Now playing information
To view more info while streaming press INFO (Rem.21). Each time you press the INFO button, another set of information will display, cycling through DLS text, programme type, ensemble name/frequency, signal strength/error rate, bite rate/codec/channels and today's date.
Press OK to view the station album in full screen.
Presets
40 presets available, see "Storing & Recalling Presets".
DAB mode settings
Dynamic range compression (DRC)
If you are listening to music with a high dynamic range in a noisy environment, you may wish to compress the audio dynamic range. This makes quiet sounds louder, and loud sounds quieter. You can change DRC as Off, Low or High.
Station order
You can choose the order of the DAB station list to be either Alphanumeric, Ensemble or Valid.
Ensemble lists groups of stations that are broadcast together on the same ensemble.
Valid lists valid stations first, alphanumerically, then off-air stations.
FM Radio
FM radio mode receives analogue radio from the FM band and displays RDS (Radio Data System) information about the station and broadcast if available.
To find a station, press OK. The frequency display starts to run up as the device scans the FM band. Alternatively, you can tune manually by turning the NAVIGATE knob.
Now playing information
While the stream is playing, the screen shows its frequency. If RDS information is available such as station name, programme name, track title and contact details these will also be visible. If there is no information available, on the radio display you will only see the radio station frequency. Stereo broadcasts are indicated with an icon at the top of the screen, to view further information about the broadcast, press INFO button (Rem.21).
Each time you press INFO button, another set of information is displayed, cycling through RDS text, further RDS text (station/programme type), frequency and today's date.
Presets
40 presets available, see "Storing & Recalling Presets".
FM Settings Scan settings
By default, FM scans stop at any available station. This may result in a poor signal-to-noise ratio (hiss) from weak stations. To stop at radio stations with good signal strength only change the scan settings to 'Strong station only,' select 'Yes' to confirm.
Audio settings
All stereo stations are reproduced in stereo. For weak stations, this may result in a poor signal-to-noise ratio (hiss). To play weak stations in mono, select FM weak reception: 'Listen in mono only' and then YES to confirm.
Bluetooth & AUX In Mode
Bluetooth Mode
The Majority Bard can be paired via Bluetooth with a phone, a tablet or similar device to play audio from, via the radio speaker.
In Bluetooth mode, the radio enters the pairing mode automatically.

You can turn on Bluetooth on your device and search the radio Majority Bard. When it is waiting for pairing, there is a blinking Bluetooth icon at the bottom. If the pairing is successful, the Bluetooth icon becomes steady.
Control the music playback from your Bluetooth device.
To disconnect from the radio, press, and hold PRESET/BT PAIR (Rem.15) or go to the menu and choose BT disconnect.
Please note: The Majority Bard radio is not compatible with Bluetooth earphones.
Aux in
The Aux in mode can be used to play audio from an external source such as an MP3 player, a phone, a tablet, or any other similar device via the Majority Bard speaker.
Connect the external audio source to the Aux in stereo jack port on the back of the Bard radio (Ref.15), using the 3.5 mm audio cable.
Adjust the volume level on the radio and on the audio source device that you are connecting with, if necessary.
Dual Alarm & Sleep timer
Sleep Timer
To set the sleep timer, select Sleep under Main menu or press SLEEP button (Rem.12) on the remote control. Choose from Sleep OFF, 15, 30, 45, 60, 90 or 120 minutes. The radio will count and turn off after you select a sleep time.
Alarm
There are two versatile wake-up alarms with snooze facility, and a sleep function to turn the system off after a set period of time. Each alarm can be set to start in a particular mode.
Select Alarms under the Main menu to set or change an alarm.

Select the alarm number (1 or 2) then configure the following parameters
- Enable: on/off,
- Frequency: Daily, Once, Weekends or Weekdays,
- Time: as per your choice
- Mode: Buzzer tone, Internet Radio, DAB or FM,
- Preset: Last listened or Preset 1-40
- Volume: set the volume level.
To activate the new settings, scroll down and select Save. The screen shows active alarms with an icon at the bottom left of the radio display screen. At the set time, the alarm will sound.
To temporarily silence, press any buttons except STANDBY. You can change the snooze period. The radio returns to standby for the set period, with the silenced alarm icon flashing.
Press STANDBY to turn off the alarm.
System Settings
On the playing screen of any modes, press and hold MENU / INFO button (Ref.7) on the unit or press MENU on the remote control (Rem.3), choose System settings to continue.

Equalizer
Several preset EQ modes are available: Normal, Flat, Jazz, Rock, Movie, Classic, Pop and News.
Also, a user-defined setting is available; create your own EQ with custom bass, treble settings.
Network
Network wizard - Enter to search AP SSID, then input the WEP / WPA key or choose Push Button/Pin/Skip WPS to connect to the wireless network.
PBC WLAN setup - Push Button Configuration, it is to connect the AP that supports WPS (Wi-Fi Protected Setup).
View settings - View the information of current connected network: Active connection, MAC address, WLAN region, DHCP, SSID, IP address, Subnet mask, Gateway address, Primary DNS, and Secondary DNS.
Manual settings - Choose wireless network connection and enable or disable DHCP (Dynamic Host Configuration Protocol).
NetRemote PIN Setup - Here you can view and edit the NetRemote PIN. The default NetRemote PIN is: 1234. The NetRemote PIN is required when you want to connect a smartphone or Tablet PC to your radio.
Network profile - The smart radio remembers the last four wireless networks it has connected to, and automatically tries to connect to whichever one of them it can find.
From here you can see the list of registered networks. You can delete unwanted networks by pressing the OK button and then choosing 'YES' to confirm delete.
Clear network settings - Select 'YES' to clear all the current network settings.
Select 'NO' to cancel.
Keep network connected - If you choose to keep network connected the Wi-Fi will not disconnect even in standby mode. This option allows the device to be ready for UNDOK (Details can be found on Section 3) connection in any operating modes.
Time/Date
Set the time manually or auto update, time format, time zone and daylight. Details can be referred to Setting date and time under Section 3 (First Time Setup).
Language
The default language is English. Change it as your preference. There are 13 languages available - English, Dansk, Deutsch, Español, Français, Italiano, Nederlands, Norsk, Polski, Português, Suomi, Svenska, Türkçe.
Factory Reset
A factory reset will set all user settings to default values, therefore the existing presets, time and date, network configuration will be lost.
Software Update
Auto-check setting - This option automatically checks for latest updates from time to time. Automatic updating is enabled by default. To disable it, select 'NO.' To enable it again, select 'YES.'
Check now - Search for available updates immediately.
If newer available software is detected, you will be asked if you want to go ahead with an update. If you agree, the new software is then downloaded and installed. After a software upgrade, all user settings are maintained.
NOTE: Before starting a software upgrade, ensure that the radio is plugged into a stable main power connection. Disconnecting power during an upgrade may permanently damage the unit.
Setup Wizard
With this function, you can start the setup wizard at any time. Any parameters or stations entered already are not deleted. For more information, please read Section 3 (First-time setup).
Info
Enter Info to view the firmware version and the radio ID.
Backlight
You may change the backlight of each environment (power on or standby) to High, Medium, or Low. And adjust the timeout duration which the radio turns to standby backlight level when it has not been controlled.
Troubleshooting
| Error | Potential Cause/Solution |
| The device does not switch on or turn off suddenly. |
|
| No Power | Ensure that the power adaptor plug of the unit is connected properly. |
| No Sound or lower sound |
|
| No network connection can be established. |
|
| Wi-Fi connection cannot be established. |
|
| No station is found. |
|
| No signal or hiss in DAB/FM mode. |
|
| USB driver or MP3 player is not detected. |
|
| Alarm does not work. |
|
| All other undetermined cases. / Electro-Magnetic Interference. |
|
Product Specification
| Model number | Majority Bard |
| Description | Internet Radio Music System |
| Speaker output power | 100W |
| Display | 2.4", 320 x 240, colour TFT display |
| FM | 87.5 – 108.0 MHz, RDS supported |
| DAB/DAB+ | 174 – 240 MHz (Band III) |
| Power adaptor | 15.0V 2.4A 36.0W |
| Connections | AUX in (3.5mm socket) Headphone (3.5mm socket) USB (type A) - for playback only, no charging function DC IN power supply (5.5mm socket) |
| Network standby power | <2.0W |
| Max. power consumption | 36.0W |
| Operating temperature | 0 oC - 35 oC |
| Dimensions | 235mm(L) x 129mm(H) x 135mm(D) |
| Weight | 2.1 kg |
Power Adaptor
| Input voltage | 100 – 240V ~ AC, 50/60Hz, 1.2A |
| Output voltage | DC 15.0V |
| Output current | 2.4 A |
| Output power | 36.0 W |
| Average active efficiency | 89.73% |
| Efficiency at low load (10%) | 88.95% |
| No-load power consumption | 0.07W |
Specifications subject to change without notice.
Support
If you require further assistance with your new Majority Bard radio, please contact our support team on the Majority website: www.majority.co.uk/support
Safety Information
- Read these instructions.
- Keep these instructions. Instructions are also available for download at www.majority.co.uk.
- Heed all warnings.
- Follow all instructions.
- Do no clean the apparatus near or with water.
- Do not block any ventilation openings. Install in accordance with the manufacturer's instructions.
- Do not block any ventilation openings. Install in accordance with the manufacturer's instructions.
- Do not install near any heat sources such as radiators, heat registers, stoves, or other apparatus that produce heat.
- Protect the power from being walked on or pinched particularly at plugs, convenience receptacles, and the point where they exit from the apparatus.
- Only use accessories specified by the manufacturer.
- Unplug this apparatus during light storms or when unused for long periods of time.
- Refer all servicing to qualified service personnel.
- No naked flame sources, such as a lit candle should be placed on the apparatus.
- Dispose of used electrical products and batteries safely according to your local authority and regulations.
ADDITIONAL WARNINGS
The apparatus shall not be exposed to dripping, splashing or objects filled with water.
The main plug is used to disconnect the device. In order to disconnect the apparatus from the main mains completely, the mains plug should be disconnected from the main socket outlet completely.
Battery shall not be exposed to excessive heat.

Please read all instructions carefully before use and keep for future reference.
 Risk of electric shock. Do not open.
Read all instructions carefully before use and keep for future reference.
![]() When servicing, use only identical replacement parts.
When servicing, use only identical replacement parts.
Please read all instructions carefully before use and keep for future reference
Documents / Resources
References
![play.google.com]() Google Play
Google Play![itunes.apple.com]() UNDOK on the App Store
UNDOK on the App StoreSpotify - Connect
![www.spotify.com]() Pagina niet gevonden - Spotify
Pagina niet gevonden - Spotify![www.majority.co.uk]() Support – Majority
Support – Majority![www.majority.co.uk]() Majority – Home Audio | DAB & Internet Radios | Soundbars
Majority – Home Audio | DAB & Internet Radios | Soundbars
Download manual
Here you can download full pdf version of manual, it may contain additional safety instructions, warranty information, FCC rules, etc.
Advertisement


Need help?
Do you have a question about the Bard and is the answer not in the manual?
Questions and answers