Table of Contents
Advertisement
Quick Links
Advertisement
Table of Contents

Related Manuals for midiplus SmartPAD II


Summary of Contents for midiplus SmartPAD II
- Page 1 SmartPAD II Owner's Manual MIDIPLUS Co., Ltd. Manual 001 V.0.1 - June 2022...
-
Page 2: Table Of Contents
Connect the steps ..........................1 Software Setup ............................. 1 Chapter 1:Quick Start ........................2 1.1. SmartPAD II panel Overview ....................2 1.1.1. Function and mode of 8 encoder knobs ..............2 1.1.2. Four main function buttons ..................3 1.1.3. Four navigation buttons ....................3 1.1.4. -
Page 3: Preface
Preface Congratulations on your purchase of the MIDIPLUS SmartPAD II primary MIDI controller. It is one of the best in its class, has been extensively researched and is the MIDI controller that users need. When you combine the MIDIPLUS SmartPAD II with your computer and the right music software, you will be able to discover the wonderful world of computer music, getting a complete set of instruments from your sound card or workstation. -
Page 4: Chapter 1:Quick Start
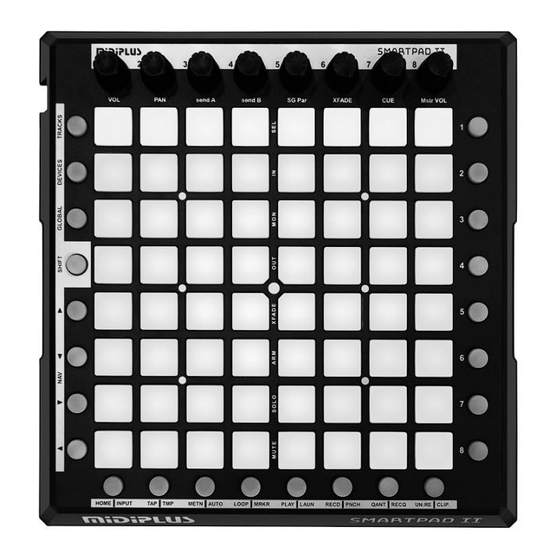
Chapter 1:Quick Start 1.1. SmartPAD II panel Overview 8 encoder knobs 4 main function buttons 4 navigation buttons 8 controller enable buttons 8 scene start buttons 64 Clip startup buttons 1.1.1. Function and mode of 8 encoder knobs ◼ TRACKS mode—8 knobs enable the controller to select the track: Knob 1(VOL): adjust the volume of the track. -
Page 5: Four Main Function Buttons
RECD|PNCH button– This button enables the recording function, SHIFT+ this button enables Punch In and Punch Out functions. ◼ QANT|RECQ button– This button enables quarter function, SHIFT+ this button enables RECQ function. ◼ UN:RE|CLIP. button– This button is used to edit undo and redo, and SHIFT+ enables CLIP. MIDIPLUS Co, Ltd. http://www.midiplus.com.tw... -
Page 6: Eight Scene Start Buttons
Eight scene start buttons ◼ 1~8 button– Eight buttons are Clip that enables eight-line scenes to play. 1.1.6. 64 Clip start buttons (8x8) ◼ 64 Clip button– 64 Clip buttons enable Ableton LIVE software to play in 8 tracks. MIDIPLUS Co, Ltd. http://www.midiplus.com.tw... -
Page 7: Chapter 2: Detailed Function Description
Tracks Button Devices Button Global Button Single Press Single Hold Tracks Quick Mode Device Quick Mode Select Master Tracks Double Press Show/Hide Device mode Double Hold Tracks Quick Mode Show/Hide Device mode window Select Master Tracks MIDIPLUS Co, Ltd. http://www.midiplus.com.tw... -
Page 8: Gesture Function Of Four Navigation Buttons
Shift+Single Hold MIDI Arrangement On/Off Midi CREATE CLIP 2 Bar Quantization: None Punch-Out On/Off REC.Q OFF Shift+Double Press Midi CREATE CLIP 3 Bar Quantization: Auto add Loop On/Off MIDI REC.Q Shift+Double Hold Midi CREATE CLIP 4 Bar MIDIPLUS Co, Ltd. http://www.midiplus.com.tw... -
Page 9: Graphic Description Of Functions
Hold down the "TRACKS" button, and eight knobs control the track's function, as shown below. 1.3.2. Knob function of Devices mode Hold down the "DEVICES" button, and eight knobs control the Device Title Bar's function, the Audio Effect Rack window knob is shown below. MIDIPLUS Co, Ltd. http://www.midiplus.com.tw... -
Page 10: Knob Function Of Global Mode
The default mode of the 64 Clip buttons is Session mode. The status of the 64 Clip buttons on the hardware is synchronized with that of the LIVE software. As shown in the following picture, the hardware Clip button and the software interface are in the same state. MIDIPLUS Co, Ltd. http://www.midiplus.com.tw... -
Page 11: Clip Buttons Of Tracks Setting Mode
Clip button light will display the new status. You can observe the function description of LIVE software affixed to the Clip button picture below, so that you can find the button position of the corresponding function. MIDIPLUS Co, Ltd. http://www.midiplus.com.tw... -
Page 12: Function Diagram Of The Eight Controller Enable Buttons
MIDI ON : 0x90 0x00 0xXX (XX: 0x48~0x6F)(Hex). MIDI OFF:0x90 0x00 0x00 0xXX Value Query the number corresponding to the color diagram. Note: The number in this picture is the third note of decimal value (velocity value). MIDIPLUS Co, Ltd. http://www.midiplus.com.tw... - Page 13 Control white LED(Solid State): ON:0x90 0x00 0x57 OFF:0x90 0x00 0x00 Note: You need to change the LED color, you must send the MIDI OFF command to turn off the light before you can change the other color. MIDIPLUS Co, Ltd. http://www.midiplus.com.tw...
-
Page 14: Minimum System Requirement
1.4. Minimum System Requirement If you are using your SmartPAD II with a computer, the following minimum system requirements need: Windows Mac OS Pentium 3800 MHz or higher. Macintosh G3*800/G4*733 MHz or higher. CPU requirement may be higher laptops. CPU requirement may be higher for laptops. -
Page 15: Safety Instructions
Ensure that children do not detach any small parts from the unit. They could swallow the pieces! Do not use open light or fire in the near of the SmartPAD II. The plastic cabinet can burn, and this can cause a fire! Cleaning the SmartPAD II When cleaning the SmartPAD II, never use gasoline, alcohol, or solvent. - Page 16 Please follow this signs on the packaging Disposal of your old SmartPAD II The SmartPAD II itself should not be disposed in your normal waste. All electronics should be disposed like usual for special electronic waste in your country.
Need help?
Do you have a question about the SmartPAD II and is the answer not in the manual?
Questions and answers