Advertisement
Quick Links
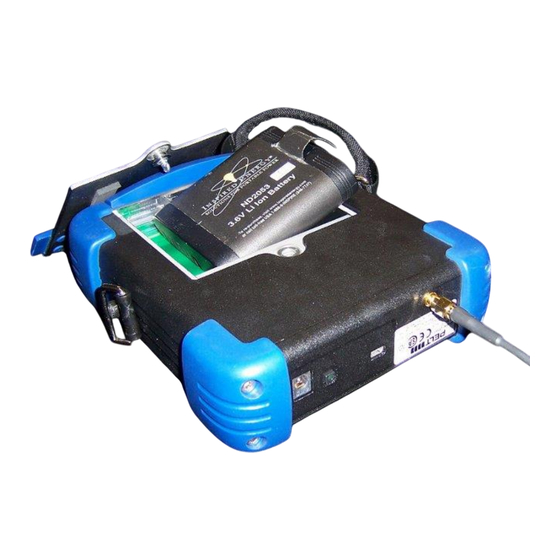
1.
Insert a charged battery by opening the battery compartment door on the bottom of the gauge. A flat blade screw
driver or similar tool (a thin coin) is needed to unlock & lock the latch.
2.
The battery can be charged before use in the charger kit included with the PELT system. The battery will also be
charged in the uPELT-ts unit when powered from the included 5VDC wall adapter.
3.
Connect the PELT-uPts-CBL150 coax cable to the brass connector and attach the desired transducer and
WearCap to the other end of the cable.
05-Dec-2014
uPELT-ts Quick Start Guide
µPELT-ts Quick Start Guide
www.Imaginant.com/PELT
Advertisement

Subscribe to Our Youtube Channel
Related Manuals for BYK mPELT-ts


Summary of Contents for BYK mPELT-ts
- Page 1 µPELT-ts Quick Start Guide uPELT-ts Quick Start Guide Insert a charged battery by opening the battery compartment door on the bottom of the gauge. A flat blade screw driver or similar tool (a thin coin) is needed to unlock & lock the latch. The battery can be charged before use in the charger kit included with the PELT system.
- Page 2 µPELT-ts Quick Start Guide Power ON the gauge entering the Job Start touch screen shown below. Read Order Sequence Select Panel File Select Start Live Measurement Position Markers (gates) Select Calibration Change Settings Battery Fuel Gauge and Host Connection Icons Tap the Cals button to enter the Calibration Select screen.
- Page 3 µPELT-ts Quick Start Guide Select <New Job> from the ‘Select a Job’ field. Tap <Auto-Number> or select existing panel file from the list in the ‘Panel’ field. Auto shortcut button resets to New Job & Auto-Number Tap the Start button to start the live PELT waveform. Connected to Host Icon 05-Dec-2014 www.Imaginant.com/PELT...
- Page 4 µPELT-ts Quick Start Guide Tap the Capture button in the Capture Screen to acquire the waveform and to advance to the next measurement point. NOTE: Tapping anywhere inside the live wave box is the same as tapping the Capture button. Generic point names indicate an Auto-Number job, not using a Panel File.
- Page 5 µPELT-ts Quick Start Guide Select Gauge Import or the Gauge Import icon, the UP arrow in the toolbar. Select any destination folder on the host computer using the Browse button or leave the default. Choose the desired job file from the displayed list, and select the Open button. Open will download the file to the shown directory and automatically display the wave file in a PELT Manager window.
- Page 6 µPELT-ts Quick Start Guide Placing Markers in PELT Manager The Marking Screen is used to position markers (gates) on features that indicate layer boundaries for each selected wave point. Reviewing the proper guide wave found in the Calibration File will help identify the proper peaks.
- Page 7 µPELT-ts Quick Start Guide Placing Markers on the Gauge Select a Job to be marked from the Job Start screen. Jobs must be previously captured and saved before they can be marked. Select the Job to mark in the Job Start screen and tap Mark. The markers associated with the Cal Record used will be displayed in the Place Markers screen.
- Page 8 µPELT-ts Quick Start Guide Copy a Calibration Record to the Gauge from the Host Computer Power ON your gauge and return to the Job Start screen. Connect the uPELT gauge to the host PC. Start PELTManager on the host. Close all waveform windows if the application is already open. Select Gauge\Cal Records from the menu bar pulldown.
- Page 9 µPELT-ts Quick Start Guide The LEFT box indicates calibrations in the CA2 file on the host computer. The RIGHT box lists calibration records on the gauge. Selecting a record in either list will highlight layer details in the box below. Drag the desired cal record from the LEFT box (computer) to the RIGHT box (gauge) to copy.
- Page 10 µPELT-ts Quick Start Guide Important Settings Screens There are a number of gauge settings that are managed from the Settings screens, accessed with the ‘Tools’ icon at the Job Start Screen. These are arranged as tabs organized by basic function. In most cases, gauge settings are persistent. The last settings used will remain even after turning the gauge off.
Need help?
Do you have a question about the mPELT-ts and is the answer not in the manual?
Questions and answers