Table of Contents
Advertisement
Quick Links
Advertisement
Table of Contents

Related Manuals for Inkbird ICC-510


Summary of Contents for Inkbird ICC-510
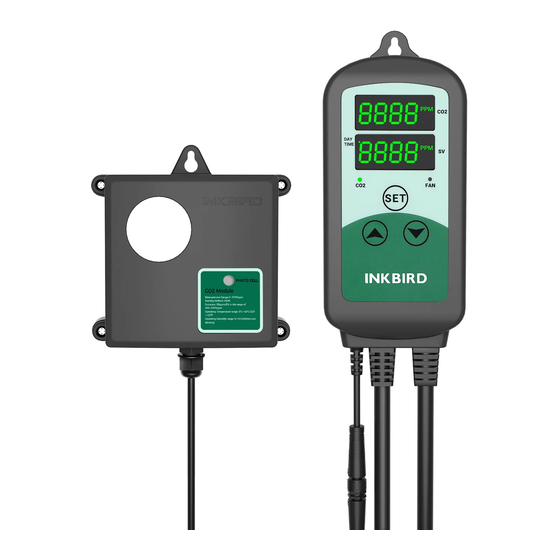
- Page 1 User Manual CO₂ Controller ICC-510...
- Page 2 Warm tips To quickly jump to a specific chapter page, click on the relevant text on the contents page. You can also use the thumbnail or document outline in the top left corner to quickly find a specific page.
- Page 3 QR code below to visit our official website for product usage videos. For any usage issues, please feel free to contact us at support @inkbird.com. Wenn Sie eine Bedienungsanleitung in deutscher Sprache benötigen, scannen Sie bitte den QR-Code und besuchen Sie unsere Website, um sie zu erhalten und ein Video über die...
-
Page 4: Table Of Contents
Overview Product Diagram Operation Instructions Troubleshooting Guide Technical Specifications Important Notes/Warnings Cleaning and Maintenance Customer Service... -
Page 5: Overview
Overview The INKBIRD ICC-510 is a plug and play CO2 controller that comes with a professional grade CO2 sensor manufactured to ANSI/ ASHRAE Standard 62.1-2022+Addendum ab (31 October 2023) RESET Grade B and provides you with Plant Mode and Human Mode for different usage scenarios. -
Page 6: Control Panel
2.1 Control Panel DAY TIME indicator light: Flashes in daytime mode, dims in nighttime mode. CO2 indicator light: The CO2 outlet is outputting when it is lit. : Setting button; Press and hold it to enter/exit the setting mode. : In the setting mode, press to adjust the relevant parameter. - Page 7 2.2 Outlet CO2: Plug the CO2 device into this outlet. FAN: Plug the air ventilation fan into this outlet. 2.3 Product Size and Cords 4.3CM/1.7IN 10.3CM/4.1IN Length 200CM/78.7IN...
-
Page 8: Operation Instructions
3.5CM/1.4IN 7.2CM/2.8IN Length 150CM/95IN Operation Instructions 3.1 Install CO2 Sensor... - Page 9 3.2 Power On Plug the controller to a power source. 1) The screen will first display 2) Wait for 3 seconds, it will display 3) Wait for 3 seconds again, it will display numeric values.
- Page 10 3.3 Menu and Symbols SV Display CO2 Display Function Meaning Range Screen Screen Description Plant mode without fan, see 3.4.1 (CO2) Plant mode with fan, CO2 or Fan (CF) see 3.4.2 (botH) Human mode, see 3.4.3 (FAN) 1200ppm When CO2 ≤ 1200ppm, 0~9950 CO2 on value (custom)
- Page 11 3.4.1 Plant Mode without Fan Only for CO2 devices, such as a CO2 regulator or generator. (For Human Mode, see section 3.4.3) NOTE: Please note that the photo sensor only works for the CO2 outlet. When there is light, it will turn the CO2 outlet on/off based on the set values;...
- Page 12 (ON) (ALM) ALM=alarm; Press to select to turn on/off the alarms. (Set the alarm value only when you select (9999ppm) (AH) AH=High CO2 alarm; Press to adjust the high CO2 alarm value, then press to confirm. (0ppm) (AL) AL=Low CO2 alarm; Press to adjust the low CO2 alarm value, then press to confirm.
- Page 13 Press and hold the button to enter the setting mode. (botH) (CF) Press to select , which means that both the CO2 and fan outlets are enabled, then press the button. (1200ppm) (Con) Press to adjust the CO2 start value, then press the button.
- Page 14 (ON) (ALM) ALM=alarm; Press to select to turn on/off the alarms. (Set the alarm value only when you select (9999ppm) (AH) AH=High CO2 alarm; Press to adjust the high CO2 alarm value, then press to confirm. (0ppm) (AL) AL=Low CO2 alarm; Press to adjust the low CO2 alarm value, then press to confirm.
- Page 15 Press and hold the button to enter the setting mode. (FAN) (CF) Press to select FAN, which means that only the FAN outlet is enabled, then press the button. (800ppm) (Fon) Press to adjust the FAN start value, then press the button.
- Page 16 (0ppm) (AL) AL=Low CO2 alarm; Press to adjust the low CO2 alarm value, then press to confirm. Press and hold the button to save and exit the setting mode, or the controller will automatically save and exit after 30 seconds of inactivity. In setting mode, it displays the menu character;...
- Page 17 3.5.2 Professional Calibration NOTE: Please place the CO2 sensor in an environment with a stable CO2 level, otherwise the calibration time may be prolonged or the calibration may fail. If the CO2 level in the current environ- ment fluctuates greatly, please use the general calibration. 1) With the controller running, press and hold the buttons simultaneously for 2 seconds until the SV screen dis- plays...
- Page 18 2) Press the button to switch to 3) Press to select 4) Then, set the alarm values using the same method. NOTE: If the device is sounding an alarm, press any button to stop the alarm. 3.6.2 Disable the audible alarm 1) When running, press and hold the button for 2 seconds to enter the setting mode.
-
Page 19: Troubleshooting Guide
Technical Specifications 5.1 Controller Brand: INKBIRD Model Number: ICC-510 Input Power: 100~240Vac 50/60Hz 10A MAX Output Power: 100~240Vac 50/60Hz 10A MAX Operating Environment Temperature: Room temperature Storage Environmen Temperature: 0℃~60℃/32℉~140℉ Storage Environmen Humidity: 20~80%RH (unfrozen or non- condensing state) 5.2 CO2 Sensor... -
Page 20: Important Notes/Warnings
During this period, products that prove to be defective will, at the discretion of INKBIRD, be either repaired or replaced without charge. For any problems in use, please feel free to contact us at support@inkbird.com. - Page 21 Shenzhen Inkbird Technology Co.,Ltd. support@inkbird.com Consignor: Shenzhen Inkbird Technology Co., Ltd. Office Address: Room 1803, Guowei Building, No.68 Guowei Road, Xianhu Community, Liantang, Luohu District, Shenzhen, China Manufacturer: Shenzhen Inkbird Technology Co., Ltd. Factory Address: 6th Floor, Building 713, Pengji Liantang Industrial Area, No.2 Pengxing Road, Luohu District, Shenzhen, China...
Need help?
Do you have a question about the ICC-510 and is the answer not in the manual?
Questions and answers