Table of Contents
Advertisement
Quick Links
Advertisement
Table of Contents

Related Manuals for Inkbird ITC-312


Summary of Contents for Inkbird ITC-312
- Page 1 ITC-312 BLUETOOTH SMART TEMPERATURE CONTROLLER...
-
Page 3: Table Of Contents
CONTENTS Overview Cleaning and Maintenance Technical Specifications Important Notes/Warnings Product Diagram Troubleshooting Guide Operation Instructions FCC Requirement APP Installation & Connection IC Warning Customer Service... -
Page 4: Overview
For any usage issues, please feel free to contact us at support@inkbird.com. Overview The ITC-312 Bluetooth Smart Temperature Controller has three control functions--general temperature mode, day/night mode, and time mode, and supports two setting methods--range method and return differential method, making it more flexible to use. Users can choose the setting method according to their usage habits. -
Page 5: Technical Specifications
100 meters in an open area NOTE: For the first use or after unplugging the controller for more than 10 days (when displayed on the device), please login to the INKBIRD app to connect the controller to have it synchronize the clock and work regularly. -
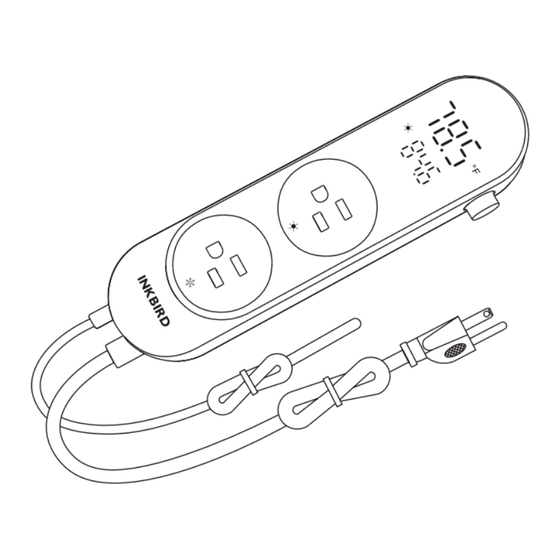
Page 6: Product Diagram
Product Diagram... - Page 7 White Light LED Current Temperature and Unit Target Temperature Temperature Unit Heating Symbol Cooling Symbol Bluetooth Symbol...
-
Page 8: Operation Instructions
Rotary Button Button Function Press and hold it for 2 seconds to enter or exit setting; in the setting state, short Rotary press to select the setting menu; in the non-setting state, short press to Button authorize Bluetooth connection; rotate up or down to adjust the parameter. Output Port (HEATING &... - Page 9 Temperature range setting mode: Separately set start and stop temperatures for heating and cooling devices. (Recommended) Temperature return difference setting mode: Set the target temperature and the return difference value of heating and cooling temperatures. (Select this method if you are more accustomed to the setting logic of the ITC-308.) 4.2 Running Mode Guideline Select the device operating mode through the App: Temperature mode (default), Day/Night...
- Page 10 4.3 Description of the Menu Characters Character Function Range Default Temperature unit switch C or F -40.0℃~100℃ 50℃ High-temperature alarm -40.0℉~212℉ 122℉ -40.0℃~100℃ 0℃ Low-temperature alarm -40.0℉~212℉ 32℉ Refrigeration delay 0~10 minutes 0 minute -4.9℃~4.9℃ 0.0℃ Temperature calibration -9.9℉~9.9℉ 0.0℉ Alarm sound ON or OFF...
- Page 11 4.4 How To Quick Set Target Temperature 4.4.1 Temperature Range Setting Mode Press the knob button to enter the quick setting of target temperature. The screen will display the character and the start heating temperature, with the latter flashing. Turn the knob button to adjust the parameter, then press the knob button to confirm and switch to the setting of end heating temperature ( ), start cooling temperature (...
- Page 12 -40.0℃~100℃ 25.0℃ End cooling temperature -40.0℉~212℉ 77.0℉ 4.4.2 Temperature Return Difference Setting Mode Press the knob button to enter the quick setting of target temperature. The screen will display the character and the start heating temperature, with the latter flashing. Turn the knob button to adjust the parameter, then press the knob button to confirm and switch to the setting of heating differential value ( ) and cooling differential value (...
-
Page 13: App Installation & Connection
APP Installation & Connection INKBIRD APP 5.1 Search the INKBIRD App from Google Play or App Store to get it for free, or you can scan the QR code to download it directly. - Page 14 5.2 Registration Step1: Registering an account is necessary before using the INKBIRD app for the first time. Step2: Open the app, select your Country/Region, and a verification code will be sent to you. Step3: Enter the verification code to confirm your identity, and the registration is complete.
- Page 15 5.3 How to Connect Open the INKBIRD app and click the "+" in the top right corner to add a device. Then follow the app's instructions to complete the connection. Please make sure to place the device as close to your smartphone as possible during the connection process.
- Page 16 Select the setting method Set the temperature unit (Set temperature range or Set temperature return difference)
- Page 17 Set the temperatures Select the running mode of the device (Temp Mode, Day/Night Mode, or Time Mode)
- Page 18 Set the high and Set the refrigeration delay low-temperature alarms...
- Page 19 5.4.2 Main Interface Introduction Go to the Product model Settings page Go to Set Temperatures History records Alarm records Select Running Mode...
- Page 20 5.4.3 Setting Interface Introduction Go to the Settings page...
- Page 21 Set the Temperatures Select Running Mode...
- Page 22 Heating Cooling condition condition History records Alarm records...
- Page 23 5.4.4 Introduction to the Temperature Range Main Interface and the Temperature Setting Pop-up Window Temp Mode Heating/Cooling in progress and working time Main interface...
- Page 24 Day/Night Mode Main interface Set the tempera- tures for Day/Night...
- Page 25 Time Mode Rename the current time segment Main interface Set the periodic temperatures...
-
Page 26: Cleaning And Maintenance
Cleaning and Maintenance 6.1 Please make sure to unplug the temperature controller before cleaning. If cleaning is necessary, use a dry, clean cloth to wipe it; do not clean with water or a wet cloth. 6.2 Do not place it where children can touch it. Store in a dry, ventilated place. Important Notes/Warnings 7.1 KEEP CHILDREN AWAY. -
Page 27: Troubleshooting Guide
1. Check that your smartphone has Bluetooth enabled. 2. Check that the device is in the connecting state. Display Please login to the INKBIRD app to connect the controller to have it synchronize the clock and work regularly. Incorrect probe readings? - Page 28 D. Turn the knob button to the left, and the heating symbol will light up on the LED, indicating that the heating output is open. At this point, check that the unit is turned on. E. Turn the knob button to the right, and the cooling symbol will light up on the LED, indicating that the cooling output is open.
-
Page 29: Fcc Requirement
Wipe to clean the stainless steel part of the probe and blow with a hairdryer to completely evaporate the moisture inside the probe (making sure that the device is disconnected from the power supply). Outlet melted/burnt? Please check that the load power of the external device is within the rated power of this product, 1200W (120Vac) or 2200W (220Vac), or contact Customer Support instead. - Page 30 Note: This equipment has been tested and found to comply with the limits for a Class B digital device, pursuant to Part 15 of the FCC Rules. These limits are designed to provide reasonable protection against harmful interference in a residential installation. This equipment generates, uses, and can radiate radio frequency energy, and if not installed and used in accordance with the instructions, may cause harmful interference to radio communications.
-
Page 31: Ic Warning
IC Warning This device contains licence-exempt transmitter(s)/receiver(s) that comply with Innovation, Science and Economic Development Canada’s licence-exempt RSS(s). Operation is subject to the following two conditions: (1) This device may not cause interference. (2) This device must accept any interference, including interference that may cause undesired operation of the device. L'émetteur/récepteur exempt de licence contenu dans le présent appareil est conforme aux CNR d'Innovation, Sciences et Développement économique Canada applicables aux appareils radio exempts de licence. L'exploitation est autorisée aux deux conditions suivantes : 1)L'appareil ne doit pas produire de brouillage; 2)L'appareil doit accepter tout brouillage radioélectrique subi, même si le brouillage est susceptible d'en compromettre le fonctionnement. The device meets the exemption from the routine evaluation limits in section 2.5 of RSS 102 and compliance with RSS-102 RF exposure, users can obtain Canadian information on RF exposure and compliance. -
Page 32: Customer Service
During this period, products that prove to be defective will, at the discretion of INKBIRD, be either repaired or replaced without charge. For any problems in use, please feel free to contact us at support@inkbird.com. We will do our best to help you. - Page 33 Shenzhen Inkbird Technology Co.,Ltd. support@inkbird.com Consignor: Shenzhen Inkbird Technology Co., Ltd. Office Address: Room 1803, Guowei Building, No.68 Guowei Road, Xianhu Community, Liantang, Luohu District, Shenzhen, China Manufacturer: Shenzhen Inkbird Technology Co., Ltd. Factory Address: 6th Floor, Building 713, Pengji Liantang Industrial Area, No.2 Pengxing Road, Luohu District, Shenzhen, China V2.0...
Need help?
Do you have a question about the ITC-312 and is the answer not in the manual?
Questions and answers