Advertisement
Advertisement
Table of Contents

Related Manuals for Inkbird IIC-600-WIFI


Summary of Contents for Inkbird IIC-600-WIFI
- Page 1 SMART SPRINKLER CONTROLLER IIC-600-WIFI U S E R M A N U A L V1.0...
-
Page 3: Table Of Contents
CONTENTS 01 Overview 02 Features & Specifications 03 Product Diagram 04 Operation Instructions 05 Installation 06 Troubleshooting Guide 07 Product Warranty 08 FCC Requirement 09 Irrigation Schedule Table... -
Page 4: Overview
01 OVERVIEW INKBIRD IIC-600-WIFI is a smart sprinkler controller that can upgrade our water pipes into a smart automation system, saving us plenty of time we used to spend on watering. Also, it has Wi-Fi capability that enables us to control and monitor irrigation from our smartphones. -
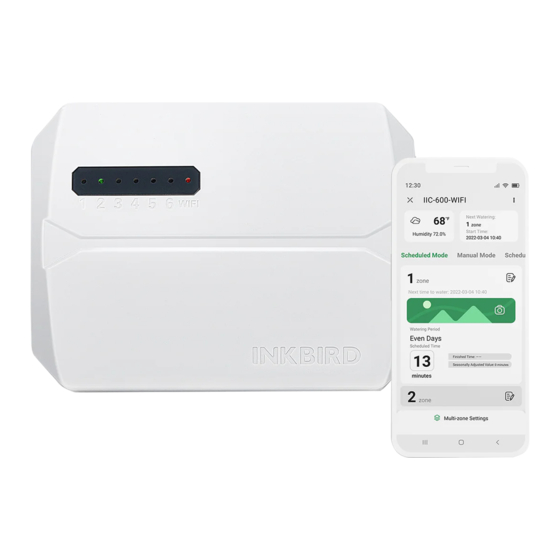
Page 5: Product Diagram
03 PRODUCT DIAGRAM Wi-Fi Button Indicators of Wi-Fi Setting Button Connection and Start/Stop Button Irrigation Zone Common Port Zone1~6 24Vac /1A Power Valve Ports Adaptor Port Master Valve Port Rain Sensor Port... -
Page 6: Operation Instructions
04 OPERATION INSTRUCTIONS INKBIRD APP SETTINGS Download the App Search the keyword “INKBIRD” in App Store or Google Play, or scan the QR code on the left to download and install the APP. Pair Your Phone United States United States... - Page 7 Open the app and enter the login interface. You can log in by your Apple ID or Google ID. You can also click register and use your email address as prompted to register. Registration and login are completed. Congratulation that you created your family successfully.
- Page 8 Click “+” on the top right corner to add a device. Find and click IIC-600-WIFI on All Devices or Device Category. 1/ Power on the device IIC-600-WIFI...
- Page 9 2/ Confirm the Wi-Fi icon status and click the relevant icon on the app. Wi-Fi Wi-Fi Note: If the Wi-Fi icon on the device is in the Stay Lit or No Display status, click the relevant icon on the app and follow the steps below.
- Page 10 Wi-Fi Wi-Fi Fast Flash: Press and hold the button for 2 seconds to reset the Wi-Fi connection, and make sure the Wi-Fi indicator flashes quickly. Slow Flash: Press and hold the button for 2 seconds to reset the Wi-Fi connection. When the Wi-Fi indicator is quickly flashing, short press the button again to switch to the slow flashing state.
- Page 11 3/ SmartConfig Connection Mode (Fast Flash) Wi-Fi Select your Wi-Fi device name, enter the Wi-Fi password, and click “Next Step” to start the connection.
- Page 12 Cancel Pairing is successful.
- Page 13 4/ AP Connection Mode (Slow Mode) Wi-Fi Select your Wi-Fi device name, enter the Wi-Fi password, and click “Next Step”to start the connection.
- Page 14 Go to Connect Click “Go to Connect” to go to your phone's WLAN setting page, select the “SmartLife-XXXX” to connect to the router, and then return to the connection page.
- Page 15 Cancel Pairing is successful.
- Page 16 APP OPERATION Main Interface Device Name Menu Information IIC-600-WIFI Back to Local Weather Home Page Conditions Scheduled Mode / Manual Mode/ Schedules & History Zone Number Edit Schedules Edit Multi-zone Schedules...
- Page 17 Main Interface Back to Home Page Rain Sensor Switch Master Valve Switch Master Valve Switch Seasonally Adjusted Value More Information Reset Parameters Power ON/OFF...
- Page 18 Scheduled Watering Interface Information of the upcoming irrigation IIC-600-WIFI zone IIC-600-WIFI Information of current irrigating zone 0 minutes Finished Time Seasonally 7 minutes Adjusted Value 0 minutes Scheduled Time Remaining Time Watering Period Zone Number Cancel irrigation of the current zone and activate irrigation of the next zone in the sequence.
- Page 19 Setting Interface of Scheduled Watering Confirm the settings Shut down the zone Cancel the setting and restore the last setting parameters Zone description, such as“Front yard garden” Watering Peroid Choose to obey or ignore the rain sensor on this zone Scheduled irrigation time Start Time Shut down the zone and...
- Page 20 Setting Interface of Manual Watering IIC-600-WIFI IIC-600-WIFI Zone Number Manual watering time Start irrigation Multi-zone Settings Stop irrigation at the current zone and enter the next zone...
- Page 21 IIC-600-WIFI Finished Time Remaining Time Stop all irrigation...
- Page 22 DEVICE OPERATION Manual Mode Press the button to enter the setting mode, and the indicator lights of each channel are on. When setting channel one, the indicator of channel one flashes. Press the button to cancel the manual irrigation of that channel and enter the setting of the next channel.
-
Page 23: Installation
05 INSTALLTION Controller Installation Choose a proper place for installation where we can connect the device to an external power source. Please make sure the distance between the device and the power socket is under 6 feet (1.8 meters). Meanwhile, you should leave proper heights and space to install conduits of the device. - Page 24 You can tighten up both holes on the bottom using screws just in case, though it would be uneasy to disassemble them afterward. Wiring connection a) Connect zone valves Connect the power supply of each zone valve to the terminal of the controller, corresponding to the zone number.
- Page 25 The connection method of the pump start relay and the controller is the same as that of the main valve, but the connected water source is different. Note: The IIC-600-WIFI controller does not provide the main power supply for the water pump.
- Page 26 d) Connect rain sensors (optional) Remove the jumpers for port 24 VAC- and port S on the terminal.
- Page 27 Separately connect the line of the rain sensor to port 24 VAC- and port S. Note: The 24 VAC- port is a common port. You must connect the S port with the 24 VAC- port if there is no rain sensor connected.
- Page 28 Connect Power Supply This controller adopts an adapter following local safety regulations' certification, which is convenient and safe. Insert the power output end into the PWR IN jack of the device. Put power lines into the line slots of the device. Note: PLEASE DO NOT turn on the power before confirming all lines are well connected.
- Page 29 Wiring Diagram Valve 3 Valve 4 Valve 5 Valve 6 Valve 1 Valve 2 24VAC Power Adapter Master valve...
-
Page 30: Troubleshooting Guide
Here are some possible reasons and relative solutions for reference. We hope they are helpful. For any further questions, please feel free to contact INKBIRD. Q: The water supply is not available? A: Please confirm if the water main is connected and if all water pipes are open and work normally. -
Page 31: Product Warranty
07 PRODUCT WARRANTY This item carries a 2-year warranty against defects in either components or workmanship. During this period, products that prove to be defective will, at the discretion of INKBIRD, be either repaired or replaced without charge. 08 FCC REQUIREMENT Changes or modifications not expressly approved by the party responsi- ble for compliance could void the user’s authority to operate the... -
Page 32: Irrigation Schedule Table
– Increase the separation between the equipment and receiver. – Connect the equipment into an outlet on a circuit different from that to which the receiver is connected. – Consult the dealer or an experienced radio/TV technician for help. This equipment complies with FCC radiation exposure limits set forth for an uncontrolled environment. - Page 33 WATERING DEFINI- WATERING WATERING ZONE DURATION TION START TIMES CYCLIC DAYS TIME Days of the week: am/pm am/pm Mon. Tue. Wed. Thur. Fri. Sat. Sun. am/pm am/pm odd days even days am/pm am/pm every ____ days Days of the week: am/pm am/pm Mon.
- Page 34 WATERING DEFINI- WATERING WATERING ZONE DURATION TION START TIMES CYCLIC DAYS TIME Days of the week: am/pm am/pm Mon. Tue. Wed. Thur. Fri. Sat. Sun. am/pm am/pm odd days even days am/pm am/pm every ____ days...
- Page 36 INKBIRD TECH.C.L. support@inkbird.com Factory address: 6th Floor, Building 713, Pengji Liantang Industrial Area, NO.2 Pengxing Road, Luohu Disctrict, Shenzhen, China Office address: Room 1803, Guowei Building, NO.68 Guowei Road, Xianhu Community, Liantang, Luohu District, Shenzhen, China V1.0...
Need help?
Do you have a question about the IIC-600-WIFI and is the answer not in the manual?
Questions and answers