Table of Contents
Advertisement
Available languages
Available languages
Quick Links
Advertisement
Table of Contents

Related Manuals for iScooter iX8


Summary of Contents for iScooter iX8
- Page 1 www.iscooterglobal.eu support@iscooterglobal.com...
- Page 2 01 ~ 16 18 ~ 33 35 ~ 50 52 ~ 67 69 ~ 84 86 ~ 101...
-
Page 3: Table Of Contents
TABLE OF CONTENTS SAFETY INSTRUCTIONS PRODUCT OVERVIEW UNFOLDING & FOLDING DISPLAY SCREEN BUTTONS & FUNCTIONS SETTINGS ERROR CODES DISC BRAKE ADJUSTMENT BATTERY & CHARGER MAINTENANCE PARAMETERS WARRANTY... - Page 4 TABLE DES MATIÈRES CONSIGNES DE SÉCURITÉ APERÇU DU PRODUIT DÉPLIAGE & PLIAGE ÉCRAN D'AFFICHAGE BOUTONS & FONCTIONS PARAMÈTRES CODES D'ERREUR RÉGLAGE DU FREIN À DISQUE BATTERIE & CHARGEUR ENTRETIEN PARAMÈTRES GARANTIE...
- Page 5 INHALTSÜBERSICHT SICHERHEITSHINWEIS PRODUKTÜBERSICHT ENTFALTEN & FALTEN ANZEIGEBILDSCHIRM TASTEN & FUNKTIONEN EINSTELLUNGEN FEHLERCODES EINSTELLUNG DER SCHEIBENBREMSE BATTERIE & LADEGERÄT WARTUNG PARAMETER GARANTIE...
- Page 6 INDICE DEI CONTENUTI ISTRUZIONI DI SICUREZZA PANORAMICA DEL PRODOTTO DISPIEGATURA & PIEGATURA SCHERMO PULSANTI & FUNZIONI IMPOSTAZIONI CODICI DI ERRORE REGOLAZIONE DEL FRENO A DISCO BATTERIA & CARICABATTERIE MANUTENZIONE PARAMETRI GARANZIA...
- Page 7 ÍNDICE INSTRUCCIONES DE SEGURIDAD RESUMEN DE PRODUCTOS DESPLEGAR & PLEGAR PANTALLA DE VISUALIZACIÓN BOTONES & FUNCIONES AJUSTES CÓDIGOS DE ERROR AJUSTE DEL FRENO DE DISCO BATERÍA & CARGADOR MANTENIMIENTO PARÁMETROS GARANTÍA...
- Page 8 SPIS TREŚCI WSKAZÓWKI BEZPIECZEŃSTWA PRZEGLĄD PRODUKTÓW ROZKŁADANIE & SKŁADANIE EKRAN WYŚWIETLACZA PRZYCISKI & FUNKCJE USTAWIENIA KODY BŁĘDÓW REGULACJA HAMULCA TARCZOWEGO AKUMULATOR & ŁADOWARKA KONSERWACJA PARAMETRY GWARANCJA...
-
Page 9: Safety Instructions
SAFETY INSTRUCTIONS 1. This product is suitable for adults and no passengers are allowed. 2. Please wear a helmet and other protective equipment when you are riding. 3. Please ride on the road safely and legally. 4. Practice before riding. 5. -
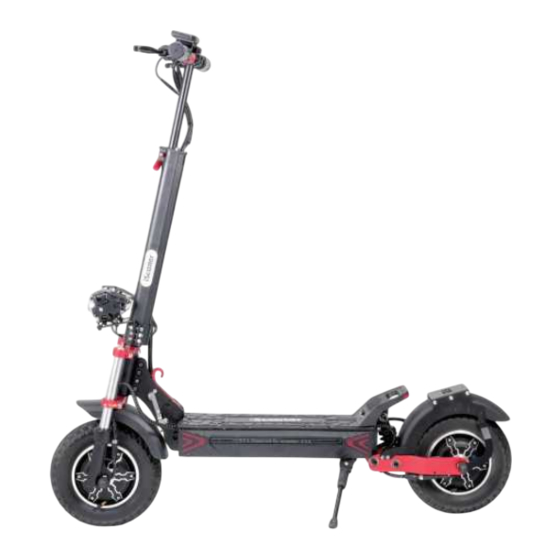
Page 10: Product Overview
PRODUCT OVERVIEW Rear Brake Lever Control Pad Display Screen Trigger Throttle Front Brake Lever Headlight Brake Light Folding Right Indicator Rear Disc Brake Mechanism Kickstand Front Disc Brake Battery Compartment Rear Suspension... -
Page 11: Unfolding & Folding
UNFOLDING & FOLDING Unfolding Steps Step 1: Press down the silver locking lever to disengage it from the upper groove. Step 2: While pushing down the silver locking lever, unfold the steering stem upright until you hear a click. - Page 12 Step 3: Fully close the red safety lever. Step 4: 1. Lift the handlebars upward until the red locking sleeves slide into the threads. 2. Turn the left and right sleeves in the directions of the arrows to fully lock the handlebars.
- Page 13 Step 5: Adjust the handlebars to the desired height and then close the quick release clamp tightly. Folding Steps Step 1: Turn the left and right sleeves in the directions of the arrows to unlock the handlebars. Then fold down the handlebars.
- Page 14 Step 2: Open the QR (quick release) clamp, adjust the height of the handlebars to the lowest, and then close the QR clamp. Step 3: Hold the steering stem, open the red safety lever, and press down the silver locking lever to disengage it from the lower groove. Step 4: Fold down the steering stem until you hear a click.
-
Page 15: Display Screen
DISPLAY SCREEN Dual Single Assist TURBO Distance TRIP Error Icons and meanings Riding mode: Assist TURBO 6 km/h top speed ECO (10 km/h top speed) STD (15 km/h top speed) TURBO (25 km/h top speed) Left indicator Brake applied Right indicator Headlight on Cruise control (blinking) Dual: Dual-wheel drive mode... -
Page 16: Buttons & Functions
Battery level and voltage Voltage Voltage Battery Level Battery Level Voltage Battery Level 50-54.6 V 48.5-49.9 V 47.5-48.4 V 45.5-47.4 V 43.5-45.4 V 41.0-43.4 V (blinking) BUTTONS & FUNCTIONS... - Page 17 Power on/off Press for 3 seconds to turn on/off the scooter. Odometer and trip odometer ODO (odometer) and TRIP (trip odoemter ) will display alternately after the scooter is turned on. Switch between Dual-Motor Drive and Single-Motor Drive Press after turning on the scooter. Select riding modes Press to choose from four modes: 1, 2 ECO, 3 STD,...
-
Page 18: Settings
SETTINGS To enter the settings, press for about 3 seconds after turning on the scooter. Press to select between the setting options: P01, P02, P03, P05, P99, and ODO. After selecting an option, press to to change the settings. Press to save the current setting and skip to the next setting option. -
Page 19: Error Codes
ERROR CODES Transmitting Communication Fault (Yellow) Receiving Communication Fault (Green) Rear Motor Controller Fault Front Motor Controller Fault Accelerator Fault Brake Lever Fault Rear Motor Hall Fault Rear Motor Phase Loss Front Motor Hall Fault Front Motor Phase Loss... -
Page 20: Disc Brake Adjustment
DISC BRAKE ADJUSTMENT You need a hex wrench to loosen the bolt on the cable clamp. • If the disc brake is dragging, slide the arm of the clamp backward along the cable while holding the cable in one hand. Then, retighten the bolt on the brake clamp. •... -
Page 21: Battery & Charger
BATTERY & CHARGER Each scooter has its own battery and charger. Each part has different serial numbers. Please do not charge the scooter with chargers of other brands. Battery Please charge your scooter after you receive this scooter. It is better to fully charge your scooter before first ride. -
Page 22: Maintenance
MAINTENANCE Lubrication Add some lubricant on the folding part of the handlebar every 6 months to keep the handlebar working smoothly. Note: Do not add WD-40 lubes on the scooter. Do not add any lubricant on the front or rear wheel. Tyre Both front and rear tyres are pneumatic tyres. -
Page 23: Parameters
PARAMETERS Unfolding size 127*60*124 cm Folding size 130*30*46 cm SCOOTER Weight 35.85 kg Maximum load 150 kg Maximum speed 25 km/h PERFORMANCE Range 65-70 km BATTERY Capacity 48 V, 20 Ah MOTOR 1,200 W x2 Power Input AC 100-240 V, 50/60 Hz CHARGER Output 54.6 V, 2 A... -
Page 24: Warranty
WARRANTY If any of the parts in the following sheet occurs failure in normal use, please contact us. We will provide complete after-sale service. Quality Warranty Parts Service description period Failure occurs in Motor 2 years Free of charge normal use Failure occurs in Controller 6 months... - Page 25 Warranty becomes invalid if the followings occur: 1. Haven't maintained according to this manual. 2. Broken parts caused by dangerous actions. 3. Disassembling and assembling by users or use of parts of other brands. Broken parts resulting from traffic accidents or impact from external force by users.
-
Page 26: Consignes De Sécurité
CONSIGNE DE SÉCURITÉ 1. Ce produit convient aux adultes et est destiné à être utilisé par une seule personne. 2. Veuillez porter un équipement de protection tel qu'un casque lorsque vous roulez. 3. Veuillez rouler en toute sécurité et légalement sur la route. 4. -
Page 27: Aperçu Du Produit
APERÇU DU PRODUIT Pavé de Écran Accélérateur Levier de commande d'affichage à gâchette frein arrière Levier de frein avant Phare avant Feu de freinage Mécanisme de Frein à disque arrière Indicateur de droite pliage Béquille Frein à disque avant Suspension arrière Compartiment à... -
Page 28: Dépliage & Pliage
DÉPLIAGE & PLIAGE Dépliage des marches Étape 1 : Appuyez sur le levier de verrouillage argenté pour le désen- gager de la rainure supérieure. Étape 2 : Tout en poussant le levier de verrouillage argenté vers le bas, dépliez la tige de direction vers le haut jusqu'à ce que vous entendiez un clic. - Page 29 Étape 3 : Fermez complètement le levier de sécurité rouge. Étape 4 : 1. Soulever le guidon vers le haut jusqu'à ce que les douilles de verrouillage rouges s'insèrent dans les filetages. 2. Tournez les manchons gauche et droit dans le sens des flèches pour verrouiller complètement le guidon.
- Page 30 Étape 5 : Réglez le guidon à la hauteur souhaitée, puis fermez fermement le collier de serrage rapide. Marches pliantes Étape 1 : Tournez les manches gauche et droite dans le sens des flèches pour déverrouiller le guidon. Rabattre ensuite le guidon.
- Page 31 Étape 2 : Ouvrez le collier QR (quick release), réglez la hauteur du guidon au plus bas, puis refermez le collier QR. Étape 3 : Tenez la tige de direction, ouvrez le levier de sécurité rouge et appuyez sur le levier de verrouillage argenté pour le désengager de la rainure inférieure.
-
Page 32: Écran D'affichage
ÉCRAN D'AFFICHAGE Dual Single Assist TURBO Distance TRIP Error Icônes et significations Mode de conduite : Assist TURBO Vitesse maximale de 6 km/h ECO (Vitesse maximale de 10 km/h) STD (Vitesse maximale de 15 km/h) TURBO (Vitesse maximale de 25 km/h) Indicateur gauche Frein serré... -
Page 33: Boutons & Fonctions
Niveau et tension de la batterie Niveau de Niveau de Niveau de Tension Tension Tension la batterie la batterie la batterie 50-54.6 V 48.5-49.9 V 47.5-48.4 V 45.5-47.4 V 43.5-45.4 V 41.0-43.4 V (clignotant) BOUTONS & FONCTIONS... - Page 34 Mise sous tension/hors tension Appuyez sur pendant 3 secondes pour allumer/éteindre le scooter. Compteur kilométrique et compteur journalier ODO (odomètre) et TRIP (compteur de voyage) s'afficheront alternativement après la mise en marche du scooter. Passage de l'entraînement à deux moteurs à l'entraînement à un seul moteur Appuyez sur après avoir mis le scooter en marche.
-
Page 35: Paramètres
PARAMÈTRES Pour entrer dans les réglages, appuyez sur pendant environ 3 secondes après avoir allumé le scooter. Appuyez sur pour sélectionner les options de réglage : P01, P02, P03, P05, P99 et ODO. Après avoir sélectionné une option, appuyez sur pour modifier les paramètres. -
Page 36: Codes D'erreur
CODES D'ERREUR Défaut de communication en émission (jaune) Réception d'un défaut de communication (vert) Défaut du contrôleur du moteur arrière Défaut du contrôleur du moteur avant Défaut d'accélérateur Défaut au niveau du levier de frein Défaut Hall du moteur arrière Perte de phase du moteur arrière Défaut Hall du moteur avant Perte de phase du moteur avant... -
Page 37: Réglage Du Frein À Disque
RÉGLAGE DU FREIN À DISQUE Pour régler la sensibilité du frein à disque : Vous avez besoin d'une clé hexagonale pour retirer les vis du culbuteur. • Lorsque le frein à disque est trop sensible, tournez légèrement la bascule du frein à disque vers le bas. -
Page 38: Batterie & Chargeur
BATTERIE ET CHARGEUR Chaque trottinette a sa propre batterie et son propre chargeur et chaque pièce a un numéro de série différent. Veuillez ne pas utiliser un chargeur d'une autre marque pour charger votre trottinette. Batterie Veuillez charger votre trottinette lorsque vous la reçoives. Il est préférable de la charger complètement avant de conduire. -
Page 39: Entretien
ENTRETIEN Lubrification Ajoutez un peu de lubrifiant sur la partie pliante du guidon tous les 6 mois, pour que le guidon fonctionne bien. Attention: N'ajoutez pas de WD40 à la trottinette, ni de lubrifiant aux roues avant et arrière. Pneus Les pneus avant et arrière sont pneumatiques. -
Page 40: Paramètres
PARAMÈTRES Taille de trottinette pliée 127*60*124 cm SCOOTER Taille de trottinette dépliée 130*30*46 cm Poids net 35,85 kg Charge maximale 150 kg Vitesse maximale 25 km/h PERFORMANCES Autonomie 65-70 km BATTERIE Capacité 48 V, 20 Ah MOTEUR Puissance 1.200 W x2 Entrée AC 100-240 V, 50/60 Hz CHARGEUR... -
Page 41: Garantie
GARANTIE Si l'un des composants du tableau ci-dessous tombe en panne lors d'une utilisation normale, veuillez nous contacter et nous assurerons un service après-vente complet. Description Délai de Service Composant de la qualité garantie Défauts lors d'une Entretien Moteur 2 an utilisation normale gratuit Défauts lors d'une... - Page 42 La garantie n'est pas valable pour les raisons suivantes. 1. l'entretien n'est pas effectué conformément à ce manuel. 2. Pièces cassées suite à un jeu ou à des actions dangereuses. 3. Démontage et montage par les utilisateurs ou utilisation de pièces d'autres marques dans notre trottinette.
-
Page 43: Sicherheitshinweis
SICHERHEITSHINWEIS 1. Dieses Produkt ist nur für Erwachsene geeignet und erlaubt keine Mitfahrer. 2. Bitte tragen Sie beim Fahren einen Helm und andere Schutzausrüstung. 3. Fahren Sie sicher und korrekt im Straßenverkehr. 4. Üben Sie vor dem Fahren. 5. Seien Sie vorsichtig und sicher; beide Hände und Füße sollten auf dem Roller bleiben. -
Page 44: Produktübersicht
PRODUKTÜBERSICHT Hinterradbremshebel Steuerkreuz Bildschirm Abzugsdrossel Vorderradbremshebel Scheinwerfer Bremslicht Mechanismus Hintere Scheibenbremse Rechter Indikator zum Falten Ständer Scheibenbremse vorne Hintere Aufhängung Batteriefach... -
Page 45: Entfalten & Falten
ENTFALTEN & FALTEN Entfaltende Stufen Schritt 1: Drücken Sie den silbernen Verriegelungshebel nach unten, um ihn aus der oberen Rille zu lösen. Schritt 2: Drücken Sie den silbernen Verriegelungshebel nach unten und klappen Sie die Lenkstange nach oben, bis Sie ein Klicken hören. - Page 46 Schritt 3: Schließen Sie den roten Sicherungshebel vollständig. Schritt 4: 1.Heben Sie den Lenker nach oben, bis die roten Sicherungshülsen in die Gewinde gleiten. 2.Drehen Sie die linke und rechte Hülse in Pfeilrichtung, um den Lenker vollständig zu verriegeln.
- Page 47 Schritt 5: Stellen Sie den Lenker auf die gewünschte Höhe ein und schließen Sie dann die Schnell- spannklemme. Klappbare Stufen Schritt 1: Drehen Sie die linke und rechte Hülse in Pfeilrichtung, um den Lenker zu entriegeln. Klappen Sie dann den Lenker herunter.
- Page 48 Schritt 2: Öffnen Sie die QR-Klemme (Schnellspanner), stellen Sie den Lenker auf die niedrigste Höhe ein und schließen Sie die QR-Klemme. Schritt 3: Halten Sie die Lenkstange fest, öffnen Sie den roten Sicherungshebel und drücken Sie den silbernen Verriegelungshebel nach unten, um ihn aus der unteren Rille zu lösen. Schritt 4: Klappen Sie die Lenkstange nach unten, bis Sie ein Klicken hören.
-
Page 49: Anzeigebildschirm
ANZEIGEBILDSCHIRM Dual Single Assist TURBO Distance TRIP Error Icons und Bedeutungen Fahrmodus: Assist TURBO 6 km/h Höchstgeschwindigkeit ECO (10 km/h Höchstgeschwindigkeit) STD (15 km/h Höchstgeschwindigkeit) TURBO (25 km/h Höchstgeschwindigkeit) Linker Blinker Bremse angezogen Rechter Blinker Scheinwerfer an Tempomat (blinkend) Dual: Zweiradantrieb Dual 6 km/h Gehmodus Single: Modus Hinterradantrieb... -
Page 50: Tasten & Funktionen
Batteriestand und -spannung Spannung Spannung Spannung Batteriestand Batteriestand Batteriestand 50-54.6 V 48.5-49.9 V 47.5-48.4 V 45.5-47.4 V 43.5-45.4 V 41.0-43.4 V (blinkt) TASTEN & FUNKTIONEN... - Page 51 Strom ein/aus Drücken Sie 3 Sekunden lang, um den Scooter ein-/auszus- chalten. Kilometerzähler und Tageskilometerzähler ODO (Kilometerzähler) und TRIP (Tageskilometerzähler) werden nach dem Einschalten des Rollers abwechselnd angezeigt. Umschalten zwischen Zweimotorenantrieb und Einmo- torenantrieb Drücken Sie nach dem Einschalten des Rollers. Fahrmodi auswählen Drücken Sie oder...
-
Page 52: Einstellungen
EINSTELLUNGEN Um die Einstellungen aufzurufen, drücken Sie nach dem Einschalten des Rollers etwa 3 Sekunden lang Drücken Sie , um zwischen den Einstelloptionen zu wählen: P01, P02, P03, P05, P99, und ODO. Nach der Auswahl einer Option, drücken Sie oder , um die Einstellungen zu ändern. -
Page 53: Fehlercodes
FEHLERCODES Kommunikationsfehler beim Senden (gelb) Fehler bei der Empfangskommunikation (grün) Fehler in der hinteren Motorsteuerung Fehler in der vorderen Motorsteuerung Beschleuniger Störung Störung des Bremshebels Hall-Fehler des hinteren Motors Verlust der hinteren Motorphase Frontmotor Hall-Fehler Frontmotor Phasenverlust... -
Page 54: Einstellung Der Scheibenbremse
EINSTELLUNG DER SCHEIBENBREMSE So stellen Sie die Empfindlichkeit der Scheibenbremse ein: Sie benötigen einen Sechskantschlüssel, um die Schrauben an der Wippe zu entfernen. •Wenn die Scheibenbremse zu empfindlich ist, drehen Sie die Wippe der Scheibenbremse ein wenig nach unten. Bringen Sie dann die Schrauben wieder an der Bremsseilhülle an und ziehen Sie sie fest. -
Page 55: Akku Und Ladegerät
AKKU UND LADEGERÄT Jeder Roller hat seinen eigenen Akku und sein eigenes Ladegerät. Jedes Teil hat eine eigene Seriennummer. Bitte laden Sie den Roller nicht mit Ladegeräten anderer Marken auf. Akku Bitte laden Sie Ihren Roller sofort nach Erhalt auf. Es ist besser, den Roller vor der ersten Fahrt vollständig aufzuladen. -
Page 56: Wartung
WARTUNG Schmierung Tragen Sie alle 6 Monate ein wenig Schmiermittel auf den klappbaren Teil des Lenkers auf, um die Leichtgängigkeit des Lenkers zu gewährleisten. Hinweis: Tragen Sie kein WD-40 Schmiermittel auf den Roller auf. Tragen Sie kein Schmiermittel auf das Vorder- oder Hinterrad auf. Reifen Die Vorder- und Hinterreifen sind Luftreifen. -
Page 57: Parameter
PARAMETER Auseinandergeklappt 127*60*124 cm Zusammengeklappt 130*30*46 cm ROLLER Gewicht 35,85 kg Maximale Belastung 150 kg Geschwindigkeit 25 km/h LEISTUNG Reichweite 65-70 km AKKU Kapazität 48 V, 20 Ah MOTOR Macht 1.200 W x2 Eingabe AC 100-240 V, 50/60 Hz LADEGERÄT Ausgabe 54,6 V, 2 A Ladezeit... -
Page 58: Garantie
GARANTIE Sollte eines der unten aufgeführten Teile bei normaler Verwendung ausfallen, wenden Sie sich bitte an uns, wir bieten Ihnen einen umfassenden Kundendienst. Kundendienst Teile Qualitätsbeschreibung Garantiezeit Ausfall bei normaler Motor 2 Jahre Kostenlos Verwendung Ausfall bei normaler Steuergerät 6 Monate Kostenlos Verwendung Ausfall bei normaler... - Page 59 Die Garantie erlischt, wenn Folgendes geschieht: 1. Nicht gemäß dieser Anleitung gewartet wurde. 2. Gebrochene Teile, die durch gefährliche Handlungen verur sacht wurden. 3. Demontage und Montage durch den Benutzer oder Verwend ung von Teilen anderer Marken. Gebrochene Teile durch Verkehr sunfälle oder äußere Einwirkungen durch den Benutzer.
-
Page 60: Istruzioni Di Sicurezza
ISTRUZIONI DI SICUREZZA 1. Questo prodotto è adatto per adulti che possono essere utilizzati solo da una persona. 2. Si prega di indossare il casco e altri dispositivi di protezione durante la guida. 3. Si prega di guidare sulla strada in modo sicuro e legale. 4. -
Page 61: Panoramica Del Prodotto
PANORAMICA DEL PRODOTTO Leva del freno Pad di Schermo di Acceleratore posteriore controllo visualizzazione a grilletto Leva del freno anteriore Faro Luce del freno Meccanismo di Freno a disco posteriore Indicatore destro ripiegamento Cavalletto Freno a disco anteriore Vano batteria Sospensione posteriore... -
Page 62: Dispiegatura & Piegatura
DISPIEGATURA & PIEGATURA Passi per dispiegare Fase 1: premere la leva di bloccaggio argentata per sganciarla dalla scanalatura superiore. Fase 2: spingendo verso il basso la leva di bloccaggio argentata, dispiegare lo stelo dello sterzo in verticale fino a sentire uno scatto. - Page 63 Fase 3: chiudere completamente la leva di sicurezza rossa. Fase 4: 1.Sollevare il manubrio verso l'alto fino a quando i manicotti di bloccaggio rossi non scivolano nelle filettature. 2.Ruotare i manicotti destro e sinistro in direzione delle frecce per bloccare completamente il manubrio.
- Page 64 Fase 5: Regolare il manubrio all'altezza desiderata e chiudere bene il morsetto a sgancio rapido. Passi per piegare Fase 1: Ruotare i manicotti destro e sinistro in direzione delle frecce per sbloccare il manubrio. Quindi ripiegare il manubrio.
- Page 65 Fase 2: aprire il morsetto QR (sgancio rapido), regolare l'altezza del manubrio al minimo, quindi chiudere il morsetto QR. Fase 3: Tenere lo stelo dello sterzo, aprire la leva di sicurezza rossa e premere la leva di bloccaggio argentata per sganciarla dalla scanala- tura inferiore.
-
Page 66: Schermo
SCHERMO Dual Single Assist TURBO Distance TRIP Error Icone e significati Modalità di guida: Assist TURBO 6 km/h di velocità massima ECO (10 km/h di velocità massima) STD (15 km/h di velocità massima) TURBO (25 km/h di velocità massima) Indicatore sinistro Freno inserito Indicatore destro Controllo della velocità... -
Page 67: Pulsanti & Funzioni
Livello e tensione della batteria Livello della Livello della Livello della Tensione Tensione Tensione batteria batteria batteria 50-54.6 V 48.5-49.9 V 47.5-48.4 V 45.5-47.4 V 43.5-45.4 V 41.0-43.4 V (lampeggiante) PULSANTI & FUNZIONI... - Page 68 Accensione e spegnimento Premere per 3 secondi per accendere/spegnere lo scooter. Contachilometri e contachilometri parziale ODO (contachilometri) e TRIP (contachilometri parziale) vengono visualizzati alternativamente dopo l'accensione dello scooter. Commutazione tra azionamento a due motori e a un motore Premere dopo aver acceso lo scooter. Selezionare le modalità...
-
Page 69: Impostazioni
IMPOSTAZIONI Per accedere alle impostazioni, premere per circa 3 secondi dopo aver acceso lo scooter. Premere per selezionare le opzioni di impostazione: P01, P02, P03, P05, P99 e ODO. Dopo aver selezionato un'opzione, premere per modificare le impostazioni. Premere per salvare l'impostazione corrente e passare all'opzione successiva. -
Page 70: Codici Di Errore
CODICI DI ERRORE Guasto di comunicazione in trasmissione (giallo) Guasto di comunicazione in ricezione (verde) Guasto al controllore del motore posteriore Guasto al controllore del motore anteriore Guasto all'acceleratore Guasto alla leva del freno Guasto Hall del motore posteriore Perdita di fase del motore posteriore Guasto Hall del motore anteriore Perdita di fase del motore anteriore... -
Page 71: Regolazione Del Freno A Disco
REGOLAZIONE DEL FRENO A DISCO Per regolare la sensibilità del freno a disco: Per rimuovere le viti sul bilanciere è necessaria una chiave esagonale. • Quando il freno a disco è troppo sensibile, ruotare leggermente il bilanciere del freno a disco verso il basso. -
Page 72: Batteria & Caricabatterie
BATTERIA E CARICABATTERIE Ogni monopattino ha la propria batteria e caricabatterie, ogni parte ha un numero di serie diverso. Si prega di non caricare il monopattino con caricabatterie di altre marche. Batteria Si prega di caricare il monopattino quando si riceve questo monopattino, è meglio caricare il monopattino completamente prima di guidare. -
Page 73: Manutenzione
MANUTENZIONE Lubrificazione Aggiungere un po' di lubrificante sulla parte pieghevole del manubrio per ogni 6 mesi, mantenere il manubrio funzionante liscio. Nota: Non aggiungere il WD40 sul monopattino. Non aggiungere lubrificante sulla ruota anteriore e posteriore. Pneumatico Sia i pneumatici anteriori che quelli posteriori sono pneumatici, se è ovviamente rotto, contattare il distributore per sostituirli. -
Page 74: Parametri
TABELLA DEI PARAMETRI Dimensione di dispiegamento 127*60*124 cm Dimensioni pieghevoli 130*30*46 cm SCOOTER Peso 35,85 kg Carico massimo 150 kg Velocità massima 25 km/h PRESTAZIONE Distanza 65-70 km BATTERIA Capacità 48 V, 20 Ah MOTORE Potenza 1.200 W x2 Ingresso CA 100-240 V, 50/60 Hz CARICABATTERIA Uscita... -
Page 75: Garanzia
GARANZIA Una qualsiasi delle parti nella scheda seguente si verifica un guasto durante il normale utilizzo, ti preghiamo di contattarci, forniremo un completo servizio post-vendita . Descrizione Periodo di Servizio Parti della qualità garanzia Il guasto si verifica Manutenzione 2 anno Motore durante l'uso normale gratuita... - Page 76 Garanzia non valida se causata dai seguenti motivi: 1. Non eseguire la manutenzione secondo questo manuale. 2. Parti rotte causate dal gioco o da azioni pericolose. 3. Smontaggio e montaggio da parte degli utenti o utilizzo di parti di altre marche in questo monopattino. Parti rotte a causa di incidente stradale o battuto da utenti.
-
Page 77: Instrucciones De Seguridad
INSTRUCCIÓN DE SEGURIDAD 1. Este producto es adecuado para adultos y solo puede ser utilizado por una persona. 2. Use un casco y otro equipo de protección cuando esté conduciendo. 3. Conduce por la carretera de forma segura y legal. 4. -
Page 78: Resumen De Productos
RESUMEN DE PRODUCTOS Acelerador Panel de Palanca de Pantalla de del gatillo control freno trasero visualización Palanca de freno delantero Faro delantero Luz de freno Freno de disco trasero Mecanismo de Indicador derecho plegado Caballete Freno de disco delantero Compartimento de Suspensión trasera la batería... -
Page 79: Desplegar & Plegar
DESPLEGAR Y PLEGAR Pasos de despliegue Paso 1: Presione hacia abajo la palanca de bloqueo plateada para desengancharla de la ranura superior. Paso 2: Mientras empuja hacia abajo la palanca de bloqueo plateada, despliegue el vástago de dirección en posición vertical hasta que oiga un clic. - Page 80 Paso 3: Cierre completamente la palanca roja de seguridad. Paso 4: 1. Levante el manillar hasta que los casquillos de bloqueo rojos se introduzcan en las roscas. 2. Gire los casquillos izquierdo y derecho en la dirección de las flechas para bloquear completamente el manillar.
- Page 81 Paso 5: Ajuste el manillar a la altura deseada y, a continuación, cierre bien la abrazadera de liberación rápida. Peldaños plegables Paso 1: Gire los manguitos izquierdo y derecho en el sentido de las flechas para desbloquear el manillar. A continuación, abata el manillar.
- Page 82 Paso 2: Abra la abrazadera QR (liberación rápida), ajuste la altura del manillar al mínimo y, a continuación, cierre la abrazadera QR. Paso 3: Sujete el vástago de la dirección, abra la palanca roja de seguridad y presione hacia abajo la palanca plateada de bloqueo para desengancharla de la ranura inferior.
-
Page 83: Pantalla De Visualización
PANTALLA DE VISUALIZACIÓN Dual Single Assist TURBO Distance TRIP Error Iconos y significados Modo de conducción: Assist TURBO 6 km/h de velocidad máxima ECO (10 km/h de velocidad máxima) STD (15 km/h de velocidad máxima) TURBO (25 km/h de velocidad máxima) Indicador izquierdo Freno accionado Indicador derecho... -
Page 84: Botones & Funciones
Nivel y tensión de la batería Nivel de Nivel de Nivel de Tensión Tensión Tensión batería batería batería 50-54.6 V 48.5-49.9 V 47.5-48.4 V 45.5-47.4 V 43.5-45.4 V 41.0-43.4 V (parpadeando) BOTONES & FUNCIONES... - Page 85 Encendido/apagado Pulse durante 3 segundos para encender/apagar el scooter. Odometer and partial odometer ODO (odómetro) y TRIP (cuentakilómetros parcial) se mostrarán alternativamente después de encender el scooter. Cambio entre accionamiento de motor doble y accionamiento de motor único Pulse después de encender el scooter. Seleccionar modos de conducción Pulse para elegir entre cuatro modos: 1, 2 ECO, 3 STD...
-
Page 86: Ajustes
AJUSTES Para entrar en los ajustes, pulse durante unos 3 segundos después de encender el scooter. Pulse para seleccionar entre las opciones de ajuste: P01, P02, P03, P05, P99 y ODO. Después de seleccionar una opción, pulse para cambiar los ajustes. Pulse para guardar el ajuste actual y pasar a la siguiente opción de ajuste. -
Page 87: Códigos De Error
CÓDIGOS DE ERROR Fallo de comunicación de transmisión (amarillo) Fallo de comunicación de recepción (verde) Fallo del controlador del motor trasero Fallo del controlador del motor delantero Fallo del acelerador Fallo de la palanca de freno Fallo Hall Motor Trasero Pérdida de fase del motor trasero Sala Fallo Motor Delantero Pérdida de fase del motor delantero... -
Page 88: Ajuste Del Freno De Disco
AJUSTE DEL FRENO DE DISCO Para ajustar la sensibilidad del freno de disco: Necesitas una llave hexagonal para quitar los tornillos o pernos del balancín. •Si el freno de disco es demasiado sensible, gira el balancín del freno de disco un poco hacia abajo. -
Page 89: Batería & Cargador
BATERÍA Y CARGADOR Cada scooter tiene su propia batería y cargador, cada pat tiene un número de señal diferente. No cargue el scooter con cargadores de otras marcas. Batería Cargue su scooter cuando obtenga este scooter, es mejor tomar su scooter completamente cargado antes de conducir. -
Page 90: Mantenimiento
MANTENIMIENTO Lubricación Agregue un poco de lubricante en la parte plegable del manillar cada 6 meses y mantenga el manillar funcionando sin problemas. Nota: No agregue el WD40 en el scooter. No agregue ningún lubricante en la rueda delantera y trasera. Neumático Tanto las llantas delanteras como las traseras son llantas neumáticas si están rotas obviamente, comuníquese con el distribuidor para reemplazarlas. -
Page 91: Parámetros
TABLA DE PARÁMETROS tamaño desplegado 127*60*124 cm Tamaño plegable 130*30*46 cm SCOOTER Peso 35,85 kg Carga máxima 150 kg 25 km/h Velocidad máxima RENDIMIENTO Distancia 65-70 km Capacidad 48 V, 20 Ah BATERÍA MOTOR Potencia 1.200 W x2 Entrada CA 100-240 V, 50/60 Hz Salida 54,6 V, 2 A CHARGER... -
Page 92: Garantía
GARANTÍA Si alguna de las piezas en la siguiente hoja falla durante el uso normal, contáctenos, le brindaremos un servicio postventa completo. Calidad Servicio Piezas Descripción Garantía Falla ocurre durante Gratis Motor 2 año el uso normal mantenimiento Falla ocurre durante Gratis controlador 6 meses... - Page 93 La garantía no es válida si se debe a las siguientes razones: 1. No ha realizado el mantenimiento de acuerdo con este manual 2. Partes rotas causadas por jugar o algunas acciones peligrosas. 3. Desmontaje y montaje por parte de los usuarios o utilizando el otro Las piezas de la marca en este scooter se rompen a causa de un accidente de tráfico o golpe por parte del usuario.
-
Page 94: Wskazówki Bezpieczeństwa
WSKAZÓWKI BEZPIECZEŃSTWA 1. Ten produkt jest przeznaczony dla osób dorosłych, zabronione jest przewożenie pasażerów. 2. Podczas jazdy należy nosić kask i inne wyposażenie ochronne. 3. Zachęcamy do bezpiecznej jazdy po drogach zgodnie z przepisami. 4. Przed rozpoczęciem jazdy należy przeprowadzić jazdę próbną. 5. -
Page 95: Przegląd Produktów
PRZEGLĄD PRODUKTÓW Dźwignia Ekran Spust wyświetlacza hamulca tylnego przepustnicy Control Pad Dźwignia hamulca przedniego Reflektor Światło hamowania Mechanizm Tylny hamulec tarczowy Prawy wskaźnik składania Podpórka Przedni hamulec Komora akumulatora Tylne zawieszenie tarczowy... -
Page 96: Rozkładanie & Składanie
ROZKŁADANIE & SKŁADANIE Rozkładane stopnie Krok 1: Naciśnij srebrną dźwignię blokującą, aby odłączyć ją od górnego rowka. Krok 2: Naciskając srebrną dźwignię blokującą, rozłóż wspornik kierownicy do pozycji pionowej, aż usłyszysz kliknięcie. - Page 97 Krok 3: Całkowicie zamknij czerwoną dźwignię bezpieczeństwa. Krok 4: 1. Podnieś kierownicę do góry, aż czerwone tuleje blokujące wsuną się w gwinty. 2. Obróć lewą i prawą tuleję zgodnie z kierunkiem strzałek, aby całkowicie zablokować kierownicę.
- Page 98 Krok 5: Dostosuj kierownicę do żądanej wysokości, a następnie szczelnie zamknij zacisk szybko- zamykacza. Składane stopnie Krok 1: Obróć lewy i prawy rękaw zgodnie z kierunkiem strzałek, aby odblokować kierownicę. Następnie złóż kierownicę.
- Page 99 Krok 2: Otwórz zacisk QR (szybkozamykacz), ustaw najniższą wysokość kierownicy, a następnie zamknij zacisk QR. Krok 3: Przytrzymaj wspornik kierownicy, otwórz czerwoną dźwignię zabezpieczającą i naciśnij srebrną dźwignię blokującą, aby odłączyć ją od dolnego rowka. Krok 4: Złóż drążek kierowniczy, aż usłyszysz kliknięcie.
-
Page 100: Ekran Wyświetlacza
EKRAN WYŚWIETLACZA Dual Single Assist TURBO Distance TRIP Error Ikony i znaczenia Tryb jazdy: Assist TURBO Prędkość maksymalna 6 km/h ECO (Prędkość maksymalna 10 km/h) STD (Prędkość maksymalna 15 km/h) TURBO (Prędkość maksymalna 25 km/h) Lewy wskaźnik Hamulec zaciągnięty Prawy wskaźnik Reflektor włączony Tempomat (miga) Podwójny: Tryb napędu na dwa koła... -
Page 101: Przyciski & Funkcje
Poziom naładowania i napięcie akumulatora Poziom Poziom Poziom Napięcie Napięcie Napięcie naładowania naładowania naładowania baterii baterii baterii 50-54.6 V 48.5-49.9 V 47.5-48.4 V 45.5-47.4 V 43.5-45.4 V 41.0-43.4 V (miga) PRZYCISKI & FUNKCJE... - Page 102 Włączanie/wyłączanie zasilania Naciśnij przycisk przez 3 sekundy, aby włączyć/wyłączyć hulajnogę. Licznik kilometrów i licznik przebiegu podróży ODO (licznik przebiegu) i TRIP (licznik podróży) będą wyświetlane naprzemiennie po włączeniu skutera. Przełączanie między napędem z dwoma silnikami a napędem z jednym silnikiem Naciśnij po włączeniu hulajnogi.
-
Page 103: Ustawienia
USTAWIENIA Aby wprowadzić ustawienia, naciśnij przycisk przez około 3 sekundy po włączeniu hulajnogi. Naciśnij , aby wybrać między opcjami ustawień: P01, P02, P03, P05, P99 i ODO. Po wybraniu opcji naciśnij , aby zmienić ustawienia. Naciśnij , aby zapisać bieżące ustawienie i przejść do następnej opcji ustawień. -
Page 104: Kody Błędów
KODY BŁĘDÓW Błąd komunikacji nadawczej (żółty) Błąd komunikacji odbiorczej (zielony) Usterka tylnego sterownika silnika Usterka przedniego sterownika silnika Usterka akceleratora Brake lever fault Usterka Halla tylnego silnika Utrata fazy tylnego silnika Błąd Halla przedniego silnika Utrata fazy przedniego silnika... -
Page 105: Regulacja Hamulca Tarczowego
REGULACJA HAMULCA TARCZOWEGO Aby wyregulować czułość hamulca tarczowego: Do wykręcenia śrub głowicy potrzebny jest klucz sześciokątny. • Gdy hamulec tarczowy jest zbyt czuły, lekko obróć jego dźwignię w dół. Następnie wkręcić śruby z powrotem do rdzenia linki hamulca, aby dokręcić. •... -
Page 106: Akumulator & Ładowarka
AKUMULATOR I ŁADOWARKA Każda hulajnoga posiada odrębny akumulator i ładowarkę. Każda część posiada odmienne numery seryjne. Prosimy nie ładować hulajnogi ładowarkami innych marek. Akumulator Hulajnogę należy naładować po jej odebraniu. Przed pierwszą jazdą zalecamy całkowite naładowanie hulajnogi. Hulajnogę należy ładować przynajmniej raz w miesiącu. Akumulator może zostać... -
Page 107: Konserwacja
KONSERWACJA Smarowanie Dodawaj niewielką ilość smaru na składanej części kierownicy co 6 miesięcy, aby utrzymać płynną pracę kierownicy. Uwaga: Nie należy dodawać smarów WD-40 na hulajnodze. Nie dodawaj żadnego smaru na przednim ani tylnym kole. Opona Zarówno przednie, jak i tylne opony są oponami pneumatycznymi, jeżeli zostaną wyraźnie uszkodzone, prosimy o kontakt z dystrybutorem w celu ich wymiany. -
Page 108: Parametry
PARAMETRY Rozmiar po rozłożeniu 127*60*124 cm Rozmiar po złożeniu 130*30*46 cm SKUTER Waga 35,85 kg Maksymalne obciążenie 150 kg Prędkość maksymalna 25 km/h WYSTĘP Zasięg 65-70 km Pojemność AKUMULATOR 48 V, 20 Ah SILNIK 1.200 W x2 Wejście AC 100-240 V, 50/60 Hz Wyjście 54,6 V, 2 A ŁADOWARKA... -
Page 109: Gwarancja
GWARANCJA Każda z części w poniższym arkuszu występuje awaria w normalnym użytkowaniu, prosimy o kontakt, zapewnimy pełną obsługę posprzedażową. Okres Części Serwis Opis gwarancji Awaria występuje przy Bez opłat Silnik 2 lata normalnym użytkowaniu Awaria występuje przy 6 miesięcy Bez opłat Sterownik normalnym użytkowaniu Awaria występuje przy... - Page 110 Gwarancja traci ważność, jeżeli dojdzie do następujących sytuacji: 1. Brak konserwacji zgodnie z niniejszą instrukcją. 2. Uszkodzenia części spowodowane niebezpiecznymi czynnościami. 3. Demontażu i montażu przez użytkowników lub użycia części innych marek. Uszkodzone części w wyniku wypadków drogowych lub uderzenia przez użytkownika siłą zewnętrzną. 4.
Need help?
Do you have a question about the iX8 and is the answer not in the manual?
Questions and answers