Advertisement
Quick Links
Advertisement

Related Manuals for Kuat CLASS 4 v2


Summary of Contents for Kuat CLASS 4 v2
- Page 1 CLASS 4 USER GUIDE...
- Page 2 (4) M6 Washer (4) Flush Mounts (4) T-Channel Bolt Heads 75 lbs Maximum Boat Weight 4.25” Max Crossbar Width 2” .5” Min Crossbar Height Class 4 v2 will work with round, square & aero bars within this size range. ™...
- Page 3 Installing Universal Flip Mounts Open your Class 4 v2 rack by pulling the butterfly lever and lifting the clamshell open. Once the Class 4 v2 rack is opened, ensure alignment of the following components: one (1) locking Flip mount, one (1) non-locking Flip mount, two (2) M6 bolts, two (2) M6 lock washers, and two (2) M6 washers.
- Page 4 Leveling Depending on your vehicle and crossbars, it may be necessary to adjust the angle of your racks so they sit level. Adjust the angle of your mounts and rack using the angle adjustment bolt and the provided M4 hex key. Following the adjustments, confirm that your rack is relatively level to the ground, and securely fasten the angle adjustment bolt.
- Page 5 Using the Universal Flip Mounts Pivot the lever upward to release strap. Once both Flip mounts are open, position the Class 4 v2 onto the crossbar, threading the straps underneath and securing them into the strap lever. Use Strap Option 1 Use Strap Option 2 Close Flip mount lever ™...
- Page 6 Ensure a snug fit of the mounts onto the crossbar by re-tightening the strap tensioner using the provided M4 hex key. Overtightening can damage crossbar and mount When tightening Flip straps, check the lever periodically. Lever should be snug, but not too difficult to articulate. Once straps have been properly adjusted to the crossbar, further adjustment should not be necessary to remove or reinstall the racks.
- Page 7 Installing Flush Mounts With the Class 4 v2 in the open position, align (2) Flush Mounts, (2) M6 bolts and (2) t-channel bolt heads beneath each mounting bolt hole. Guide the M6 bolt through the Flush Mount into the t-channel bolt head and secure it by threading it using the M4 hex key.
- Page 8 Feeding Straps and Loading Boat Thread the straps through the straps port in each Class 4 v2 lid. Pull the straps through and place them on each side for convenient access later. Load the boat with the hull positioned vertically. Bring the straps up and over the bow and stern of the boat.
- Page 9 Guide the strap end through the lower strap port, around the crossbar, up through the opposite strap port, and secure it into the cam buckle. Strap Option 1 Use with Class 4 v2 mounted behind roof bar. Strap Feed Strap Option 2 Use with Class 4 v2 mounted in front of roof bar.
- Page 10 Fixing Bow and Stern Lines Thread the cam of the short looped strap through the bow handle and loop it back through Secure the looped connecting strap by passing it through the tow hook and looping it back through.
- Page 11 Feed tow hook strap into cam strap affixed to bow handle to secure bow line. Repeat step 7 for the stern line. Strap Feed...
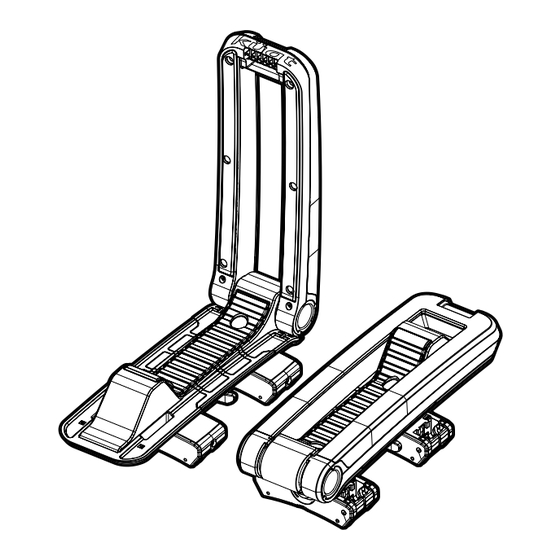
- Page 12 The tow hook straps are equipped with a protective sleeve designed to shield against contact between the strap and your vehicle. In cases of multiple contact points, the protective sleeve can be modified by cutting and re-sleeving to extend protection to additional areas. Closing the Class 4 When not in use, the Class 4 v2 kayak rack can be folded down.
- Page 13 · Do not take through automatic car wash. · Drive responsibly. If you have questions or problems, please contact Küat Racks directly by calling toll free 1(877)822-KUAT, or by email: info@kuat.com ADVERTENCIAS · Siga las instrucciones para un montaje, instalación y uso adecuados.
- Page 14 You can review our limited warranty on our website or call customer service at the number below if you have questions or need a repair, replacement, refund, or a copy of the limited warranty. www.kuat.com/warranty Questions or comments? Drop us an email or call us directly! kuat.com info@kuat.com...
- Page 15 Notes:...
- Page 16 1.877.822.5828 info@kuat.com v.03 kuat.com...
Need help?
Do you have a question about the CLASS 4 v2 and is the answer not in the manual?
Questions and answers