Table of Contents
Advertisement
Available languages
Available languages
Quick Links
Advertisement
Chapters
Table of Contents

Related Manuals for Occhio lettura NV 125


Summary of Contents for Occhio lettura NV 125
- Page 1 lettura NV Montageanleitung mounting instructions body head...
- Page 3 lettura NV Montageanleitung S. 2 mounting instructions p. 27...
- Page 4 Fällen mit der Oberfläche von Möbeln reagieren (insbesondere beim Einsatz von Putz- oder Pflegemitteln). Der Hersteller empfiehlt im Zweifels- fall das Occhio sensorpad mit einem Filz oder ähnlichem zu unterlegen. Eine Haftung des Herstellers für Sachschäden wird ausgeschlossen.
-
Page 5: Table Of Contents
Produktbeschreibung Die Leuchte Occhio lettura NV ist eine Niedervolt-Halogen-Leuchte der Schutzklasse 2. Die Leuchte ist mit dem Occhio controller, optional zusätzlich mit dem Occhio sensorpad ausgerüstet. Inhalt Produktbeschreibung Aufbau Ausrichtung Einzelteile Montage Ausrichtung rechts 11 Montage Ausrichtung links 16 Ausrichten der Leuchte... -
Page 7: Aufbau
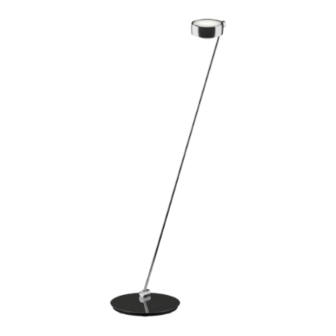
Aufbau Reflektorkopf Leuchtenkörper Controller Leuchtenfuß Sensorpad (optional) -
Page 8: Ausrichtung
Ausrichtung Occhio lettura NV ist werkseitig monta- gevorbereitet für die Standardausrichtung nach rechts. Falls gewünscht, kann die Ausrichtung nachträglich nach links geändert werden. -
Page 9: Einzelteile
Einzelteile Occhio lettura NV besteht aus folgenden Einzelteilen: A: Leuchtenkörper incl. Occhio controller, optional incl. Occhio sensorpad, Reflektorkopf B: Leuchtenfuß, bestehend aus Grundplatte und Deckplatte mit Intarsie... -
Page 10: Montage Ausrichtung Rechts
Montage Ausrichtung rechts Achtung! Vor der Montage alle stromführenden Leitungen vom Stromnetz trennen! Die magnethaftende Deckplatte mit der Zentrierhilfe auf die Grundplatte legen. Deckplatte auf der Grundplatte so dre- hen, dass der Ausschnitt für die Intarsie symmetrisch über den Montagebohrun- gen liegt. - Page 11 Montage Ausrichtung rechts Montage bei starrem Fuß Für die Leuchtenmontage den Leuch- tenfuß so auf den Tisch legen, dass die Bohrungen für die Montage von unten zugänglich bleiben. Montage bei drehbarem Fuß Für die Leuchtenmontage den Leuch- tenfuß so auf den Tisch legen, dass die Bohrungen für die Montage von unten zugänglich bleiben.
- Page 12 Montage Ausrichtung rechts Leuchte mit beiden Gewindehülsen durch die Aussparungen der Intarsie in die Boh- rungen der Grundplatte einstecken. Schrauben Linsenkopf-Inbus M5 und Zylinderkopf-Inbus M3 einschrauben und gut festziehen. Klebeband der Kabelfixierung entfernen.
-
Page 13: Montage Ausrichtung Links
Montage Ausrichtung links Achtung! Vor der Montage alle stromführenden Leitungen vom Stromnetz trennen! Die magnethaftende Deckplatte mit der Zentrierhilfe auf die Grundplatte legen. Deckplatte auf der Grundplatte so dre- hen, dass der Ausschnitt für die Intarsie symmetrisch über den Montagebohrun- gen liegt. - Page 14 Montage Ausrichtung links Montage bei starrem Fuß Für die Leuchtenmontage den Leuch- tenfuß so auf den Tisch legen, dass die Bohrungen für die Montage von unten zugänglich bleiben. Montage bei drehbarem Fuß Für die Leuchtenmontage den Leuch- tenfuß so auf den Tisch legen, dass die Bohrungen für die Montage von unten zugänglich bleiben.
- Page 15 Montage Ausrichtung links Gelenk des Leuchtenarms wie gezeigt mit Inbusschlüssel auseinander schrauben. Anschlagpins im Befestigungszylinder (b) nach Schema ändern. Lettura 125 Lettura 125 Ausrichtung rechts Ausrichtung links (Auslieferungszustand) Lettura 160 Lettura 160 Ausrichtung rechts Ausrichtung links (Auslieferungszustand) eingesteckter Pin...
- Page 16 Montage Ausrichtung links Kabel des Leuchtenkörpers auf andere Seite führen. Version rechts Version links (Auslieferungs- zustand) Gelenk nach Schema zusammensetzen und verschrauben, … … dabei auf die richtige Anordnung der Tellerfedern achten.
- Page 17 Montage Ausrichtung links Leuchte mit beiden Gewindehülsen durch die Aussparungen der Intarsie in die Boh- rungen der Grundplatte einstecken. Schrauben Linsenkopf-Inbus M5 und Zylinderkopf-Inbus M3 einschrauben und gut festziehen. Klebeband der Kabelfixierung entfernen.
-
Page 18: Ausrichten Der Leuchte
Der Leuchtenarm lässt sich aus senk- rechter Position nach vorne und hinten schwenken. Der Anschlag ist begrenzt. Die Beweglichkeit kann mit dem beilie- genden Inbusschlüssel an der Gelenk- schraube eingestellt werden. Schwenkbereich: Occhio lettura NV 125: 20° Ochhio lettura NV 160: 15°... -
Page 19: Leuchtmittel Einsetzen
Leuchtmittel einsetzen Achtung! Vor der Montage alle stromführenden Leitungen vom Stromnetz trennen! Reflektorköpfe abkühlen lassen! Niedervolthalogen Leuchtmittel in die Gy6.35 Stiftfassung setzen. Den Glaskolben des Leuchtmittels nur mit einem weichen Tuch, nicht mit der bloßen Hand anfassen. Fingerabdrücke auf dem Leuchtmittel vor dem Einschalten der Leuchte mit einem weichen Tuch abwischen. - Page 20 Reflektorkopf aufsetzen/wechseln Die Montage des Reflektorkopfes wird in der getrennt beiliegenden Anleitung zum entsprechenden Reflektorkopf beschrieben. Leuchtmittel wechseln Das Wechseln des Leuchtmittels wird in der getrennt beiliegenden Anleitung zum entsprechenden Reflektorkopf beschrieben.
- Page 21 An- und Ausschalten/Dimmen Occhio controller im Auslieferungszustand: Schalt- und Dimmfunktion über Tastwippe. Kurzes Betätigen der Tastwippe schaltet die Leuchte ein und aus. Längeres Betätigen der Tastwippe dimmt die Leuchte stufenlos auf und ab. Eine Übersicht über die unterschiedlichen Setup-Optionen des Occhio controllers...
-
Page 22: Occhio Controller Setup
Occhio controller Setup... - Page 23 Occhio controller Setup Controller mit eingestecktem Pin: Kurzes Betätigen der Tastwippe schaltet die Leuchte ein und aus. Schalt- und Dimmfunktion nur Längeres Betätigen der Tastwippe dimmt über Tastwippe. die Leuchte stufenlos auf und ab. Um Störungen der Elektronik Kurzes Berühren des Leuchtenkörpers zu vermeiden: Vor Entfernen oder Betätigen der Tastwippe schaltet die...
-
Page 24: Sensordimmung
Sensordimmung Die Funktionsweise des Sensordimmers kann unter Umständen durch Spannungs- schwankungen, störende Netzfrequenzen in der Stromversorgung oder zu gute Isolierung des Anwenders gegenüber dem Boden beeinträchtigt sein. Mögliche Abhilfe: · Netzstecker um 180° drehen und in die Steck dose einstecken. ·... -
Page 25: Pflege
Pflege Zur Reinigung der Metall- als auch der Glasteile der Leuchte empfehlen wir die Verwendung eines Glasreinigers. Leuchte nur im abgekühlten Zustand reinigen! Info & Kontakt Weitere Fragen beantwortet gerne Ihr Occhio Fachhändler www.occhio.com info@occhio.com... -
Page 26: Technische Daten
Technische Daten Artikelbezeichnung: Occhio lettura NV 125/160 incl. Occhio controller optional incl. Occhio sensorpad Armlänge: 125/160 cm Fußdurchmesser: 27 cm Niedervolt-Halogen Leuchtmittel: 12 V Halogen, matt/klar Sockel Gy 6.35 Lieferung mit 60W IRC Niedervolt-Halogen IRC Leuchtmittel max. 60 W... -
Page 27: Technische Daten Lettura Nv
Technische Daten lettura NV lettura 160 max. 75 W NV-Halogen matt schwarz 7L 78 00 MS F Gy 6.35, Occhio controller matt chrom 7L 78 00 MM F NV (Tastdimmer) chrom 7L 78 00 CC F inkl. Leuchtmittel 65 W IRC,... - Page 29 lettura NV mounting instructions...
- Page 30 Safety precautions The assembly and installation of elec- trical components must be carried out only by qualified personnel. Before working on the lamp, always disconnect it from the mains. Maintain the minimum safety distance 0.2m from flammable materials. Caution, risk of burns. Never touch the reflector head while it is hot.
- Page 31 Product description The Occhio lettura NV lamp is a safety- class 2 low-voltage halogen lamp. The lamp is equipped with the Occhio controller and, as an additional option, the Occhio sensor pad. Contents 29 Product description 31 Configuration 32 Alignment...
-
Page 33: Configuration
Configuration Reflector head Lamp body Controller Light base Sensor pad (optional) -
Page 34: Alignment
Alignment Occhio lettura NV is factory-made for assembly in the standard right alignment. If desired, the alignment can later be changed to left. -
Page 35: Components
Components Occhio lettura NV consists of the follow- ing components: A: Lamp body incl. Occhio controller, optionally incl. Occhio sensor pad, Reflector head B: Lamp base, consisting of base plate and cover plate with inlay... -
Page 36: Assembly, Right Alignment
Assembly, right alignment Caution Before fitting, disconnect all current- carrying lines from the mains supply. Lay the magnetic cover plate on the base plate using the centring aid. Turn the cover plate on the base plate until the cut-out for the inlay is positioned symmetrically over the assembly holes. - Page 37 Assembly, right alignment Assembly with fixed base To assemble the lamp, place the lamp base on the table in a position where the mounting holes remain accessible from underneath. Assembly with swivel base To assemble the lamp, place the lamp base on the table in a position where the mounting holes remain accessible from underneath.
- Page 38 Assembly, right alignment Insert the lamp into the base plate by in- serting both threaded sleeves through the recesses in the inlay and into the holes in the base plate. Screw in and tighten the M5 socket button-head and M3 socket cheese-head screws.
-
Page 39: Assembly, Left Alignment
Assembly, left alignment Caution Before fitting, disconnect all current- carrying lines from the mains supply. Lay the magnetic cover plate on the base plate using the centring aid. Turn the cover plate on the base plate until the cut-out for the inlay is positioned symmetrically over the assembly holes. - Page 40 Assembly, left alignment Assembly with fixed base To assemble the lamp, place the lamp base on the table in a position where the mounting holes remain accessible from underneath. Assembly with swivel base To assemble the lamp, place the lamp base on the table in a position where the mounting holes remain accessible from underneath.
- Page 41 Assembly, left alignment Use the Allen screw to unscrew the joint of the lamp stem as shown. Change the position of the stop pins in the fixing cylinder (b) as shown in the diagram. Lettura 125 Lettura 125 Right alignment Left alignment (when first delivered) Lettura 160...
- Page 42 Assembly, left alignment Guide the lamp body cable to the other side. Right version Left version (when first delivered) Assemble the joint as shown in the dia- gram and screw together, … … paying attention to the correct order of the spring couples as you do so.
- Page 43 Assembly, left alignment Insert the lamp into the base plate by in- serting both threaded sleeves through the recesses in the inlay and into the holes in the base plate. Screw in and tighten the M5 socket button-head and M3 socket cheese-head screws.
-
Page 44: Adjusting The Lamp
The stop position is fixed. The ease of movement can be adjusted by the screw in the joint using the en- closed Allen key. Pivoting range: Occhio lettura NV 125: 20° Occhio lettura NV 160: 15°... -
Page 45: Inserting The Bulb
Inserting the bulb Caution Before fitting, disconnect all current- carrying lines from the mains supply. Allow reflector heads to cool. Fit the low-voltage halogen bulb into the Gy 6.35 pin socket. Always use a soft cloth when handling the bulb glass. Never touch it with bare hands. -
Page 46: Fitting/Replacing The Reflector Head
Fitting/replacing the reflector head Fitting the reflector head is described separately in the enclosed instructions for the respective reflector head. Replacing the bulb Replacing the bulb is described sepa- rately in the enclosed instructions for the respective reflector head. - Page 47 A short actuation of the rocker button switches the lamp on and off. Prolonged actuation of the rocker button continuously brightens and dims the lamp. An overview of the different setup options for the Occhio controller can be found on the following pages.
-
Page 48: Occhio Controller Setup
Occhio controller setup... - Page 49 Occhio controller setup Controller with pin inserted: A short actuation of the rocker button switches the lamp on and off. Switch and dimmer function only Prolonged actuation of the rocker button via rocker button. continuously brightens and dims the lamp.
-
Page 50: Sensor Dimming
Sensor dimming The functionality of the sensor dimmer can sometimes be adversely affected by voltage fluctuations, interference from mains frequencies in the power supply or by too efficient an insulation of the user against earth. Possible remedy: · Turn the mains plug through 180° and plug it into the socket. - Page 51 For cleaning both the metal and the glass parts of the lamp, we recommend using a glass cleaner. Always allow the lamp to cool down before cleaning. Information & contact Your Occhio specialist retailer will gladly answer any other questions www.occhio.com info@occhio.com...
-
Page 52: Technical Data
Technical data Item description: Occhio lettura NV 125/160 incl. Occhio controller optionally incl. Occhio sensor pad Stem length: 125/160 cm Base diameter: 27 cm Low-voltage halogen bulb: 12 V halogen, satinised/clear Base Gy 6.35 Delivered with 60W IRC low-voltage halogen IRC bulb... -
Page 53: Technical Data, Lettura Nv
Technical data, lettura NV lettura 160 max. 75 W NV halogen matt black 7L 78 00 MS F Gy 6.35, Occhio controller matt chrome 7L 78 00 MM F NV (touch dimmer) chrome 7L 78 00 CC F incl. 65 W IRC bulb,... - Page 56 Occhio GmbH Wiener Platz 7 D 81667 München Fon +49-89-44 77 86 30 Fax +49-89-44 77 86 39 info@occhio.com www.occhio.com 4 042956 965145...
Need help?
Do you have a question about the lettura NV 125 and is the answer not in the manual?
Questions and answers