Advertisement
Quick Links
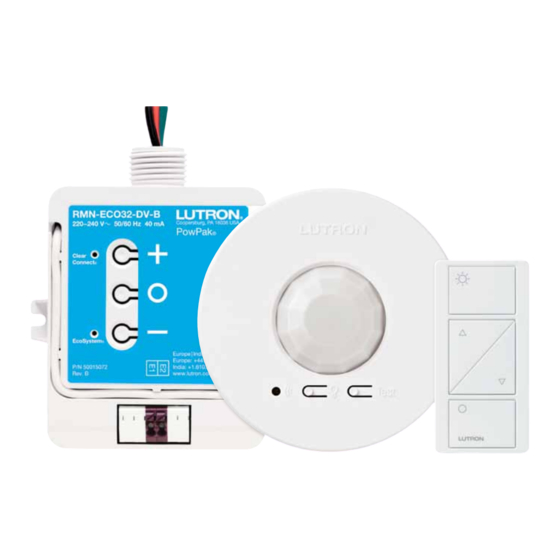
PowPakR | Installation
R
Dimming Module with EcoSystem
041405
Part of the Energi TriPakR Family
Rev. B
08/2014
RMN-ECO32-DV-B
220 - 240 V~ 50 / 60 Hz 40 mA
EcoSystemR Link: 18 V- 125 mA
Important Notes:
Please read before installing.
For installation by a qualified electrician in accordance with all local and
national electrical codes.
• Note: Use copper conductors only.
• Check to see that the device type and rating is suitable for the application.
• DO NOT install if product has any visible damage.
• If moisture or condensation is evident, allow the product to dry completely
before installation.
• Operate between 0 °C and 40 °C.
• 0% to 90% humidity, non-condensing.
• For indoor use only.
WARNING
Shock Hazard. May result in serious injury or death.
Turn off power at circuit breaker before installing the unit.
PowPakR
Dimming Module
Install in center of room to
maximize RF coverage.
Radio
Powr SavrT
Occupancy
Sensor
10 m
Maximum
PicoR
Wireless
Control
12 m
All wireless transmitters must be installed within
10 m of the PowPakR Dimming Module.
Default Functionality
Occupancy Sensors
Occupied:
All lights 100%.
Unoccupied:
All lights off.
Daylight Sensor
All lights dim in response to daylight.
Link
Cal.
Test
Wireless Transmitters
On:
All lights 100%.
Preset:
All lights 50%.
Off:
All lights off.
Daylight Override
Pressing the Raise "
" button on an associated PicoR
wireless control will temporarily override daylighting for the
fixtures in that PicoR wireless control group.
Daylight Re-Enable
Daylighting will be re-enabled for that PicoR wireless
control group when one of the following occurs:
• Two hours have passed since the override.*
• ON, OFF or Preset button has been pressed on a
PicoR wireless control controlling that group.
• All associated Occupancy Sensors have reported
unoccupied.
* Each time a daylighting override occurs for any PicoR wireless
control group, the two hour timer is reset.
Lutron EA Ltd. | 6 Sovereign Close
London, E1W 3JF, UK
Required Components
For each system ensure you have:
One PowPakR Dimming Module.
Clear ConnectR
LED
Raise
+
All On
EcoSystemR
LED
Lower
E1 & E2
R
EcoSystem
Bus Supply
PowPakR Dimming Module
with EcoSystemR
(1 maximum)
Start Here
(For programming see reverse)
R
NOTE: PowPak
Dimming Modules, wireless transmitters, and EcoSystem
will cause addressing or association issues. If replacing an existing PowPak
1
Mount, wire and install EcoSystemR devices
and lighting fixtures
Connect Mains power wiring (line, neutral, earth) to each fixture.
Connect bus cable (E1 and E2) to each fixture.
Once complete, energize power to all fixtures, which should turn on
to full brightness. If fixtures do not go to full brightness, check wiring
and consult ballast installation guide.
Green
Typical
Fixture Earth
EcoSystem
Black
NEU
ballast shown
N/C
Red
LIVE
E1
E1
E2
E2
R
To additional EcoSystem
ballasts or LED drivers.
NOTE - PLEASE READ:
3
A
Replacing an Existing PowPakR
Dimming Module
R
If you are replacing an existing PowPak
Dimming Module, you MUST reset the
R
new module and connected EcoSystem
devices to factory defaults (see Reset
Factory Defaults). Before beginning,
R
make sure all EcoSystem
devices are
connected and powered. Doing this will
allow you to properly associate wireless
transmitters to the new module in Step 3B.
4
Daylight calibration
Complete this step if the Daylight Sensor should
control all fixtures in the room equally. Otherwise skip
this step and see steps 5 and 10 on reverse.
A
Set lights in room to desired light level.
B
Press & hold the " Cal. "
button for 6 seconds.
C
Exit room for 5 minutes
to allow calibration to be
completed.
Link
Cal.
Note: When calibration has
Test
completed, all lights will flash
and the system will begin
daylighting.
Need Help? www.lutron.com or call the Lutron
At least one Wireless Transmitter.
Radio Powr SavrT
PicoR Wireless
Occupancy/Vacancy Sensor
Control
(6 maximum)
(9 maximum)
R
ballasts/drivers must be configured as a system. Pre-configuration of components
unit with a new one, pay special attention to the note in Step 3A.
®
2
Install PowPakR Dimming Module
R
PowPak
Dimming Module can be installed in a junction box or
marshalling box using the conduit nut (provided) or with mounting
screws (not provided). Please consult local and national electric codes
for proper installation.
Suggested Installation Location:
Install in center of room.
This ensures proper RF coverage of area.
R
If installing unit inside a junction box please see Application Note #423.
Once installed, energize the PowPakR Dimming Module and all fixtures.
The fixtures will start at high-end and individually dim when given an
address. Once addressing is complete, all the ballasts will return to
high-end.
If ballasts are not properly addressing, see "Reset Factory Defaults" below.
Associate Wireless Transmitters to PowPakR Dimming Module
B
Before beginning this step, make sure that there are no other PowPakR modules being set up within the same building.
It is possible that wireless transmitters from other systems can be incorrectly associated to this system.
1
On the PowPakR
Dimming Module, hold
the All On button "
for 6 seconds until
ballasts flash.
The Clear ConnectR LED
will begin flashing at a
1
rate of
second ON,
⁄
2
1
⁄
second OFF.
2
Troubleshooting
Fixtures cannot be controlled locally
• Ensure the breaker(s) to the PowPakR Dimming Module and ballasts are on.
from PowPakR Dimming Module.
• Ensure that the E1 and E2 wires of the PowPakR Dimming Module are wired to
the ballast(s) / LED Driver(s) properly.
• The PowPakR Dimming Module is damaged or not functioning.
Fixtures do not respond to wireless
• Ensure the breaker(s) to the PowPakR Dimming Module and ballasts are on.
transmitter(s).
• Ensure wireless transmitters are associated to the PowPakR Dimming Module.
Wireless transmitter(s) cannot be
• The maximum number of wireless transmitters have been associated to the
associated to PowPakR Dimming Module.
PowPakR Dimming Module.
• The PowPakR Dimming Module has been replaced. See Step 3A.
PowPakR Clear ConnectR (Top) LED is on
• Daylight calibration has failed. Press any button on Pico
solid and EcoSystem
(Bottom) LED is
®
PowPakR Dimming Module and restart calibration.
flashing.
Two or more replaced ballasts/LED drivers
• Re-group replaced ballasts/LED drivers. See Step 5.
are not responding as part of a group.
• Reset to factory defaults.
Technical Support Center, at +44.(0)20.7680.4481
®
At least one EcoSystemR H-Series ballast or EcoSystemR LED driver
Please reference "Ballast Installation Requirements" and "EcoSystemR LED Driver Installation Guide" at
www.lutron.com
Note: Rapid Start sockets MUST be used with EcoSystemR ballasts.
+
Link
Cal.
Test
Radio Powr SavrT
Daylight Sensor
EcoSystemR H-Series or EcoSystemR LED
(1 maximum)
(32 maximum. May be pre-installed in light fixtures.)
220 - 240 V~
50/60 Hz
Green
(Earth)
21 mm
knockout
opening
Conduit Nut
2
Hold the indicated button on each wireless transmitter for 6 seconds. All ballasts will
flash to show wireless transmitters have been associated.
"
3
Hold the All On button "
" on the PowPakR Dimming Module for 6 seconds to save association(s).
4
Permanently install wireless transmitters
(consult individual component installation guides for information)
Default: All wireless transmitters control all EcoSystemR devices.
www.lutron.com
wireless control or
®
Black
(Neutral)
E1
Red
(Line)
E2
To Ballast
Note:
2
Use 0.75 to 1.5 mm
(18 to 16 AWG) solid wire only
Link
Test
.
Reset Factory Defaults
Note: In some instances it may be necessary to reset
the PowPakR Dimming Module and connected
EcoSystemR devices back to factory default
settings. Before beginning, make sure all devices
are connected and powered.
A
Triple-tap any button on the PowPakR
Dimming Module and hold until the
LEDs begin to flash slowly. (Release)
B
Within 3 seconds of the start of flashing,
triple-tap the same button again and the
LEDs will flash rapidly indicating that the
unit has been reset to factory defaults.
Note: Any associations or programming previously set up
with the PowPakR will be erased and will need to be
re-programmed.
Advertisement

Subscribe to Our Youtube Channel
Related Manuals for Lutron Electronics PowPak RMN-ECO32-DV-B


Summary of Contents for Lutron Electronics PowPak RMN-ECO32-DV-B
- Page 1 Required Components Need Help? www.lutron.com or call the Lutron Technical Support Center, at +44.(0)20.7680.4481 PowPakR | Installation ® For each system ensure you have: Dimming Module with EcoSystem One PowPakR Dimming Module. At least one Wireless Transmitter. At least one EcoSystemR H-Series ballast or EcoSystemR LED driver 041405 Part of the Energi TriPakR Family Rev.
- Page 2 Set desired occupancy light levels: extent permitted by law, Lutron EA and Lutron Electronics Co. Inc. (“Lutron”) each space. make no warranties or representations as to the units except as set forth herein.
Need help?
Do you have a question about the PowPak RMN-ECO32-DV-B and is the answer not in the manual?
Questions and answers