Advertisement

Overview

- Mains Wiring
- Verify Wiring
- QS Link (IEC PELV )
- Emergency Contact Closure Input (IEC PELV)
- Multi-Function Inputs (IEC PELV)
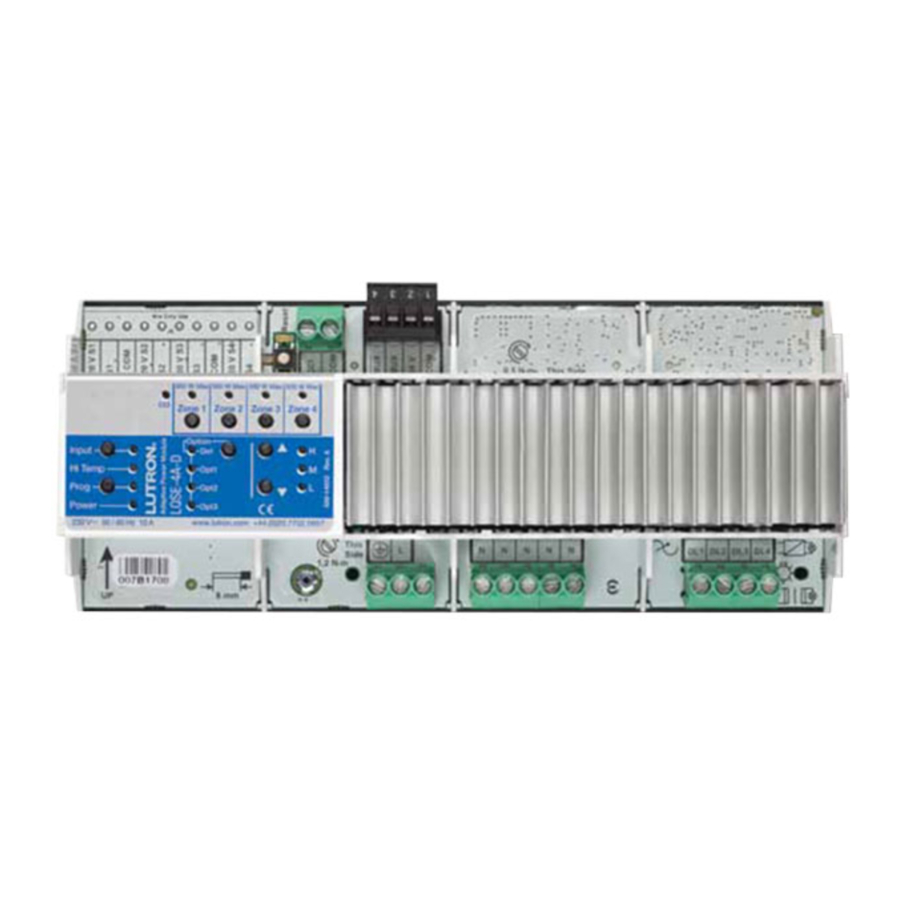
- LED Diagnostic Indicators
Shock Hazard. May result in serious injury or death.
Turn off power at circuit breaker before installing the unit.
Buttons and LEDs in the unit are used for programming and troubleshooting. If wiring is exposed when accessing buttons and LEDs, the unit must be accessed by a certified electrician, following local codes.
Note: For additional information on unit operation and ratings, please refer to Lutron® P/N 369583 (for LQSE-4A-D) or 369609 (for QSNE-4A-D) at www.lutron.com.
Mounting
- Mount in IP20 (minimum) panel with integrated DIN rail.
- Internal relays make audible noise, mount where acceptable.
- Unit is 12 DIN modules (216 mm) wide.
- Mount to DIN rail using clips on bottom of unit. Clips can be pulled out using a screwdriver.
Mains Wiring
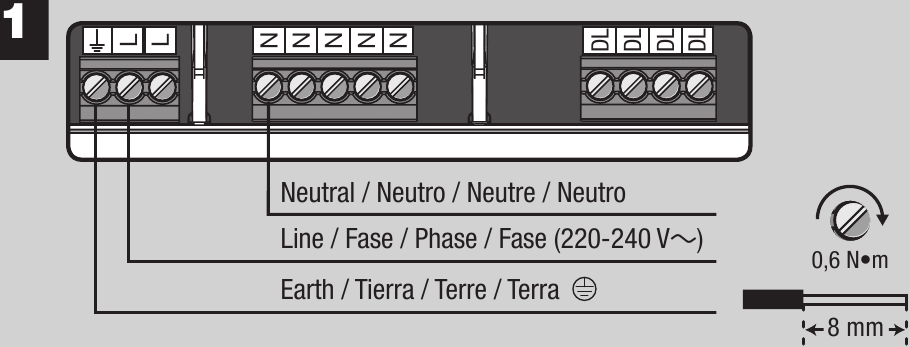
- Turn off power and wire mains to the unit as shown.
- Apply power, "Power" (Power) LED will light if unit is wired correctly.
Verify Wiring
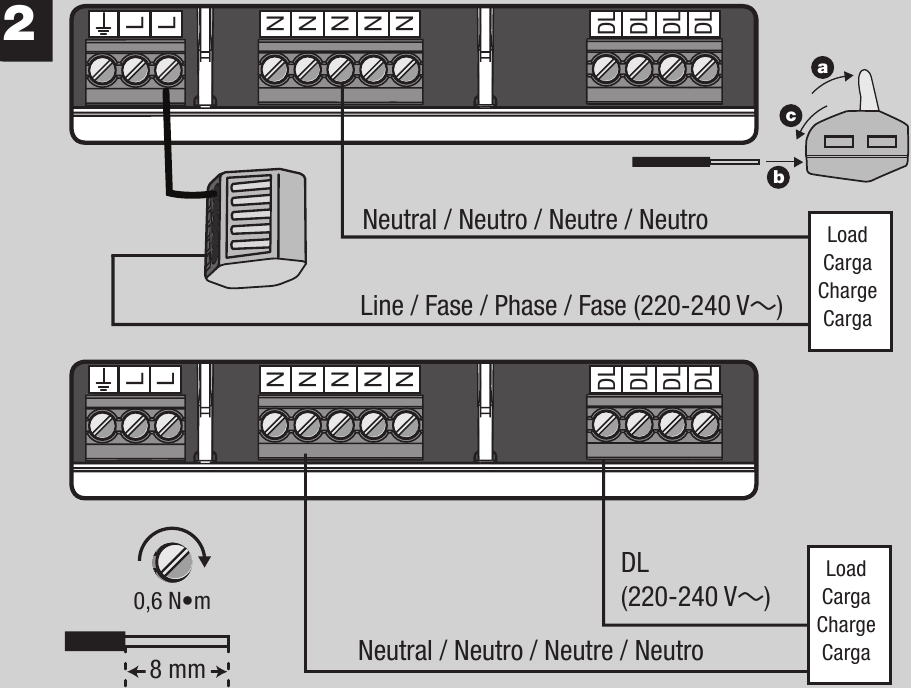
- Follow the steps below to verify there are no faults in the load or wiring.
- Turn off power.
- Wire loads to the provided connector which bypasses the unit and protects it from faults.
- Apply power and ensure that the desired loads power on without any faults.
Zone Wiring
- Ratings: 800 W Zone 1; 500 W Zone 2-4.
- 100 W Derating is required on all zones for a single module in a single non-ventilated DIN enclosure if the room ambient temperature is between 30 ºC and 40 ºC.
- 200 W Derating is required on all zones for multiple row non-ventilated DIN enclosure if the room ambient temperature is between 30 ºC and 40 ºC.
- Turn off power.
- Wire loads as shown.
- Apply power. The "Zone" and
![]() buttons can be used to locally control each zone.
buttons can be used to locally control each zone. - Each zone is unassigned by default and will switch load on or off until it has been programmed.
- Press a "Zone" button to activate that zone and
![]() to adjust its light level. Press another "Zone" button to deactivate the first zone and activate a new one.
to adjust its light level. Press another "Zone" button to deactivate the first zone and activate a new one. - Note: If iron core transformers are used, they must be intended for use with an electronic switch or dimmer per Clause 8.3 of IEC/EN 60669-2-1.
QS Link (IEC PELV)
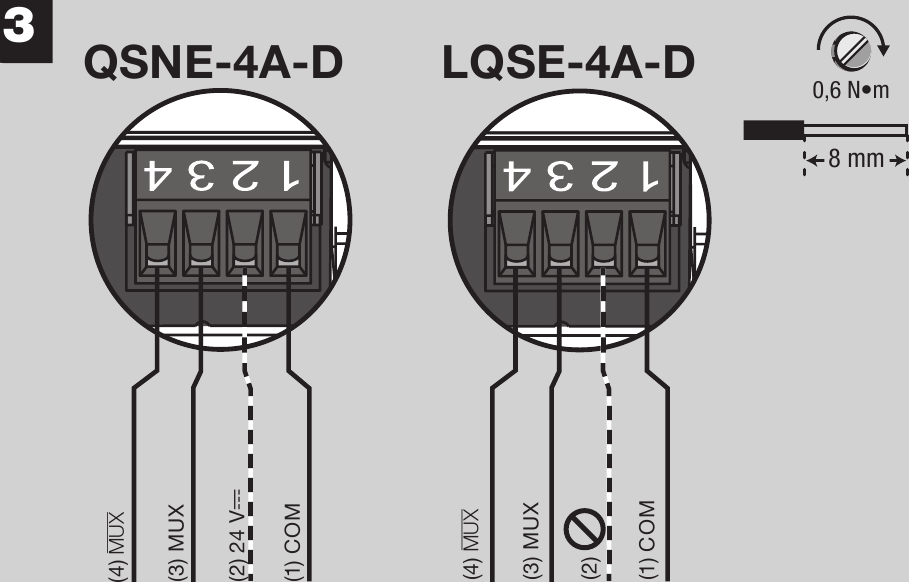
Ratings: 24 V 132 mA, 4 PDUs
- Turn off power while servicing unit.
- Wire QS Link to the unit as shown, note terminals 3 and 4 are twisted, shielded pair.
- Link may be daisy chained or t-tapped, length not to exceed 609 m.
- For QSNE-4A-D, wire terminal 2 so that it supplies a maximum of 4 PDU's. Do not connect terminal 2 between devices that supply PDU's. For additional information, refer to P/N 369405 at www.lutron.com.
- On LQSE-4A-D, do not connect to terminal 2.
Emergency Contact Closure Input (IEC PELV)

- If not needed, leave pre-installed jumper in CCI terminals.
- Turn off power while servicing unit and wire CCI as shown.
- Input is Normally Closed, if opened unit will go to Emergency light levels and not respond to inputs from other devices.
Multi-Function Inputs (IEC PELV)
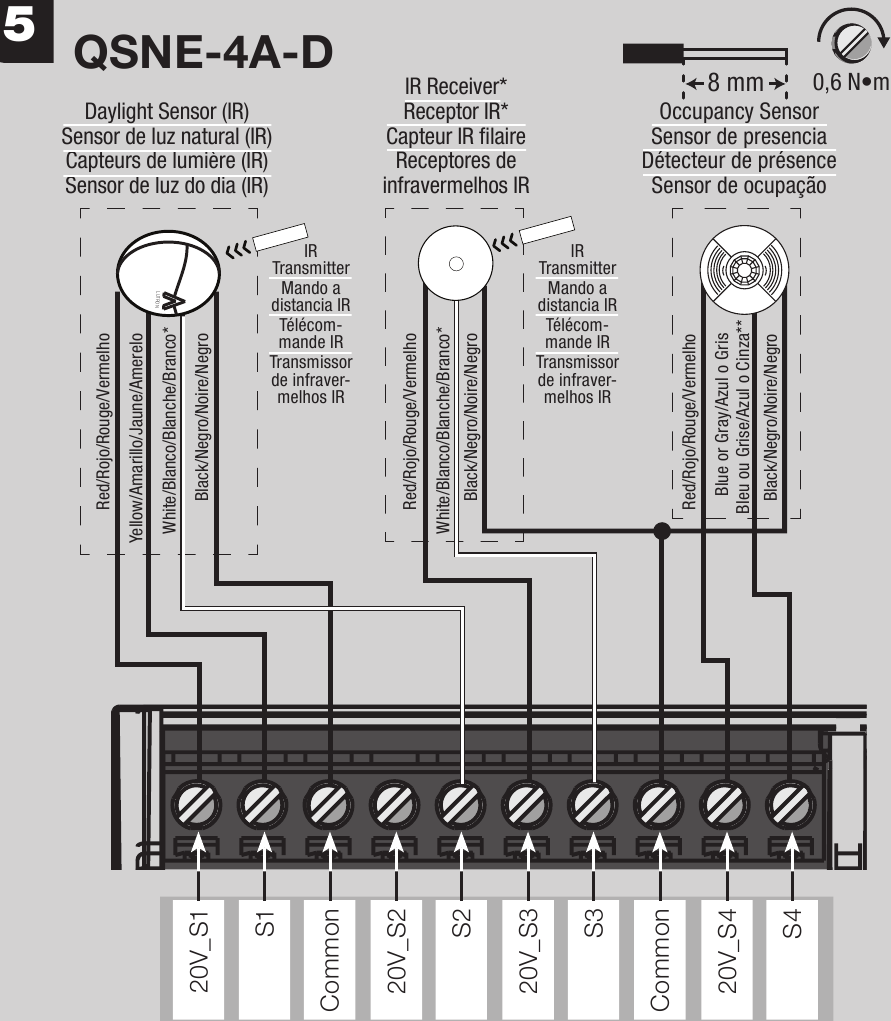
Ratings: 20 V  50 mA each
- Note: Multi-function inputs available on QSNE-4A-D only.
- Each input accepts one output from an occupancy or daylight sensor, an IR receiver or an IEC PELV dry contact switch (by others).
- Turn off power while servicing unit and wire as shown.
- Wire length to sensor/input device not to exceed 30 m.
* Note: Daylight sensor with IR requires two inputs. Only one IR device may be connected per input. If the IR signal from a daylight sensor is connected, another control may not be connected to the same input, and vice-versa.
** Note: Connect the gray wire on -R Occupancy Sensor models.
LED Diagnostic Indicators
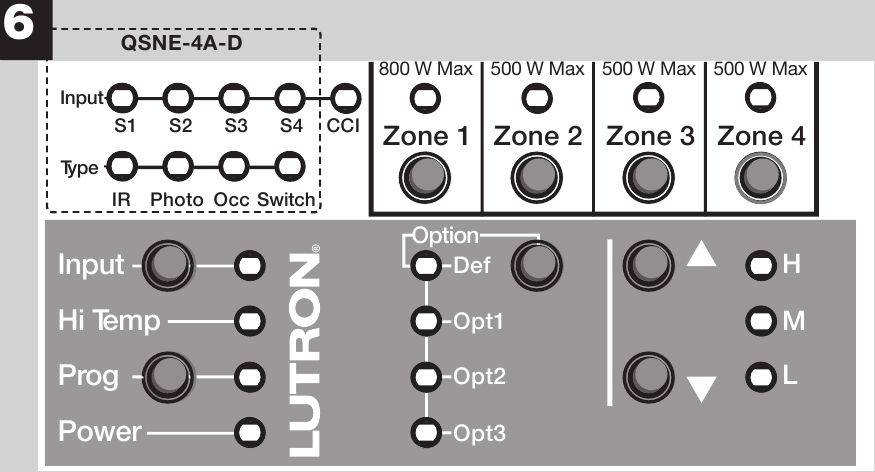
| LED | Behavior | Description |
| Power | Continuous On | Normal operation |
| Off | General system failure/No power; verify breaker is on | |
| Hi Temp | Off | Normal Operation |
| 1 second on, 7 seconds off | Unit is too hot, loads scaled to 25% power | |
| Continuous On | Unit is too hot, loads turned off | |
| Flashing: 1 blink/sec. | Unit was overheated and has now cooled to acceptable temperature | |
| Prog | Off | Device in Normal Mode |
| Flashing: 1 blink/sec. | Device in Program Mode | |
| Zone 1-4 | Off | Normal Operation: zone off |
| Continuous On | Normal Operation: zone on | |
| 1 blink, pause | Zone selected for manual control | |
Output shorted: verify wiring and do one of the following to turn on affected zone:
| ||
| 2 blink, pause | Overvoltage: contact Lutron | |
| 3 blink, pause | Shorted component: contact Lutron | |
| 4 blink, pause | Overtemperature: zone may be overloaded, all loads scaled to 25% | |
| 5 blink pause | Overtemperature: zone may be overloaded, all loads turned off | |
| Rapid flash: 10 blinks/sec. | Multiple errors: contact Lutron | |
| CCI | Continuous On | Normal operation |
| Rapid flash: 10 blinks/sec. | Emergency mode/Contact open/Jumper missing | |
| Input | Continuous On | Viewing wired input |
| Flashing: 1 blink/sec. | Viewing remote input on a QS Sensor Module (QSM) | |
| Input S1-S4 QSNE-4A-D only | Off | Sensor never detected or not currently receiving information |
| Continuous On/Flashing | Sensor is detected and is currently receiving information | |
| Def, Opt 1-3 QSNE-4A-D only | Off | Device in Normal Mode |
| Flashing/On | Selected option for Programming Mode |
Programming
- For QSNE-4A-D programming: Standalone applications please refer to Lutron® P/N 032416 (for button programming) or P/N 040384 (for iPod programming) at www.lutron.com; For Quantum® systems use the Quantum® software suite.
- For LQSE-4A-D programming: use the HomeWorks® QS Designer software.
FAQ
- Can I use non-dim loads with this product? No, only dimmable loads may be used.
- Can I use LED or CFL loads with this product? Yes, Refer to Lutron® P/N 048478 on www.lutron.com for compatibility with dimmable CFL/LED light sources.
- Can I use multiple load types on one zone? No, only one load type may be used per zone.
- Can I control receptacles with this product? No, output must not be used to control receptacles.
- How many sensors can be used with this product? For QSNE-4A-D models only: This product will accept up to four wired sensor inputs and is compatible with Lutron® Occupancy and Daylight sensors, as well as Lutron® IR receivers and IEC PELV Dry Contact Switches (by others). Additional sensors can be used by using a QS Sensor Module (QSM).
- How do I know if the unit is dimming with leading-edge or trailing-edge dimming? In system applications, the dimming type will be automatically set depending upon the load types selected in the design software. For standalone applications, please consult the unit programming guide 032416 or iPod Energi Savr NodeTM handheld programming guide 040384.
- How do I know if the QS link is working properly? Press the "Option" (Option) button. If the power LED flutters periodically, the QS link is operating normally. If the "Power" (Power) LED is flashing, there is a communication error or there are no other QS devices on the link. Verify link wiring.
- Can I install multiple devices in one panel? Yes, please refer to Lutron® P/N 048466 at www.lutron.com.
Contact Information
World headquarters
TEL +1.610.282.3800
Technical Support 1.800.523.9466
Toll-Free 1.888.LUTRON1
European headquarters
TEL +44.(0)20.7702.0657
Technical support +44.(0)20.7680.4481
FREEPHONE 0800.282.107
Asian headquarters
TEL +65.6220.4666
Technical hotlines
France: 0800.90.12.18
Germany: 00800.5887.6635
Italy: 800.979.208
Spain: 900.948.944
Northern China: 10.800.712.1536
Southern China: 10.800.120.1536
Hong Kong: 800.901.849
Singapore: 800.120.4491
Taiwan: 00.801.137.737
Thailand: 001.800.120.665853
Other Areas in Asia: +65.6220.4666
Lutron Electronics Co., Inc. | 7200 Suter Road | Coopersburg, PA 18036-1299 | U.S.A.
Limited Warranty
QSNE-4A-D
This warranty shall run for a period of two years from the date of purchase and Lutron's obligations under this warranty are limited to remedying any defect, replacing any defective part or replacement (at Lutron EA's sole option) and shall be effective only if the defective unit is shipped to Lutron EA postage prepaid within 24 months after purchase of the unit. Repair or replacement of the unit does not affect the expiry date of the warranty.
LQSE-4A-D
http://www.lutron.com/TechnicalDocumentLibrary/HomeWorks_Intl_Warranty.pdf
Lutron and HomeWorks QS are registered trademarks and Energi Savr Node is a trademark of Lutron Electronics Co., Inc.
©2013 Lutron Electronics Inc. Co., Inc.

Documents / Resources
References
![www.lutron.com]() Lutron: Beautiful light. Intelligent Shades. Powerful Controls
Lutron: Beautiful light. Intelligent Shades. Powerful Controlshttp://www.lutron.com/TechnicalDocumentLibrary/HomeWorks_Intl_Warranty.pdf
Download manual
Here you can download full pdf version of manual, it may contain additional safety instructions, warranty information, FCC rules, etc.
Advertisement

 buttons can be used to locally control each zone.
 on the unit


Need help?
Do you have a question about the QSNE-4A-D and is the answer not in the manual?
Questions and answers