Table of Contents
Advertisement
Quick Links
Advertisement
Table of Contents

Related Manuals for ACME METEOR


Summary of Contents for ACME METEOR
-
Page 2: Table Of Contents
REV B 09/27/2024 CONTENTS 01/ Safety Information ....................2 02/ Technical Specifications ..................4 03/ Overview ........................6 04/ Connecting Power and Data ................7 4.1 Connecting Power ................... 7 4.2 Connecting Data....................8 05/ Fixture Installation ....................9 06/ Operation ....................... 10 6.1 Control Menu .................... -
Page 3: 01/ Safety Information
REV B 09/27/2024 01/ Safety Information Please read the instruction carefully which includes important information about the installation, usage and maintenance. WARNING Please keep this User Manual for future consultation. If you sell the unit to another user, be sure that they also receive this instruction manual. Important: Damages caused by the disregard of this user manual are not subject to warranty. - Page 4 REV B 09/27/2024 Avoid any flammable liquids, water or metal from entering the unit. Once it happens, cut off the mains power immediately. DO NOT operate in a dirty or dusty environment. DO clean the fixture regularly. DO NOT touch any wire during operation as there might be a hazard of electric shock. ...
-
Page 5: 02/ Technical Specifications
REV B 09/27/2024 02/ Technical Specifications AC Power 180-240Vac; 50/60Hz Max. Power Consumption Light Source 12x25W RGBAWL LED Color Temperature 7000K-9000K (W) Beam Angle 3.5° DMX Channels DMX512 Control and Protocols Programming Firmware Update via DMX Display OLED display DMX and RDM 3-pin XLR (optional with 5-pin XLR) Data In/Out Construction... - Page 6 REV B 09/27/2024 Photometric Diagram: - 5 -...
-
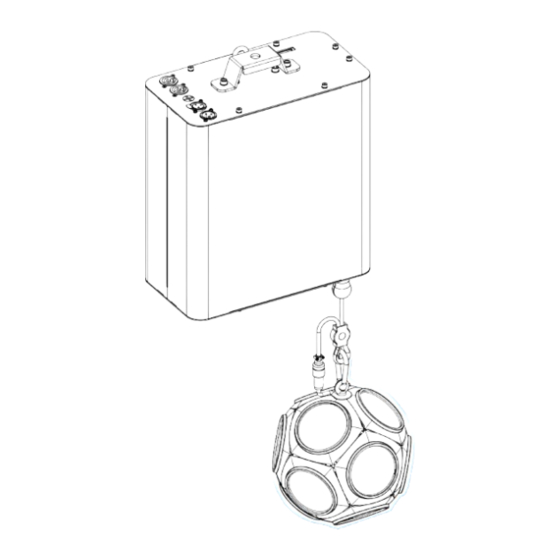
Page 7: 03/ Overview
REV B 09/27/2024 03/ Overview 1. Display To show the various menus and the selected function MENU To enter into move backward or leave the menu UP To go backward to move up in the menu 2. Buttons DOWN To go forward to move down in the menu ENTER To perform the desired functions... -
Page 8: 04/ Connecting Power And Data
REV B 09/27/2024 04/ Connecting Power and Data 4.1 Connecting Power This fixture can operate on any 180-240Vac; 50/60Hz AC mains power supply. The maximum power consumption is 85W. The fixture must be grounded/earthed and able to be isolated from AC power. The AC power supply must incorporate a fuse or circuit breaker for fault protection. -
Page 9: Connecting Data
REV B 09/27/2024 4.2 Connecting Data The fixture is equipped with 3-pin (or 5-pin) XLR sockets for DMX input and output. Use a high-quality DMX cable designed for RS-485 and 3-pin (or 5-pin) XLR-plugs and connectors in order to connect the controller with the fixture or one fixture with another. Building a serial DMX chain: Connect the DMX data output from the controller to the fixture’s data input socket. -
Page 10: 05/ Fixture Installation
REV B 09/27/2024 05/ Fixture Installation DO install and operate by qualified operator. Fixture(s) should be installed in areas outside walking paths, seating areas, or away from areas were unauthorized personnel might reach the fixture by hand. NEVER stand directly below the fixture(s) when rigging, removing or servicing. -
Page 11: 06/ Operation
REV B 09/27/2024 06/ Operation 6.1 Control Menu To access the control menus, press the [MENU] button. Navigate the menu structure, using the [ENTER], [ UP] and [ DOWN] buttons. To select a menu option or to confirm a selection, press the [ENTER] button. ... -
Page 12: Channel Mode
REV B 09/27/2024 MAIN MENU SUBMENU CHOICES/VALUES Reset Functions All Reset Special Functions Factory Restore DMX Settings Enter the control menu and select DMX Settings, press ENTER. Use the UP/DOWN button to select DMX Address, Channel Mode, No DMX Status or View DMX Value. DMX Address Select DMX Address, press ENTER. - Page 13 REV B 09/27/2024 View DMX Value Select View DMX Value, press ENTER. Use UP/DOWN button to select the desired DMX channel, for which the value is to be displayed. To exit the menu, press MENU, or wait 30 seconds. Fixture Settings Enter the control menu and select Fixture Settings, press ENTER.
- Page 14 REV B 09/27/2024 Dimmer Speed Select Dimmer Speed, press ENTER. Use UP/DOWN button to select Fast or Smooth, confirm your selection with ENTER. To exit the menu, press MENU, or wait 30 seconds. Display Settings Enter the control menu and select Display Settings, press ENTER. Use the UP/DOWN button to select Display Invert or Language.
- Page 15 REV B 09/27/2024 Information Enter the control menu and select Information, press ENTER. Use the UP/DOWN button to select Fixture Use Hour, LED Use Hour, Temperature, Fan State, Firmware Version, RDM UID or Error Logs. Fixture Use Hour Select Fixture Use Hour, press ENTER. The operating hours is displayed.
- Page 16 REV B 09/27/2024 Error Logs Select Error Logs, press ENTER. Use UP/DOWN button to select Fixture Errors, confirm your selection with ENTER. The error list is displayed. Use UP/DOWN button to select Reset Error Log, confirm your selection with ENTER. If you wish to reset the relevant error logs, select Yes.
- Page 17 REV B 09/27/2024 Special Functions Enter the control menu and select Special Functions, press ENTER. Use the UP/DOWN button to select Factory Restore. Factory Restore Select Factory Restore, press ENTER. If you wish to reset the device to the factory settings, select Yes. If you do not wish to reset anything, select No.
- Page 18 REV B 09/27/2024 RDM functions: Certain menus of the device and functions can be called up via the RDM protocol. The parameter IDs are implemented as follows for different commands: Command Command Command Parameter ID ‘Discovery’ ‘Set’ ‘Get’ DISC_UNIQUE_BRANCH √ DISC_MUTE √...
-
Page 19: 07/ Configuring The Device For Dmx Control
REV B 09/27/2024 07/ Configuring the Device for DMX Control 7.1 Address Setting All fixtures should be given a DMX starting address when operating with a DMX controller, in order to ensure that the correct fixture responds to the correct control signal. Incorrect settings will result in unpredictable responses from the lighting controller. -
Page 20: Dmx Protocol
REV B 09/27/2024 7.2 DMX Protocol CHANNEL VALUE FUNCTION 23ch LENGTH SETTING (1m) (Length can be set from 1-9 meters, please refer to the "Length Setting" table for details) 000-048 0-20cm 049-096 21-40cm 097-145 41-60cm 146-196 61-80cm 197-225 81-100cm 000-255 LENGTH SETTING FINE SPEED 000-255... -
Page 21: Led Color
REV B 09/27/2024 248-255 Open DIMMER 000-255 0%100% 000-255 DIMMER FINE LED COLOR 000-007 Close 008-011 012-015 Green 016-019 Blue 020-023 Amber 024-027 White 028-031 Lemon 032-035 Red + Green 036-039 Red + Blue 040-043 Green + Blue 044-047 Red + White 048-051 Green + White 052-055... - Page 22 REV B 09/27/2024 168-171 Amber + White + Lemon 172-192 Color Cycling 193-223 Synchronous Randomly Color Change 224-255 Asynchronous Randomly Color Change LED 1 COLOR 000-007 Close 008-011 012-015 Green 016-019 Blue 020-023 Amber 024-027 White 028-031 Lemon 032-035 Red + Green 036-039 Red + Blue 040-043...
- Page 23 REV B 09/27/2024 172-255 Close LED 2 COLOR 000-255 (Same as “LED 1 COLOR”) LED 3 COLOR 000-255 (Same as “LED 1 COLOR”) LED 4 COLOR 000-255 (Same as “LED 1 COLOR”) LED 5 COLOR 000-255 (Same as “LED 1 COLOR”) LED 6 COLOR 000-255 (Same as “LED 1 COLOR”)
-
Page 24: Background Color
REV B 09/27/2024 168-175 Built-in Effect 21 176-183 Built-in Effect 22 184-191 Built-in Effect 23 192-199 Built-in Effect 24 200-207 Built-in Effect 25 208-215 Built-in Effect 26 216-223 Built-in Effect 27 224-231 Built-in Effect 28 232-239 Built-in Effect 29 240-247 Built-in Effect 30 248-255 Built-in Effect 31... - Page 25 REV B 09/27/2024 128-131 Red + Lemon + White 132-135 Green + Blue + Amber 136-139 Green + Blue + White 140-143 Green + Blue + Lemon 144-147 Green + Amber + White 148-151 Green + Amber + Lemon 152-155 Green + White + Lemon 156-159 Blue + Amber + White...
- Page 26 REV B 09/27/2024 Length Length Length Length 0-20cm 0-20cm 0-20cm 0-20cm 7-11 21-40cm 21-40cm 21-40cm 21-40cm 12-18 41-60cm 10-14 41-60cm 9-12 41-60cm 7-10 41-60cm 19-24 61-80cm 15-19 61-80cm 13-16 61-80cm 11-13 61-80cm 25-31 81-100cm 20-24 81-100cm 17-20 81-100cm 14-16 81-100cm 32-37 101-120cm 25-30...
-
Page 27: 08/ Error Information
REV B 09/27/2024 218-227 721-740cm 179-186 721-740cm 228-236 741-760cm 187-194 741-760cm 237-246 761-780cm 195-202 761-780cm 247-255 781-800cm 203-209 781-800cm 210-218 801-820cm 219-226 821-840cm 227-235 841-860cm 236-244 861-880cm 245-255 881-900cm 08/ Error Information Error codes are shown continuously in the display when the fixture fails and they will not disappear until the fixture is repaired. -
Page 28: 09/ Troubleshooting
REV B 09/27/2024 09/ Troubleshooting Problem Potential cause(s) Remedies Confirm that the power is switched No power to the fixture. Fixture does not respond on and cables are plugged in. or appears to be off. No output from PSU. Replace the PSU. Fixture suddenly turned Check the power supply, switches Power was turned off. -
Page 29: 10/ Fixture Cleaning
REV B 09/27/2024 10/ Fixture Cleaning Regular cleaning is very important for fixture life and performance. Buildup of dust, dirt, smoke particles, fog fluid residues, etc. degrades the fixture’s light output and cooling ability. Cleaning schedules for lighting fixtures vary greatly depending on the operating environment. It is therefore impossible to specify precise cleaning intervals for the fixture.
Need help?
Do you have a question about the METEOR and is the answer not in the manual?
Questions and answers