Spirit XBR95 Owner's Manual
Hide thumbs
Also See for XBR95:
- Manual (48 pages) ,
- Owner's manual (43 pages) ,
- Service manual (26 pages)

Subscribe to Our Youtube Channel
Related Manuals for Spirit XBR95


Summary of Contents for Spirit XBR95
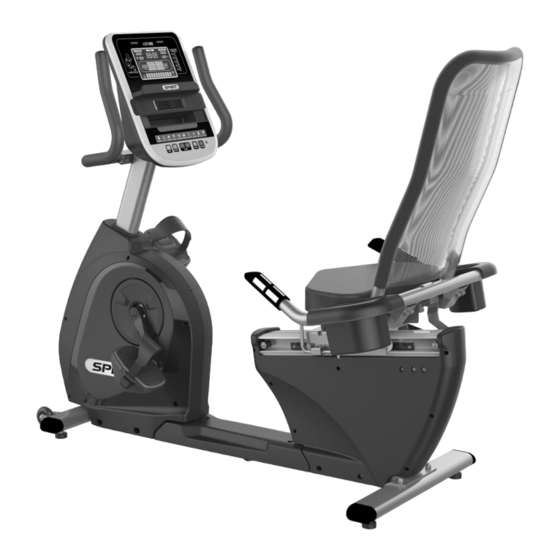
- Page 1 Owner’s Manual Model No. 16207383950 XBR95 - Assembly - Operation - Adjustments - Parts - Warranty CAUTION: Read and understand this manual before operating unit Retain For Future Reference...
-
Page 2: Table Of Contents
Important Safety Instructions……………………………………………….3 Important Electrical Instructions……………………………………………5 Important Operation Instructions…………………………………………..5 Assembly Instructions…………………………………………....6 Setting Up Your Bike………………………………………….…....11 About Your Machine & Using the Spirit+ App………………….……..12 Operation of Your Console……..…………………………………………..13 Programmable Features………………………………………………..… 16 Programs Intro…………………………………………………………...….17 Using A Heart Rate Transmitter………………………………………… .. 25 Maintenance &... -
Page 3: Product Registration
CONGRATULATIONS ON YOUR NEW FITNESS BIKE Thank you for your purchase of this quality fitness bike trainer from Dyaco Canada Inc. Your new bike was manufactured by one of the leading fitness manufacturers in the world and is backed by one of the most comprehensive warranties available. Through your dealer, Dyaco Canada Inc. -
Page 4: Important Safety Instructions
Important Safety Instructions When using electrical equipment, basic precautions should always be followed, including the following: WARNING - Read all instructions before using this equipment. DANGER - To reduce the risk of electric shock: Always unplug this equipment from the electrical outlet immediately after using and before cleaning. - Page 5 • Close supervision is necessary when this equipment is used by, on, or near children, invalids, or disabled persons. • Keep children under the age of 13 away from this machine. • The Recumbent bike is not a medical device. Please ensure that you review and adhere to the user weight restrictions and power requirements of your new machine.
-
Page 6: Important Electrical Instructions
Important Electrical Instructions WARNING! NEVER expose this unit to rain or moisture. This product is NOT designed for use outdoors, near a pool or spa, or in any other high-humidity environment. The operating temperature specification is 40 to 120 degrees Fahrenheit, and humidity is 95% non-condensing (no water drops forming on surfaces). -
Page 7: Assembly Instructions
ASSEMBLY INSTRUCTIONS PRE-ASSEMBLY !!ATTENTION: IMPORTANT UNPACKING INSTRUCTIONS. PLEASE READ BEFORE UNPACKING YOUR FOLDING UPRIGHT BIKE!! Using a razor knife (Box Cutter), cut the banding straps that wrap around the carton. Reach under the bottom edge of the carton and pull it away from the cardboard underneath, separating the staples that join the two together. - Page 8 STEP 1: 1. Attach the REAR STABILIZER (7) to the MAIN FRAME (1) with 2 BOLTS (65) and 2 FLAT WASHERS (84) and 2 CAP NUTS (191). Tighten completely with the WRENCH (112). 2. Attach the SEAT BACK (5) to the SEAT CARRIAGE (4) of the main frame. Slide 1 BOLT (67) through each side, then attach a NYLON NUT (89) to each bolt.
- Page 9 STEP 2: 1. Slide the COMPUTER CABLE (44), HANDLEBAR RESISTANCE CONTROL CABLE (148), and HAND PULSE CABLE (45) through the bottom of the CONSOLE MAST COVER (31) and then the bottom of the CONSOLE MAST (2). Make sure the Console Mast Cover is correctly oriented (see illustration).
- Page 10 STEP 3: 1. Install the SEAT (61) on the SEAT CARRIAGE (4) with 4 PHILLIPS HEAD SCREWS (98). Tighten with the PHILLIPS HEAD SCREWDRIVER (114). 2. Attach the SEAT HANDLEBAR (6) to the SEAT CARRIAGE (4) with the 4 Hex Head Bolts (71), 4 FLAT WASHERS (77), and 4 NYLON NUTS (89).
- Page 11 STEP 4: 1. Install the GAS CYLINDER (57) on the SEAT BACK FRAME (5) with 1 BOLT (70), 1 FLAT WASHER (76) and 1 NYLON NUT (91) by using the WRENCHES provided (112 & 113). 2. Attach the PEDALS (116) to the CRANK ARMS (51L, 51R). Tighten with the WRENCH (113).
-
Page 12: Setting Up Your Bike
Setting Up Your Bike ■ Levelling Use a M14 Wrench to adjust the height of the Leveling Feet. ■ Moving The Recumbent Bike The Bike is equipped with 2 transport wheels on the front stabilizer. Lift the bike by the rear stabilizer and gently tilt the bike up and roll it away. -
Page 13: About Your Machine & Using The Spirit+ App
Downloading the Spirit+ app will help unlock more features- such as tracking workouts and sharing data via Google Fit and Apple Fitness. Simply search for “Spirit+” in the app store on your smartphone or tablet or scan the QR code below. -
Page 14: Operation Of Your Console
Level Buttons Powering On The XBR95 Recumbent Bike has a built-in generator for power and does not need to be plugged into an AC outlet. To power up the bike simply start to pedal, and the console will turn on automatically. - Page 15 Quick Start After the console powers up you just press the Start key to begin, this will initiate the Quick Start mode. In Quick Start the Time will count up from zero and the workload may be adjusted manually by pressing the Level + / - buttons. The dot matrix display will have only the bottom row lit at first.
- Page 16 Dot Matrix Center Display Twenty columns (10 high) indicate each segment of a workout. The boxes only show an approximate level (resistance) of effort. They do not necessarily indicate a specific value - only an approximate percent to compare levels of intensity. In Manual Operation the resistance dot matrix window will build a profile “picture”...
-
Page 17: Programmable Features
PROGRAMMABLE FEATURES Programming the Console Each of the programs can be customized with your personal information and changed to suit your needs. Some of the information asked for is necessary to ensure the readouts are correct. You will be asked for your Age and Weight. Entering your Age is necessary during the Heart Rate programs to ensure the correct settings are in the program for your Age. -
Page 18: Programs Intro
PROGRAMS - TO SELECT AND START A PROGRAM Preset Press the PROGRAM key to select the desired program button, then press the Enter key. The Message Center will ask you to enter your Age. You may adjust the age setting, using the + and - keys, then press the Enter key to accept the new number and proceed on to the next screen. - Page 19 PROGRAMS - PRESET The Recumbent Bike has multiple different programs that have been designed for a variety of workouts. These six programs have factory preset work level profiles for achieving different goals. Hill This program follows a triangle or pyramid type of gradual progression from approximately 10% of maximum effort (the level that you chose before starting this program) up to a maximum effort which lasts for 10% of the total workout...
- Page 20 HIIT This program takes you through high levels of intensity followed by recovery periods of low intensity. This program utilizes and develops your “Fast Twitch” muscle fibres which are used when performing tasks that are intense and short in duration. These deplete your oxygen level and spike your heart rate, followed by periods of recovery and heart rate drop to replenish oxygen.
- Page 21 PROGRAMS Fusion In this interval program, you will alternate between mid-high-intensity cardiovascular intervals on the bike, strength exercises off of the bike, and low-intensity recovery intervals on the bike. You will need a pair of objects that can be comfortably held in your hands (dumbbells, water jugs, soup cans, etc.) for 4 of the 5 strength exercises performed in this program.
- Page 22 Countdown Mode Target programs can set a Target Time, Target Distance or Target Calories for your workout. When the program begins the target item will count down; once it reaches zero the program ends. Press the PROGRAM key to select TARGET PROGRAM, then press Enter. Press the PROGRAM key to select the Target Time program, Target Distance program or Target Calories program.
- Page 23 The Message Center will ask you to enter your Age. You may enter your age, using the Level +/- keys, then press the Enter key to accept the new value and proceed on to the next screen. You are now asked to enter your Weight. You may adjust the weight value using the Level +/- keys, then press Enter to continue.
- Page 24 HEART RATE EXERTION The old motto, “no pain, no gain”, is a myth that has been overpowered by the benefits of exercising comfortably. A great deal of this success has been promoted by the use of heart rate monitors. With the proper use of a heart rate monitor, many people find that their usual choice of exercise intensity was either too high or too low and exercise is much more enjoyable by maintaining their heart rate in the desired benefit range.
- Page 25 HEART RATE - PERCEIVED EXERTION Heart rate is important but listening to your body also has a lot of advantages. There are more variables involved in how hard you should work out than just heart rate. Your stress level, physical health, emotional health, temperature, humidity, the time of day, the last time you ate, and what you ate, all contribute to the intensity at which you should workout.
-
Page 26: Erratic Operation
How to wear your wireless chest strap transmitter: 1. Attach the transmitter to the elastic strap using the locking parts. 2. Adjust the strap as tightly as possible as long as the strap is not too tight to remain comfortable. 3. -
Page 27: Maintenance & Care
MAINTENANCE & CARE POST-WORKOUT MACHINE CARE 1. Store your machine according to the folding instructions when not in use. 2. Use a slightly damp cloth to clean areas where sweat or oil made contact with the machine. 3. Use a microfiber cloth to clean the touchscreen and remove unwanted oils and other things that may damage the screen. -
Page 28: Troubleshooting
TROUBLESHOOTING Problem Solution/Cause Squeak, thump, and clicking sound heard 1. The hardware was not sufficiently tightened during assembly. All bolts that were installed during assembly need to be tightened as much as possible. It may be necessary to use a larger wrench than the one provided if you cannot tighten the bolts sufficiently. -
Page 29: Exploded View Diagram
EXPLODED VIEW DIAGRAM Customer Service 1-888-707-1880 Dyaco Canada Inc. 2023 Email: customerservice@dyaco.ca... -
Page 30: Parts List
PARTS LIST Part Description Q’ty Main Frame Console Mast Mast Handlebar Assembly Seat Carriage Seat Back Frame Seat Handle Bar Rear Stabilizer Crank Axle Seat Wheel Adjustment Plate (L) Seat Wheel Adjustment Plate (R) Idler Wheel Assembly Seat Stop Axle Seat Position Latch Backing Plate Aluminum Track... - Page 31 Part Description Q’ty Front Shroud (R) Console Mast Cover Handgrip End Cap Bottom Cover Round Disk Cover Rear Shroud (L) Rear Shroud (R) Drink Bottle Holder (R) Drink Bottle Holder (L) Release Lever 300mm_Hand Pulse Sensor Assembly W/Cable Generator/Brake Controller Computer Cable 2300mm_Hand Pulse Sensor Assembly W/Cable 1300mm_Sensor W/Cable...
- Page 32 Part Description Q’ty Ø17_C Ring Ø20_C Ring M8 × 170mm_J Bolt M8 × 7T_Nylon Nut 3/8" × 7T_Nylon Nut 1/4" × 8T_Nylon Nut 5/16" × 6T_Nylon Nut M6 × 38mm_Socket Head Cap Bolt 5/16" × UNC18 × 3/4"_Hex Head Bolt M5 ×...
- Page 33 Part Description Q’ty Rotate Axle Bracket Ø5/16" × 16 × 1.5T_Flat Washer M6 × 10L_Flat Phillips Head Screw Ø1/4" × Ø16 × 1.0T_Flat Washer Sleeve M6 × 19L_Nut M6 × 10L_Button Head Socket Bolt PU Wheel Seat Front/Aft Adjustment Lever Lever Anchor M5 ×...
-
Page 34: Manufacturer's Limited Warranty
REPAIR PARTS AND SERVICE All of the parts for the Spirit cycle shown in this manual can be ordered from Dyaco Canada Inc. 5955 Don Murie Street, Niagara Falls, Ontario L2G 0A9. When ordering parts, the parts will be sent and billed at the current prices. - Page 35 Please visit us online for information about our other brands and products manufactured and distributed by Dyaco Canada Inc. spiritfitness.ca solefitness.ca xterrafitness.ca dyaco.ca/products/everlast.html dyaco.ca/UFC/UFC-home.html spiritfitness.ca/johnnyg.html trainorsports.ca For more information, please contact Dyaco Canada Inc. T: 1-888-707-1880 ⏐ 5955 Don Murie St., Niagara Falls, Ontario L2G 0A9 ⏐ sales@dyaco.ca Customer Service 1-888-707-1880 Dyaco Canada Inc.
Need help?
Do you have a question about the XBR95 and is the answer not in the manual?
Questions and answers