Table of Contents
Advertisement
Quick Links
Advertisement
Table of Contents

Subscribe to Our Youtube Channel
Related Manuals for Omni Prep 96


Summary of Contents for Omni Prep 96
- Page 1 OMNI Prep 96 Automated Homogenizer User Manual...
- Page 3 This product is warranted to be free from defects in material and workmanship for a period of ONE YEAR from the date of delivery. OMNI International will repair or replace and return free of charge any part which is returned to its factory within said period, transportation prepaid by user, and which is found upon inspection to have been defective in materials or workmanship.
-
Page 4: Table Of Contents
Overview ......................5 Section 1: Key Features and Specifications ..........6 Section 2: Rotor Stator Homogenizer Probes ......... 7 Section 3: Preparing the OMNI Prep 96 for Use ........9 Section 4: Operation ..................13 Section 5: Cleaning and Maintenance ............19 Section 6: Creating and Editing Methods .......... -
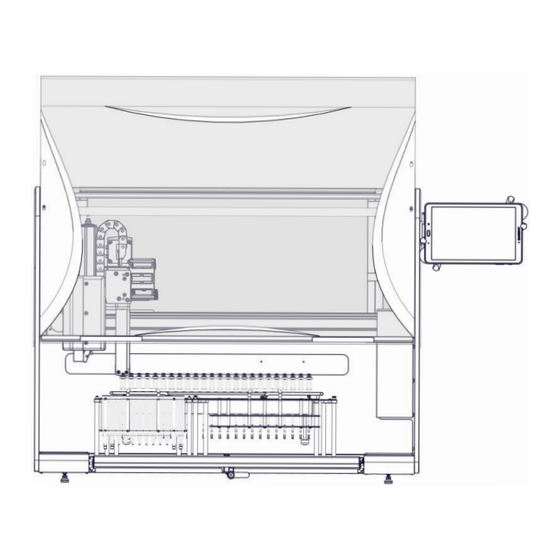
Page 5: Overview
Overview 1. End Effector Homogenizer 4. Tip Rack for Dirty Probes 96 Position 2. Touchscreen Controller 5. Tip Rack for Clean Probes 96 Position 3. 96 Position Sample Rack... -
Page 6: Section 1: Key Features And Specifications
OMNI Tip™ Homogenizer probes. The OMNI Prep 96 fully automates the time consuming manual homogenization of samples. Load the sample tubes into the sample rack, and the OMNI Prep 96 will quickly and efficiently homogenize the samples in accordance with the selected method. - Page 7 Proper Equipment Operation To reduce the risk of electric shock, do not remove the cover. No user serviceable parts are inside. Refer to qualified service personnel if help is required. Use this product only in the manner described in this manual. If the equipment is used in a manner not specified by the manufacturer, the protection provided by the equipment may be impaired.
-
Page 8: Section 2: Rotor Stator Homogenizer Probes
(Stator). The OMNI Prep 96 homogenizes a sample by inserting a specific probe into the specified sample tube and operating the probe at high rotational speeds to shear and mix the sample. The OMNI Prep 96 also oscillates the probe up-and-down and side-to-side to fully process the entire sample, simulating the motions used in manually operated homogenizers. -
Page 9: Section 3: Preparing The Omni Prep 96 For Use
1. Turn on the OMNI Prep 96 by pressing the On-Off switch to the ON (1) position. The On-Off switch is located on the left side of the OMNI Prep 96 toward the rear. There is an additional circular switch on the front left hand side of the unit, ensure this is also pressed. - Page 10 4. In the System - OMNI Menu, ensure the Labware selected matches the installed accessories. If necessary change the selected Labware. Then press Initialize and Load Labware. Press BACK and then press Labware Calibration.
- Page 11 5. You can choose to input an offset, or the actual value. Select which value you’d like to edit by clicking the appropriate value in the white box. Note that the three tables correspond to the three different accessories installed on this system. 6.
- Page 12 Prepare and turn on the system 1. Check the OMNI Prep 96 unit to verify that there are no used probes or sample tubes left in the racks. Verify that the unit is clean and that no contaminants remain from previous runs.
-
Page 13: Section 4: Operation
1. Select ‘New Cycle’ to proceed to Method Select 2. Methods are software programs that control the OMNI Prep 96 operations and set the parameters (tube size, probe size, probe speed, etc.) used during sample processing. Default methods may have been created during the equipment installation to meet your specific needs. - Page 14 4. On the ‘Overview Screen the Clean Tip rack is displayed. Tips can be selected individually. It is typically easiest to use the ‘Select All’ function. This will tell the system that the clean tip rack is full. 5. Loaded tips are indicated as light blue circles. Select ‘Start’ when you are ready to proceed.
- Page 15 6. Ensure the installed rack and tips match the software. Also ensure the drawer is fastened securely and the door is shut. 7. The current step of the method when in operation will be highlighted in blue on the Step Menu which is located on the left side of the screen.
- Page 16 Pausing and Stopping the OMNI Prep 96 8. When the ‘Pause Button’ is pressed, you will have the option to terminate the run, or continue. 9. There are several sensors on the system. If the door or drawer is ajar during the run, you will see the following...
- Page 17 10. At the end of the run, you will be presented with a results screen. This has useful information including number of samples run, total time elapsed, and the method steps.
- Page 18 In the event of an emergency press the red Emergency Stop button, attached to the base of the OMNI Prep 96 unit, to immediately shut down the entire operation. Power will not be restored to the OMNI Prep 96 unit until the Emergency Stop...
-
Page 19: Section 5: Cleaning And Maintenance
Section 5: Cleaning and Maintenance Turn the power off to the OMNI Prep 96 unit prior to cleaning. This minimizes the potential for electrical shock and prevents damage to sensitive components on the OMNI Prep 96 unit. Recommended: After each use and at the end of the work day (after all processing is complete), remove all racks (sample, new probe, used probe) from the OMNI Prep 96 unit, and clean separately with a mild detergent. - Page 20 2. Select the Menu. 3. Select “Manual Operation”...
-
Page 21: Section 6: Creating And Editing Methods
Section 6: Creating and Editing Methods Default Methods The OMNI Prep 96 is delivered and installed with a set of methods based upon your laboratory’s specific needs. As your needs change, we can work with your laboratory to set up and modify these methods to accommodate your processing needs. -
Page 22: Section 7: Troubleshooting
55 samples in a 24 position or less than ?? for the rack selected rack. The ?? value is usually 24, 48, or 96 depending on the sample rack. Appears when running OMNI Tips to allow VERIFY_PROPER_LOADING_FOR_ 0011... - Page 23 There should not be any OMNI Tips Displays if OMNI Tip s are improperly loaded 0012 Probe Holders on Robot Arm. However, in Probe Holders at the start of the run. probe(s) is (are) detected in position(s): ?? Appears when running fixed VERIFY_PROPER_LOADING_FOR_ homogenization probes (i.e., Stainless Steel...
- Page 24 RIFY_OMNI_TIP_ PROPERLY_LOADED_ Appears after an OMNI Tip loading error AFTER_MISLOAD window. It allows the user to confirm 0023 system has properly loaded probes before proceeding. IMPROPER_PROBE_ LOADING The system has sensors that detect the position in which homogenizer probes are loaded.
-
Page 25: Section 8: Frequently Asked Questions
- How do I terminate a sample run? Press the pause button on the OMNI Prep 96. The system will pause and ask the user to either resume or terminate. If terminate is selected, the user will be prompted again. If yes is selected on this occasion the system will terminate all processes. - Page 26 Notes...
- Page 28 935 Cobb Place Blvd NE Kennesaw, GA 30144 770.421.0058 • 1-800-776-4431 omni-inc.com 03-2801 Rev. D...
Need help?
Do you have a question about the Prep 96 and is the answer not in the manual?
Questions and answers