Advertisement
Quick Links
Advertisement

Related Manuals for Omni Drawer


Summary of Contents for Omni Drawer
- Page 1 Drawer Assembly Instruction...
- Page 2 Drawer Parts Indication A indicates, this is a Modular piece for Size A Indication A indicates, this is a corner piece for Size A Drawer Drawer Drawer Modular Drawer Corner...
- Page 3 Drawer Parts INT indicates that this is an Intermediate Piece Drawer Intermediate...
- Page 4 Annotations for Drawer Assembly This Drawer is made of 4 QTY of Corner Pieces 6 QTY of Modular Pieces and 2 QTY of Intermediate Pieces Drawer Corner Drawer Corner Drawer Drawer Drawer Modular Drawer Modular Intermediate Intermediate Drawer Corner Drawer Corner...
- Page 5 Each Folder has pre decided configuration for the drawer size Check the Drawer configuration, Print the parts as per mentioned QTY in file name/As shown in configuration picture Assemble it Following the further instructions...
- Page 6 STEP 1 : Take the Drawer Corner Piece and Drawer Modular Pieces according to the Size and assemble Drawer Corner Piece Drawer Modular Piece...
- Page 7 STEP 2 : Take the next Drawer Modular Pieces according to the Size and assemble Drawer Corner Piece Drawer Modular Piece Drawer Modular Piece...
- Page 8 STEP 3 : Prepare the Entire Raw Drawer Corner Piece Drawer Modular Piece Drawer Modular Piece Drawer Corner Piece...
- Page 9 STEP 4 : Take the Drawer Modular Piece and Assemble with the First Raw Drawer Modular Piece...
- Page 10 STEP 5 : Insert the Drawer Intermediate Piece Drawer Intermediate Piece...
- Page 11 STEP 6 : Insert the Drawer Intermediate Piece and Modular Piece to finish the raw Drawer Intermediate Piece Drawer Intermediate Piece Drawer Modular Piece...
- Page 12 STEP 7 : Insert the Drawer Corner Piece and Modular Piece to finish the next raw Drawer Corner Piece Drawer Modular Piece Drawer Modular Piece Drawer Corner Piece...
- Page 13 STEP 8 : Insert the Clock Lock and Twist it to lock...
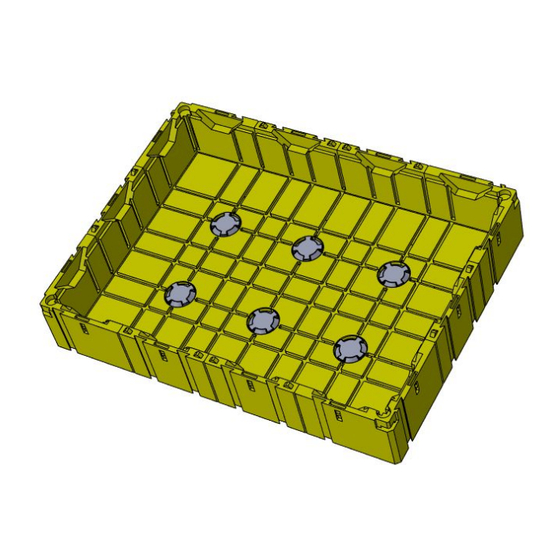
- Page 14 STEP 9 : Insert Clock lock at all positions and the single depth / Depth 1 drawer is ready.
- Page 15 Single depth / Depth 1 drawer...
- Page 16 Insert Dia 15 x 3 Magnet on slots provided Please take care of the Magnet polarity, It is advisable to insert the magnets in such a way that the same polarity of magnet goes on the internal side of the drawer at all locations!!!
- Page 17 STEP 11 : Insert Magnets on Acrylic Clip Insert Dia 15 x 3 Magnet on slots provided Please take care of the Magnet polarity, It should be opposite to the corner pieces...
- Page 18 STEP 12 : Insert Acrylic Clip on Acrylic Cover as shown. Acrylic Cover Acrylic Clip...
- Page 19 STEP 13 : Prepare all corners...
- Page 20 STEP 14 : Snap the Cover on the Drawer...
- Page 21 Further Instruction is for Increasing the depth of existing drawer by adding the extension Pieces.
- Page 22 Drawer Extension Pieces Indication A indicates, this is a Modular piece for Size A Indication A indicates, this is a corner piece for Size A Drawer Drawer Drawer Modular Extension Drawer Corner Extension These Extension pieces has the same height as of drawers. So Size A extension piece has same...
- Page 23 Drawers comes with their extension pieces to increase the drawer depth when required These Extension pieces has the same height as of drawers. So Size A extension piece has same height as Size A Drawer pieces. Increased drawer depth...
- Page 24 Please take care of the Magnet polarity, It is advisable to insert the magnets in such a way that the same polarity of magnet goes on the internal side of the drawer at all locations!!!
- Page 25 STEP 10 : To Increase the depth of the drawer, Assemble the Extension Pieces together Take the Corner Extension and Modular Extension and assemble it Corner Extension Modular Extension...
- Page 26 STEP 11 : Repeat the same method to prepare the entire border...
- Page 27 STEP 12 : Insert the Magnets Insert Dia 15 x 3 Magnet on slots provided Please take care of the Magnet polarity, the polarity of magnets should be opposite to the base drawer.
- Page 28 STEP 13 : Place it on the top of the Base Drawer...
- Page 29 STEP 14 : Insert the “Drawer Connector” on all corners Drawer Connector...
- Page 30 Dual Depth Drawer is Ready...
- Page 31 Depth can be added further ahead, Following the same instructions...
- Page 32 Further Instruction is to attach Drawer Removal Tool.
- Page 33 Drawer Remover in use Drawer Can be pulled out using these handles...
- Page 34 Drawer Remover Drawer Remover can be slides into the Drawer parts as shown...
- Page 35 Drawer Remover in use Drawer Can be pulled out using these handles...
- Page 36 Drawer Remover in use Ideally the drawer remover should be attached to top drawer. It can be removed and used on later drawers. How to Remove Drawer Remover? Press this Snap and Pull the Drawer remover...
- Page 37 OMNI Micro Drawer Configuration OMNI Micro has 3 x 3 Drawer Configuration OMNI Micro can have 2 Drawers Made using Drawer size A...
- Page 38 OMNI Briefcase Drawer Configuration OMNI Briefcase has 4 x 3 Drawer Configuration OMNI Briefcase can have 3 Drawers Made using Drawer size A...
- Page 39 OMNI Duffle bag Drawer Configuration OMNI Duffle bag has 5 x 3 Drawer Configuration OMNI Duffle bag can have 4 Drawers Made using Drawer size A along with Drawer A Spacer_Duffle...
- Page 40 OMNI Chest Drawer Configuration OMNI Chest has 6 x 4 Drawer Configuration OMNI Chest can have 6 Drawers Made using Drawer size A...
Need help?
Do you have a question about the Drawer and is the answer not in the manual?
Questions and answers