
Subscribe to Our Youtube Channel
Related Manuals for Tuuci SOLANOX CABANA


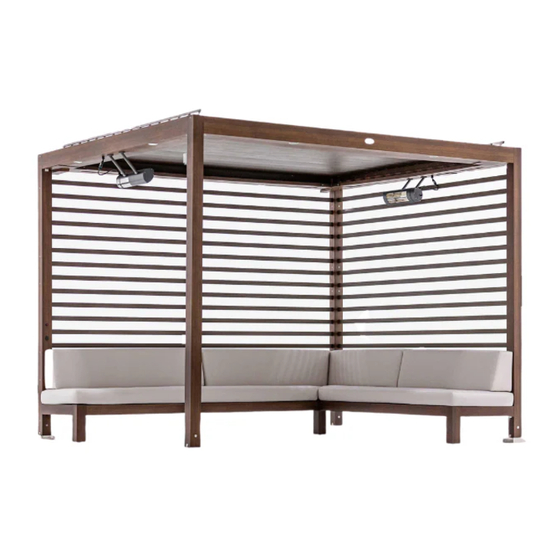
Summary of Contents for Tuuci SOLANOX CABANA
- Page 1 I N S T A L L A T I O N I N S T R U C T I O N S SOLANOX COLUMN END CAP BRACKET To protect your product, please read the operating instructions before opening the parasol. TUUCI.COM 1005164...
- Page 2 Description Quantity Column end cap bracket 1/2-13” X 3/4” Flat socket (Per column) Moving blankets Not included (Suggested) Once cabana is stationed in its desired location, mount end cap brackets. Install beauty cover before mounting end cap bracket. TUUCI.COM 1005164...
- Page 3 I N S T R U C T I O N S SOLANOX 9" X 9" STAINLESS STEEL BOTTOM PLATE To protect your product, please read the operating instructions. Anchor must be installed prior to assembling the cabana. TUUCI.COM 1005163...
- Page 4 Mark the center locations for each column and their diagonal dimensions. Using the chalk line (not included), trace the line f rom center of each mark. Attention: Accuracy in diagonal dimensions are crucial to ensure the proper alignment of cabana. DIM B DIM A TUUCI.COM 1005163...
- Page 5 Step 4 Use a 5/8” diameter drill bit and drill 2-1/4” deep to create the 8 parameter holes. Step 5 Use a 1” diameter drill bit and drill 1-1/2” deep to create the 4 inner holes. TUUCI.COM 1005163...
- Page 6 Place the security base stem on the 9”x9” base plate and insert the 4 hex bolts 1/2” into the 9”x9” base plate through the oval washers. security base stem ss oval washer 9”x9” base plate TUUCI.COM 1005163...
- Page 7 S O L A N O X 9" X 9" STAINLESS STEEL BOTTOM PLATE beauty cover Step 9 Using a level tool (not included), adjust security base stem with the leveling bolts and add beauty cover. security base 9”x9” base leveling bolt TUUCI.COM 1005163...
- Page 8 I N S T R U C T I O N S SOLANOX IN-GROUND SECURITY MOUNT (IGSM) To protect your product, please read the operating instructions before opening the parasol. Anchor must be installed prior to assembling the cabana. TUUCI.COM 1005156...
- Page 9 Hammer not included Step 1 Select your cabana dimension f rom the table below. Note: For custom sizes, see supplemental engineering layout for correct custom dimensions. Solanox Cabana Size Dim A Dim B Dim C 8’ SQUARE 92” / 233.7 cm 92”...
- Page 10 2. Step 4 Insert 1/2” mounting bolts to in-ground anchor mount (4-places). align hole axis perpendicular to Solanox cabana’s front and side edges Step 5 Pour concrete and insert in-ground anchor mount (IGSM) through the center of the concrete slab.
- Page 11 Beauty cover Step 7 Place the leveling anchor on the IGSM and mount with 1/2 Leveling inch bolts. Adjust leveling anchor with the leveling bolts and Leveling Bolts add beauty cover. IGSM TUUCI.COM 1005156...
- Page 12 P R O D U C T U S E R M A N U A L SOLANOX CABANA ASSEMBLY INSTRUCTIONS 2 LADDERS; MINIMUM HEIGHT 14’ ASSEMBLY REQUIRES 3 PEOPLE MUST READ INSTRUCTIONS DO NOT FULLY TIGHTEN HARDWARE UNTIL THE END OF INSTALLATION TUUCI.COM...
- Page 13 ASSEMBLY INSTRUCTIONS - CABANA DRAWING DO NOT FULLY TIGHTEN HARDWARE UNTIL THE END OF INSTALLATION TUUCI.COM 1005155...
-
Page 14: Tools Needed
9/16” or 14mm Socket 7/32” Allen key 5/32” allen key 5/16” allen key with a 3/4" wrench Rubber mallet Phillips screw driver 3/16” allen key locking vice grips pliers DO NOT FULLY TIGHTEN HARDWARE UNTIL THE END OF INSTALLATION TUUCI.COM 1005155... - Page 15 DO NOT FULLY TIGHTEN HARDWARE UNTIL THE END OF INSTALLATION INSTALL BASE MOUNT ASSEMBLE COLUMNS & BEAMS IF APPLICABLE CONNECT ALL ELECTRICAL IF APPLICABLE ASSEMBLE SEATING ASSEMBLE ROOF ASSEMBLE SIDE WALL FULLY TIGHTEN ALL SCREWS TIGHTEN AT THE END OF INSTALLATION TUUCI.COM 1005155...
- Page 16 Secure columns to base using the flat socket screw. SEE PAGE 6 TO 8 FOR Step BY Step Screws must remain loose do not tighten. DO NOT FULLY TIGHTEN HARDWARE UNTIL THE END OF INSTALLATION TUUCI.COM 1005155...
- Page 17 CONNECT ALL ELECTRICAL PULL OUT WIRES COMING OUT OF THE COLUMNS AND BEAMS. CONNECT ALL ELECTRICAL PLUGS WITH MATCHING LABELS. TEST ELECTRICAL IN TO OUTLET BEFORE ADDING ROOF. DO NOT FULLY TIGHTEN HARDWARE UNTIL THE END OF INSTALLATION TUUCI.COM 1005155...
- Page 18 Pre-assembled nuts Pre-assembled nuts IF CABANA COMES WITH ELECTRICAL FEATURES PULL OUT THE WIRES COMING OUT OF THE COLUMNS AND BEAMS. Step 3 Step 4 Pre-assembled nuts Pre-assembled nuts DO NOT FULLY TIGHTEN HARDWARE UNTIL THE END OF INSTALLATION TUUCI.COM 1005155...
- Page 19 Secure columns to base using the flat socket screw. Screws bases. Add beauty covers before mounting. must remain loose do not tighten. beauty cover flat socket screw x2 stem base x4 beauty cover x4 Step 7 DO NOT FULLY TIGHTEN HARDWARE UNTIL THE END OF INSTALLATION TUUCI.COM 1005155...
- Page 20 IF APPLICABLE CONNECTED CABANAS DO NOT FULLY TIGHTEN HARDWARE UNTIL THE END OF INSTALLATION TUUCI.COM 1005155...
- Page 21 I N S T A L L A T I O N I N S T R U C T I O N S SOLANOX CABANA SINGLE LEFT BENCH 3A TO PROTECT YOUR PRODUCT, PLEASE READ THE OPERATING INSTRUCTIONS BEFORE ASSEMBLING.
- Page 22 BENCH 1A OUTSIDE BACKREST BENCH BENCH 1D CORNER MATTRESS BEAM 1A MATTRESS BEAM 1D If necessary use bench corner leveler to level bench to floor. OUTSIDE BENCH CORNER DO NOT FULLY TIGHTEN HARDWARE UNTIL THE END OF INSTALLATION. TUUCI.COM 1005449...
- Page 23 ONCE BACKREST BENCH AND MATTRESS BEAM ARE INSTALLED. INSERT METAL CLIP THROUGH SECURE WITH SCREWS INSTALL BENCH FRAMES SUPPORT MOUNT CUSHIONS AND TIE WITH PANELS (NO FASTENER REQUIRED). STRAPS. DO NOT FULLY TIGHTEN HARDWARE UNTIL THE END OF INSTALLATION TUUCI.COM 1005449...
- Page 24 I N S T A L L A T I O N I N S T R U C T I O N S SOLANOX CABANA REAR BENCH Rear bench is labeled as follows BACKREST BENCH 1A BACKREST BENCH 1B...
- Page 25 Install bench frames support panels (no Mount cushions and tie with straps. fastener required). DO NOT FULLY TIGHTEN HARDWARE UNTIL THE END OF INSTALLATION. TUUCI.COM 1005450...
- Page 26 I N S T A L L A T I O N I N S T R U C T I O N S SOLANOX CABANA RIGHT BENCH DO NOT FULLY TIGHTEN HARDWARE UNTIL THE END OF INSTALLATION. TUUCI.COM 1005451...
- Page 27 BENCH 1B OUTSIDE BENCH CORNER OUTSIDE BENCH CORNER MATTRESS BEAM 1B BACKREST BENCH 1C MATTRESS BEAM 1C If necessary, use bench corner leveler to level bench to floor. DO NOT FULLY TIGHTEN HARDWARE UNTIL THE END OF INSTALLATION. TUUCI.COM 1005451...
- Page 28 Re-install metal clips and fasten to beams once backrest bench and mattress beam are installed. insert metal clip through open-slot secure with screws Install bench frames support panels (no Mount cushions and tie with straps. fastener required). DO NOT FULLY TIGHTEN HARDWARE UNTIL THE END OF INSTALLATION. TUUCI.COM 1005451...
- Page 29 I N S T A L L A T I O N I N S T R U C T I O N S SOLANOX LEFT L BENCH TUUCI.COM 1005453...
- Page 30 BACKREST BENCH 1A BACKREST BENCH 1B MATTRESS MATTRESS BEAM 1A BEAM 1B BACKREST BENCH 1D INSIDE BENCH CORNER MATTRESS BEAM 1D OUTSIDE BENCH CORNER OUTSIDE BENCH CORNER DO NOT TIGHTEN HARDWARE. TIGHTEN AT THE END OF INSTALLATION. TUUCI.COM 1005453...
- Page 31 Step 3 Once backrest bench and mattress beam are installed, re-install metal clips and fasten to beams. insert metal clip through open-slot secure with screws DO NOT TIGHTEN HARDWARE. TIGHTEN AT THE END OF INSTALLATION. TUUCI.COM 1005453...
- Page 32 Step 7 Step 8 Install bench frame support panels Mount cushions and tie with straps. (no fastener required). DO NOT TIGHTEN HARDWARE. TIGHTEN AT THE END OF INSTALLATION. TUUCI.COM 1005453...
- Page 33 I N S T A L L A T I O N I N S T R U C T I O N S SOLANOX RIGHT L BENCH TUUCI.COM 1005452...
- Page 34 BACKREST BENCH 1B BACKREST BENCH 1A BACKREST BENCH 1C MATTRESS BEAM 1B INSIDE BENCH CORNER MATTRESS OUTSIDE BEAM 1A BENCH CORNER OUTSIDE BENCH CORNER MATTRESS BEAM 1C DO NOT TIGHTEN HARDWARE. TIGHTEN AT THE END OF INSTALLATION. TUUCI.COM 1005452...
- Page 35 Step 3 Once backrest bench and mattress beam are installed, re-install metal clips and fasten to beams. insert metal clip through open-slot secure with screws DO NOT TIGHTEN HARDWARE. TIGHTEN AT THE END OF INSTALLATION. TUUCI.COM 1005452...
- Page 36 Step 7 Step 8 Install bench frame support panels Mount cushions and tie with straps. (no fastener required). DO NOT TIGHTEN HARDWARE. TIGHTEN AT THE END OF INSTALLATION. TUUCI.COM 1005452...
- Page 37 I N S T A L L A T I O N I N S T R U C T I O N S SOLANOX U BENCH TUUCI.COM 1005454...
-
Page 38: Step 1
BENCH 1B MATTRESS BEAM 1B BACKREST BENCH 1A INSIDE BENCH MATTRESS CORNER BEAM 1A BACKREST OUTSIDE BENCH 1C BACKREST BENCH BENCH 1D CORNER MATTRESS MATTRESS BEAM 1C BEAM 1D DO NOT TIGHTEN HARDWARE. TIGHTEN AT THE END OF INSTALLATION. TUUCI.COM 1005454... -
Page 39: Step 2
Step 3 Once backrest bench and mattress beam are installed, re-install metal clips and fasten to beams. insert metal clip through open-slot secure with screws DO NOT TIGHTEN HARDWARE. TIGHTEN AT THE END OF INSTALLATION. TUUCI.COM 1005454... -
Page 40: If Necessary, Use Bed Post Leveler
Step 7 Step 8 Install bench frame support panels Mount cushions and tie with straps. (no fastener required). DO NOT TIGHTEN HARDWARE. TIGHTEN AT THE END OF INSTALLATION. TUUCI.COM 1005454... - Page 41 I N S T A L L A T I O N I N S T R U C T I O N S SOLANOX FULL BED TUUCI.COM 1005455...
- Page 42 Match and connect all labels. Full bed is as follows. BACKREST BENCH 1B BACKREST BENCH 1A MATTRESS BEAM 1B MATTRESS BEAM 1A MATTRESS BEAM 1C MATTRESS BEAM 1D DO NOT TIGHTEN HARDWARE. TIGHTEN AT THE END OF INSTALLATION. TUUCI.COM 1005455...
- Page 43 Step 3 Once backrest bench and mattress beam are installed, re-install metal clips and fasten to beams. insert metal clip through open-slot secure with screws DO NOT TIGHTEN HARDWARE. TIGHTEN AT THE END OF INSTALLATION. TUUCI.COM 1005455...
- Page 44 Step 1 Install center bed beam on bracket and secure with bolts. beam bracket Step 2 Install bench frames support panels (no fas- tener required) & mount cushions. DO NOT TIGHTEN HARDWARE. TIGHTEN AT THE END OF INSTALLATION. TUUCI.COM 1005455...
- Page 45 I N S T A L L A T I O N I N S T R U C T I O N S SOLANOX TRELLIS ROOF TUUCI.COM 1005456...
- Page 46 Install each trellis roof as illustrated. Use previously removed 1/4”-20 x 3/4” cap screws. 1/4”-20 cap screws (typical) BACK trellis roof CENTER trellis roof beam 2 FRONT trellis roof beam 4 DO NOT TIGHTEN HARDWARE. TIGHTEN AT THE END OF INSTALLATION. TUUCI.COM 1005456...
- Page 47 I N S T R U C T I O N S SOLANOX FABRIC SOLAR SCREEN To protect your product, please read the operating instructions before assembly. Note: Prior to attaching the fabric solar screen, a trellis roof must be installed. TUUCI.COM 1005457...
- Page 48 I N S T R U C T I O N S S O L A N O X FABRIC SOLAR SCREEN Step 1 Mount fabric solar screen and lock by turning each turn-button. fabric solar screen turn-button DO NOT FULLY TIGHTEN HARDWARE UNTIL THE END OF INSTALLATION. TUUCI.COM 1005457...
- Page 49 I N S T A L L A T I O N I N S T R U C T I O N S SOLANOX HARDTOP ROOF - 12' SQUARE 5 PANEL TUUCI.COM 1005459...
- Page 50 Place front hardtop panel and fasten previously removed 1/4”-20 x 1-1/2” cap screws. Step 6 Snap in place the trim extrusions in 3 locations. back trim extrusion front trim extrusion FRONT hardtop roof DO NOT FULLY TIGHTEN HARDWARE UNTIL THE END OF INSTALLATION. TUUCI.COM 1005459...
- Page 51 HARDTOP ROOF - 12' SQUARE 5 PANEL Step 7 For multiple units, install weather strip center piece. weather strip center piece. Screw, 1/4-20 X 2in Philips PanHead, SS with rubber weather strip washer DO NOT FULLY TIGHTEN HARDWARE UNTIL THE END OF INSTALLATION. TUUCI.COM 1005459...
- Page 52 I N S T A L L A T I O N I N S T R U C T I O N S SOLANOX ROMAN SHADE ROOF To protect your product, install Roman Shade Roof before trellis walls. TUUCI.COM 1005460...
- Page 53 First, slide the roof all the way across the long side of the C-channel, then slide the roof across the short side in the opposite direction. piping end DO NOT FULLY TIGHTEN HARDWARE UNTIL THE END OF INSTALLATION. TUUCI.COM 1005460...
- Page 54 Step 4 Use Allen wrench and a pair of pliers to tension cables on both sides. Use pliers to hold this end Step 5 Reinstall ribs DO NOT FULLY TIGHTEN HARDWARE UNTIL THE END OF INSTALLATION. TUUCI.COM 1005460...
- Page 55 Continue the rope down and around the pulley on the column, looping the rope from the outside to the inside of the pulley (D). start here omega hook DO NOT FULLY TIGHTEN HARDWARE UNTIL THE END OF INSTALLATION. TUUCI.COM 1005460...
- Page 56 Pull and tension the rope until it is taut, then tie the rope to the omega hook making a knot that can stay behind the Roman Shade Front Bar. omega hook tie 2 knot DO NOT FULLY TIGHTEN HARDWARE UNTIL THE END OF INSTALLATION. TUUCI.COM 1005460...
- Page 57 I N S T A L L A T I O N I N S T R U C T I O N S SOLANOX CABANA LOUVERED ROOF TUUCI.COM 1005651...
- Page 58 LOUVERED ROOF PARTS LIST IMPORTANT: IF YOU HAVE SIGNED UP TO USE THE “TUUCI ENGINEERING CONSULTING SERVICE” FOR TUUCI SOLA- NOX INSTALLATION SUPPORT, THE ANCHORS MUST BE INSTALLED PRIOR TO THE ENGINEER’S AR- RIVAL AT THE INSTALLATION SITE. ANCHORS THAT ARE NOT INSTALLED PRIOR TO THE ENGINEER’S ARRIVAL WILL DELAY THE INSTALLATION PROCESS.
- Page 59 Left horizontal beam has fasteners for mounting the actuator assembly. Rear left beam and column has internal electrical connectors. electrical connectors main electrical plug *WARNING: TO PREVENT POTENTIAL INJURIES, STEPS MUST BE FOLLOWED IN THE EXACT ORDER OF THIS INSTRUCTION MANUAL. TUUCI.COM 1005651...
- Page 60 The drains point towards the rear of the cabana. Note: Do not install hardware on edge holes. This will be applied at a later step. slots slots left gutter with drain right gutter with drain edge edge hole hole edge edge hole hole TUUCI.COM 1005651...
- Page 61 Install internal gasket from BAG B over seam to seal gutters (center gasket over seam). Seal gutters by placing gasket between straight and corner gutters. Gasket must be pressed tightly onto internal corners. press tightly press tightly internal gasket center over straight and corner gutter seam TUUCI.COM 1005651...
- Page 62 Remove pre-installed screws to install antenna to rear beam. screws rear beam antenna P-RAIL Step 7 Remove pre-installed screws and washers to mount left and right p-rail on beams. Note: p-rails are engraved with “L“ for left-side and “R“ for right-side p-rail TUUCI.COM 1005651...
- Page 63 REAR ANGLE Step 8 Remove pre-installed screws to mount rear angle. Note: The cable must pass through the rear angle from below. rear angle rear beam Step 9 After mounting rear angle on previous step, install screws along sides. TUUCI.COM 1005651...
- Page 64 Step 12 Bring louver above cabana and drop into place on p-rails in the marked position. louver bearing flat surface facing up TUUCI.COM 1005651...
- Page 65 Lock louver in place using louver bearing plug (p/n 15421), hold down plate (p/n 15419), and screws (p/n 40367) from BAGD. screws p/n 40367 hold down plate p/n 15419 louver bearing plug 15421 p-rail Step 14 Repeat steps on the 2 remaining middle louvers. TUUCI.COM 1005651...
- Page 66 Install actuator onto left beam using pre-installed screws by following steps A, B and C. cable connectors A) Remove Cover Screws from Beam B) Connect cable connectors C) Install cover and mount actuator actuator cover actuator pre-installed screws left beam TUUCI.COM 1005651...
- Page 67 Attach the actuator driven arm to the louver arm using pin & clip (p/n 1005069), louver end cap bearing (p/n 15431) and washer. louver end louver arm cap bearing p/n 15431 actuator driven arm washer p/n 1005071 pin & clip p/n 1005069 TUUCI.COM 1005651...
- Page 68 Lock louver in place using louver bearing plug (p/n 15421), hold down plate (p/n 15419) and screws (p/n 40367) from screws P/N 40367 hold down plate p/n 15419 louver bearing plug 15421 p-rail Step 21 Repeat steps on the remaining rear louvers. TUUCI.COM 1005651...
- Page 69 (p/n 15421), hold down plate (p/n 15419) and screws (p/n 40367) from BAG screws P/N 40367 hold down plate p/n 15419 louver bearing plug 15421 p-rail Step 25 Repeat steps on the remaining front louvers. TUUCI.COM 1005651...
- Page 70 & clip p/n 1005069 Step 28 When the first 3 arms are attached, proceed attaching the remaining arms on both the left and right side of the ca- bana. left linkage arm right linkage arm TUUCI.COM 1005651...
- Page 71 FRONT LIMIT SWITCH FOR FULLY CLOSED ROOF POSITION Step 29 Install rear limit switch using screws from BAG E. rear limit switch Note: Install the rear limit switch at highest position. Step 30 Run electrical wire throught p-rail slot and connect wires. p-rail slot TUUCI.COM 1005651...
- Page 72 INSTALLATION IS COMPLETE IF THE LOUVERED ROOF SYSTEM OPENS AND CLOSES CORRECTLY. IN THE EVENT THAT THE SYSTEM DOES NOT OPERATE CORRECTLY FOLLOW STEPS 34 TO 45 TO RE-PROGRAM THE CONTROL BOX. TUUCI.COM 1005651...
- Page 73 THE TEMPERATURE SENSOR (SWITCH 4) INSIDE THE CONTROL BOX MUST REMAIN IN THE FACTORY SETTING “ON” POSITION TO AVOID LOUVER MALFUNC- TION AND DAMAGE DURING FREEZING SWITCH 4 Activates the temperature sensor Deactivates the temperature sensor FIG A TUUCI.COM 1005651...
- Page 74 Pergola Tilt RTS Control Box TUUCI I N S T A L L A T I O N I N S T R U C T I O N S S O L A N O X C A B A N A...
- Page 75 LOUVER ARM MUST NOT MAKE CONTACT WITH REAR ANGLE. CONTR CONTROL 1: Previously programmed control be adde The procedure to delete a RTS control or sensor rear Copyright© Somfy SAS 2/2019 angle Step 41 Confirm that the front limit switch is at its highest position. TUUCI.COM 1005651...
- Page 76 If power to the cabana is lost, press the down arrow to close the roof and engage the front limit switch. The roof will open completely once the rear limit switch is reached. The roof will automatically open and the system will restart to resume the previous operational setting. TUUCI.COM 1005651...
- Page 77 I N S T A L L A T I O N I N S T R U C T I O N S SOLANOX CABANA TRELLIS WALL TUUCI.COM 1005461...
- Page 78 S O L A N O X TRELLIS WALL Step 1 Install trellis walls using 1/4”-20 Allen Key Flat Heads. 1/4”-20 Allen Key Flat Head (typical) trellis wall MIDDLE trellis wall BOTTOM trellis wall DO NOT FULLY TIGHTEN HARDWARE UNTIL THE END OF INSTALLATION. TUUCI.COM 1005461...
- Page 79 I N S T A L L A T I O N I N S T R U C T I O N S SOLANOX CURTAINS TUUCI.COM 1005462...
- Page 80 Step 3 Slide-up curtain bar onto other side bracket per detailed view and lock-in with pin. Step 4 Attach curtains to column with turn buttons. curtain bar locking pin DO NOT TIGHTEN HARDWARE UNTIL THE END OF INSTALLATION. TUUCI.COM 1005462...
- Page 81 I N S T A L L A T I O N I N S T R U C T I O N S SOLANOX TRELLIS WALL WITH CURTAINS DO NOT TIGHTEN HARDWARE. TIGHTEN AT THE END OF INSTALLATION. TUUCI.COM 1005463...
- Page 82 I N S T R U C T I O N S S O L A N O X TRELLIS WALL Step 1 Install trellis walls using 1/4”-20 Allen Key Flat Heads. 1/4”-20 Allen Key Flat Head (typical) trellis wall MIDDLE trellis wall BOTTOM trellis wall TUUCI.COM 1005463...
- Page 83 Insert curtain bar into column bracket on one side. Step 3 Slide-up curtain bar onto other side bracket per detailed view and lock-in with pin. Step 4 Attach curtains to column with turn buttons. curtain bar locking pin TUUCI.COM 1005463...
Need help?
Do you have a question about the SOLANOX CABANA and is the answer not in the manual?
Questions and answers