Vivo STAND-V002 Series Assembly Manual
Dual monitor desk mount
Hide thumbs
Also See for STAND-V002 Series:
- Instruction manual (12 pages) ,
- Installation manual (4 pages) ,
- Instruction manual (9 pages)

Related Manuals for Vivo STAND-V002 Series


Summary of Contents for Vivo STAND-V002 Series
- Page 1 Dual Monitor Desk Mount STAND-V002 Series Assembly Manual Individual Product SKUs STAND-V002 STAND-V002-GY STAND-V002W...
-
Page 2: We're Here For You
Saturday 8am-4pm CST US-Based Customer Support from Trained Professionals Email Us Chat with Live Agent Give Us a Call help@vivo-us.com www.vivo-us.com 309-278-5303 ext. 1 Assembly Video Available Navigate to the middle of the product page to watch as our product specialists walk you through the assembly process. -
Page 3: Please Read
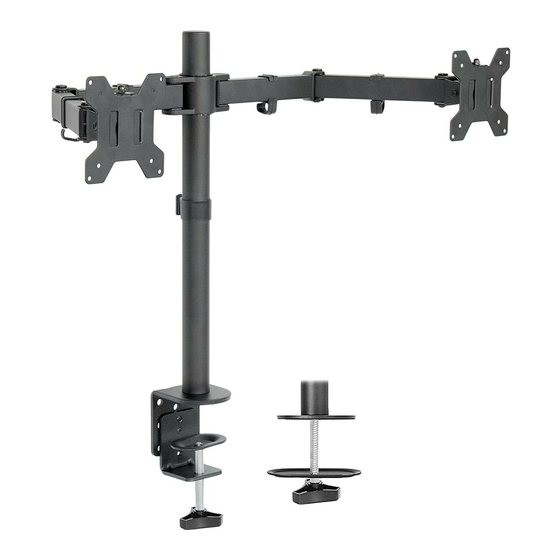
Returns: We offer a hassle-free 30 day return on all products. Contact customer support at 309-278-5303 or help@vivo-us.com. Please note: For items ordered in error or no longer needed, the return shipping charges will be at the buyer’s expense. Product Specific Warnings: WARNING: CHOKING HAZARD SMALL PARTS - NOT FOR CHILDREN UNDER 3 YEARS. - Page 4 Package Contents A (x1) B (x1) C (x1) Pole Clamp Swivel Arm E (x1) F (x1) D (x2) Grommet Soft Pad VESA Plate Base Plate I (x4) H (x1) G (x1) Arm Cable Pole Cable Pole Cap Clip Clip Included Hardware & Tools S-A (x3) S-B (x2) M-A (x8)
-
Page 5: Assembly Steps
Assembly Steps STEP 1 Loosen knob on Clamp (B). STEP 2 Option 1: Clamp Installation **For Grommet Installation, go to Page 6** 0.4-3.3” (10-85mm) Secure assembly to desktop by Mount Clamp (B) to Pole (A) using M6x16mm tightening knob on Clamp (B). Screws (S-A) and 3mm Allen Wrench (T-A). - Page 6 STEP 2 Option 2: Grommet Installation Using a Phillips screwdriver, remove the Separate Clamp Bolt (B1) and Clamp Plate (B2) screw from Clamp (B). from the clamp assembly. Mount Grommet Plate (E) to Pole (A) Remove adhesive backing from Soft Pad (F) using M6x16 Screws (S-A) and 3mm and adhere to Grommet Plate (E).
- Page 7 Option 2: Grommet Installation - Cont’d Thread Clamp Bolt (B1) into Clamp Plate (B2), grommet hole, and then into the Pole (A). 0.4-2.9” (10-75mm) No Grommet Hole? If you do not have an existing hole for installation, drill a hole through your desktop in your desired mounting location using a 3/8”...
- Page 8 STEP 3 Unfold Arms of Swivel Arm (C). STEP 4 Follow the steps below to rotate the Heads of the Swivel Arm (C) forward. Head Slide a VESA Plate (D) onto the Heads of Use the VESA Plate to rotate the Heads down. the Swivel Arm (C).
- Page 9 STEP 5 Slide Pole Cable Clip (H) and Swivel Arm (C) onto Pole (A) at desired location. Secure Swivel Arm in place using 5mm Allen Wrench (T-B). Attach Pole Cap (G) to Pole. Attach Arm Cable Clips (I) to Swivel Arm (C).
- Page 10 STEP 6 Secure VESA Plates (D) to your monitors using M4x12 Thumbscrews (M-A) or M4x30 Screws (M-B). D6 Spacers (M-C) may be required. Make sure the Lip of the VESA Plate (D) is facing the top of your monitor.
- Page 11 STEP 7 Slide monitors with VESA Plates (D) onto Swivel Arm (C). Secure VESA Plates in place using M6 Security Nuts (S-B). STEP 8 Manage cables using Arm Cable Clips (I) and Pole Cable Clip (H).
-
Page 12: Monitor Adjustments
Monitor Adjustments Follow the instructions below to adjust monitors. Your monitor’s swing can Your monitor can be turned be adjusted by hand. for a vertical display by hand. Adjust the monitor tilt using 5mm Allen Wrench (T-B). - Page 13 Monitor Adjustments - Cont’d Follow the instructions below to adjust your monitors’ level. To level monitors, remove M6 Security Nuts (S-B). Tighten or loosen adjustment screws using 3mm Allen Wrench (T-A). Once level, fasten M6 Security Nuts (S-B) back into place.
- Page 14 [ THIS PAGE HAS BEEN INTENTIONALLY LEFT BLANK ]...
- Page 15 Securely store your PC in Clamp on & under desk and more with our clamp-on an under desk mount or keyboard tray options for and wall mount solutions. cart for easy access. all setup types. Explore Endless Workspace Solutions www.vivo-us.com...
- Page 16 Need Help? We’re Here For You Monday-Friday from 7am-7pm CST Saturday 8am-4pm CST Email Us Chat with Live Agent Give Us a Call help@vivo-us.com www.vivo-us.com 309-278-5303 ext. 1 FOR MORE GREAT VIVO PRODUCTS, CHECK OUT OUR WEBSITE AT: WWW.VIVO-US.COM VIVO-us @vivo_us @VIVOus VIVO...
Need help?
Do you have a question about the STAND-V002 Series and is the answer not in the manual?
Questions and answers