Table of Contents
Advertisement
Quick Links
The Stannah Stairiser SR
User Manual
Make sure you understand the contents of this booklet.
Keep it handy for reference.
Your Stairlift Number is:
Please quote this number on any correspondence
Your local Stannah Service Office is:
f your Stairlift fails to operate and BEFORE contacting the
I
Service Office, please read page 25 of this User Handbook.
This can save time and also save you the cost of an
unnecessary service call.
301111/R:\Product Development\Stairiser SR\User Manual\SR User Manual.doc
Advertisement
Table of Contents

Related Manuals for Stannah Stairiser SR


Summary of Contents for Stannah Stairiser SR
- Page 1 Stairlift fails to operate and BEFORE contacting the Service Office, please read page 25 of this User Handbook. This can save time and also save you the cost of an unnecessary service call. 301111/R:\Product Development\Stairiser SR\User Manual\SR User Manual.doc...
-
Page 2: Your Stannah Guarantee
Your Stannah Guarantee Stannah Lifts Ltd are proud to have secured British Standards BS EN ISO 9001 Quality Assurance Certification and are pleased to guarantee the whole of our materials and workmanship for a period of twelve months from completion of installation and handover of the lift to you on the following conditions;... -
Page 3: Table Of Contents
CONTENTS PAGE Your Stannah Guarantee Introduction Intended Use General Layout Operating Instructions Emergency Operation General Stairlift Care Procedures Trouble Shooting Guide Notes NOTE: Whilst every effort has been made to ensure the clarity and accuracy of this handbook, we cannot be held responsible for damage or injury resulting from negligence or misuse of this Stairlift. -
Page 4: Introduction
Failure to ensure servicing is carried out could lead to unreliable or unsafe operation. For all enquiries regarding servicing, please contact your local Stannah Service Office at the address given on page 1 of this booklet. A Service Log Card supplied by the Service Office will be completed after each service visit. - Page 5 Key to Symbols Used in this Handbook The following signs stress important passages: Pay attention to all paragraphs marked with this sign. These paragraphs contain important hints that will insure flawless operation of the lift. WARNING! Important safety advice! Observing these instructions greatly reduces the possibility of hazardous situations.
-
Page 6: Intended Use
The maximum capacity of the lift is indicated on the front face of the carriage. Safe working load: 225 kg wheelchair and occupant. The Stannah Stairiser SR must only be used for the transport of persons in wheelchairs or sitting on the optional fold down seat. -
Page 7: General Layout
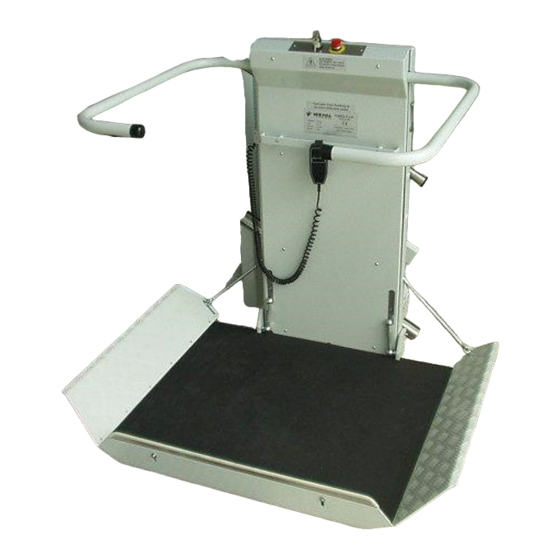
3. General Layout Pictorial View Key switch Directional control Emergency STOP Folding seat (option) Ramps Main control button at the carriage side Barriers, liftable Green lamp Carriage cover Drive (behind the carriage sidewall) Gear box Motor Hand wheel Hand lever for break release Lower guide rail (=toothed rack) 7 of 28... - Page 8 Technical Details standard performance optional performance Feature Detail Railway Gradients 15...45° Length up to 15 m Length over 15 m Speed appr. 0,1 m/s Power 0,5 kW Voltage 24V DC 1 x 230 V for recharger Position of drive Inside carriage Site indoors Tolerable temperatures...
- Page 9 General Layout Wall control Intermediate stop position Recharger Upper railway tube Carriage with drive Lower railway tube Upper stop position Overspeed governor Lower stop position 9 of 28...
- Page 10 The motor of the Stairiser SR is powered by batteries, which are reloaded by a recharger. The recharging occurs in the upper and lower stop positions by recharge contacts. As a consequence, if the Stairiser SR is not in use it is important that it is parked in the stop positions.
-
Page 11: Operating Instructions
4. Operating Instructions General The Stairiser SR is easy to use. The technical control of the lift is entirely adapted to the abilities of physically handicapped persons. Please refer to the general layouts on the previous pages for a better understanding of the lift. - Page 12 The following comments are valid only for carriages equipped with a manual platform: Calling of the Platform Most lifts are equipped with wall controls that allow control from either ends of the staircase. Landing controls are fitted in the area of landing positions. Battery behind cover “Up”-Button “Down”-Button...
- Page 13 Driving/Moving onto the Platform When the unlocked barrier is opened, the Open ramp will automatically fold down. The barrier and barrier down to the staircase is always enter locked (excepting at the lower stop platform position = special customer request). Always face the direction of travel, and use the wheelchair brake for safety.
- Page 14 When the passenger has moved onto the platform in accordance with the “Driving/Moving onto the platform” instructions, the platform control must be switched on. Put in the key and turn it into “ON” position. The green lamp will start to Turn key “ON”...
- Page 15 Leaving the Platform Turn off key switch and lift up the barrier The stairlift has been designed to stop in the correct position at each landing. Release the directional control when the carriage has reached the desired stop position. Switch off the platform control by turning the key into “OFF”...
- Page 16 The following comments are valid only for carriages equipped with automatic platforms and barriers: Wall Controls All automatic platform lifts are equipped with wall controls which allow control from either end of the staircase and allow to fold down or up the platform. Landing controls are fitted in the area of landing positions.
- Page 17 Driving/Moving onto the Platform You can move onto the platform after you have opened the platform and the barrier in accordance with the former chapter. Always face the direction of travel and use the wheelchair brake for safety. Press the button for “open” on the wall control as long as the platform is horizontally positioned and the barrier is opened.
- Page 18 Travelling The carriage control on the sidewall consists of a directional control on spiral cable, a key switch and an emergency stop. The platform contains a directional control, connected to a spiral cable, a key switch, an emergency stop and a green control lamp at the side of the platform.
- Page 19 After the lift stopped the drive button must be kept pressed until the barrier opens. If you don’t want to stop at an intermediate stop position briefly release the drive button and activate it again in the same direction. The lift will briefly stop and then continue to drive in the desired direction.
-
Page 20: Emergency Operation
5. Emergency Operation If it necessary to evacuate a user from the lift due to either lift or power failure, the procedures described here should be followed. A different process is needed, dependant on where the platform has stopped: Case 1: The occupied platform is near a stop position Main power switch Notice: The main power switch is on the side of the... - Page 21 Case 2: The occupied platform is not close to a stop position For the rescue of the passenger two persons are needed! If there is only one person available, it is necessary to wind the carriage into the next station (see case 1).
- Page 22 5. The wheelchair driver can now be lifted down from the platform 6. If using a manual platform, close the platform as usual. That means: First close the barriers and then fold up the Always rescue platform. with two people assisting 7.
- Page 23 Emergency Unclamping of Barrier For unclamping a barrier somewhere out of a station, press the lever located at the back of the carriage. The position of this lever is shown in detail on the drawing beside. Levers for unclamping are at the backside of the platform Attention: The red, marked lever must be pressed...
-
Page 24: General Stairlift Care Procedures
9. Keep the access free to the drive and to the main power switch. For cleaning the stairlift use a soft cloth and soapy water. All further maintenance work is only allowed to be done by Stannah Lift Services ltd or any of our authorised partners. -
Page 25: Trouble Shooting Guide
7. Trouble Shooting Guide For safety reasons, the Stairiser SR is equipped with several electrical and mechanical locking devices. The stairlift will not work if any of these devices are tripped or if the order of events is incorrect. By following the instructions provided in the ensuing paragraphs, the user will be able to determine the reason for breakdown. - Page 26 The landing control has been turned on with the key, the directional control is pressed, but the carriage does not move. Close the Is the platform closed? platform! Is the green lamp at the wall control Exchange glowing when calling the lift? batteries Check if the ramps and the safety pad (if existing) on the underside of the platform are...
- Page 27 The carriage start travelling after pressing the directional control on the platform and stops after about 10 cm. Please close Are all barriers the barriers! closed? Check if the ramps and the safety pad (if Does the stairlift existing on the underside of the platform) are operate? free of contact with obstacles.
-
Page 28: Notes
8. NOTES 28 of 28...
Need help?
Do you have a question about the Stairiser SR and is the answer not in the manual?
Questions and answers