Table of Contents
Advertisement
Available languages
Available languages
Quick Links
SECURITY SAFE | INSTRUCTION MANUAL
COFFRE-FORT | MODE D'EMPLOI
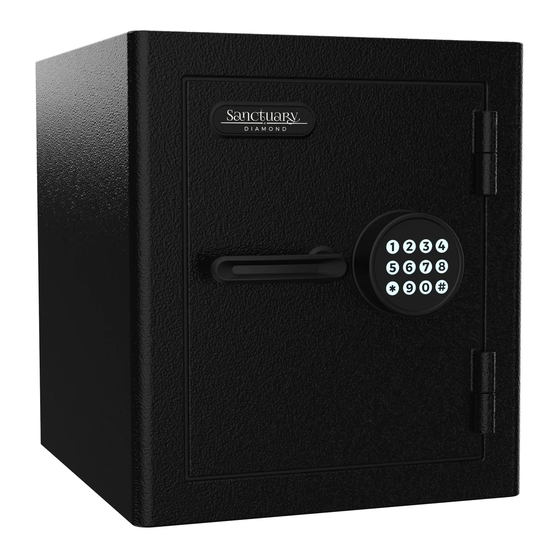
SA-DIA17-B-CC
IMPORTANT:
Please read this information and follow all safety rules carefully before operating your
security safe. Failure to do so will void your warranty.
Veuillez soigneusement lire les renseignements et suivre toutes les règles avant d'utiliser
votre coffre-fort. Le défaut de se conformer à cette exigence annulera la garantie.
031524
Advertisement
Table of Contents

Related Manuals for Sanctuary SA-DIA17-B-CC


Summary of Contents for Sanctuary SA-DIA17-B-CC
- Page 1 SECURITY SAFE | INSTRUCTION MANUAL COFFRE-FORT | MODE D’EMPLOI SA-DIA17-B-CC IMPORTANT: Please read this information and follow all safety rules carefully before operating your security safe. Failure to do so will void your warranty. Veuillez soigneusement lire les renseignements et suivre toutes les règles avant d’utiliser votre coffre-fort.
-
Page 2: Table Of Contents
TABLE OF CONTENTS IMPORTANT INFORMATION ....................2 1. REGISTRATION ........................ 3 2. UNDERSTANDING YOUR SAFE ..................4 3. INITIAL ENTRY ........................5 4. SECURITY CODE SETUP....................6 5. LOCKED OUT OF THE SAFE....................8 6. LOW BATTERY WARNING....................8 7. SILENT ENTRY MODE ......................8 8. -
Page 3: Important Information
SANCTUARY SAFE. DO NOT LOCK THIS MANUAL OR THE BACKUP KEYS IN YOUR SAFE. Thank you for choosing a Sanctuary safe to protect your valuables. We are committed to securing, organizing and protecting your most important documents, valuables and keepsakes. -
Page 4: Registration
1. REGISTRATION Register your safe at www.saproducts.com By registering your Sanctuary safe we will be able to expedite and address any problems or challenges you may have which would otherwise require a notary letter and proof of payment. REGISTRATION INFORMATION The information you record onto this page will be required in the event you cannot access the contents of your Sanctuary safe. -
Page 5: Understanding Your Safe
2. UNDERSTANDING YOUR SAFE Programmable E-Lock 9V Battery Compartment (Inside of E-Lock) Handle Backup Key Entry (Underneath E-Lock) Adjustable Reset Shelves Dead Button Locking Plates Hooks Active Bolt Locking Down Holes Plates... -
Page 6: Initial Entry
3. INITIAL ENTRY 1. Locate the backup keys inside the plastic bag hanging on the front of the safe. Locate the backup key entry on the door of the safe. Insert the key and turn clockwise from the 12 to 3 o'clock position. Turn the handle counter- clockwise to unlock the safe door. -
Page 7: Security Code Setup
3. INITIAL ENTRY (Continued) Plug the E-Lock cable into the back of the E-Lock. The connector on the cable will only fit into the connector in the E-Lock in one way. 9V BATTERY 9V BATTERY Install the keypad onto the safe. - Page 8 4. SECURITY CODE SETUP (Continued) On the inside of the safe door, locate the red plastic cap. Unscrew and remove the cap, giving you access to the reset button. Press the reset button. You will hear 2 beeps and the keypad will illuminate indicating that you are now RESET BUTTON LOCATED UNDER...
-
Page 9: Locked Out Of The Safe
5. LOCKED OUT OF YOUR SAFE In the event you are locked out of your safe, use your backup keys to gain access and follow the steps in Section 4: Electronic Lock Security Code Setup Instructions. If you have lost your backup keys, or are still having difficulties, contact customer service at the number below. -
Page 10: Proper Placement And Moving Of Safe
8. PROPER PLACEMENT AND MOVING OF SAFE To maximize burglary protection and stability, securing the safe to the floor or wall is recommended. SA Consumer Products recommends that you store your safe in a closet, office, basement, bedroom or any other location that is convenient for you but out of direct line of sight from prying eyes. -
Page 11: Securing Your Safe
10. SECURING YOUR SAFE WARNING: YOUR SAFE IS DESIGNED TO SUPPORT ITSELF WHEN THE DOOR IS OPENED. HOWEVER, CAUTION SHOULD BE USED TO AVOID TIPPING. WHILE SECURING YOUR SAFE BE SURE TO HAVE A SECOND PERSON HOLD AND STABILIZE THE SAFE TO KEEP IT FROM TIPPING, CAUSING INJURY, AND/OR DAMAGE TO THE SAFE AND SURROUNDING STRUCTURES. -
Page 12: Loading Your Safe
10. SECURING YOUR SAFE (Continued) 6. Secure the safe, by threading all anchor bolts through the factory drilled bolt down holes in the bottom of the safe and ratcheting down tight. Make sure the metal washer sits on top of the rubber washer. Tighten the bolt to compress the rubber washer between the safe and metal washer. -
Page 13: Year Warranty
TWENTY-FIVE YEAR WARRANTY SA Consumer Products will repair or replace, at their sole discretion, any Sanctuary Diamond Home Safe damaged by fire, forced entry, forced attack or natural flood for twenty-five years from the original owners purchase date. SA Consumer Products will repair or replace, at their sole discretion, any Sanctuary Diamond Home Safe with defective parts, paint or lock for twenty-five years from the original owners purchase date. -
Page 14: Renseignements Importants
Suivez toujours les règles de sécurité du fabricant d’armes à feu. Un coffre-fort Sanctuary ou tout autre dispositif de rangement d’armes à feu ne peut remplacer les autres procédures de sécurité, y compris d’aviser les enfants du danger que présentent les armes à feu. -
Page 15: Enregistrement
RENSEIGNEMENTS D’ENREGISTREMENT Les renseignements que vous fournissez sur cette page seront requis dans l’éven- tualité où vous ne pourriez accéder au contenu de votre coffre-fort Sanctuary. Veuillez fournir tous les renseignements requis ci-dessous et les conserver pour vos dossiers et pour leur sûreté. -
Page 16: Comprendre Votre Coffre-Fort
2. COMPRENDRE VOTRE COFFRE-FORT Serrure électronique Compartiment de pile 9 V (à l'intérieur de la serrure électronique) Poignée Serrure de la clé de déblocage (sous la serrure électronique) Tablettes Bouton de Plaques de réglable réinitialisation verrouillage en acier Crochets à clé Plaques de Trous de fixation verrouillage... -
Page 17: Ouverture Initiale
3. OUVERTURE INITIALE Repérez les clés de secours dans le sac de plastique suspendu à l’avant du coffre-fort. Repérez la serrure pour clé de secours sur la porte du coffre-fort. Insérez la clé et tournez-la dans le sens horaire de midi à 3 h. Tournez la poignée dans le sens antihoraire pour déverrouiller la porte du... -
Page 18: Configuration Du Code De Sécurité De La Serrure Électronique
3. OUVERTURE INITIALE (Suite) Branchez le câble de la serrure électronique à l’arrière de la face de la serrure. Le connecteur sur le câble ne se branche à l’arrière de la face de la serrure que d’une seule manière. Enfin, installez le pavé 9V BATTERY 9V BATTERY numérique sur le coffre-fort. - Page 19 4. CONFIGURATION DU CODE DE SÉCURITÉ DE LA SERRURE ÉLECTRONIQUE (Suite) 2. Repérez le capuchon en plastique rouge à l’intérieur de la porte du coffre-fort. Dévissez et retirez le capuchon. Vous aurez maintenant accès au bouton de réinitialisation. BOUTON DE Appuyez sur le bouton.
-
Page 20: Perte D'accès Au Coffre-Fort
5. PERTE D’ACCÈS AU COFFRE-FORT Dans l’éventualité où vous auriez perdu l’accès à votre coffre-fort, utilisez vos clés de secours afin d’avoir accès à votre coffre-fort et suivez les étapes de la section 4, Configuration du code de sécurité de la serrure électronique. Si vous avez perdu vos clés de secours, ou que vous éprouvez toujours des difficultés, communiquez avec le Service à... -
Page 21: Positionnement Adéquat Et Déplacement Du Coffre-Fort
8. POSITIONNEMENT ADÉQUAT ET DÉPLACEMENT DU COFFRE-FORT Afin de maximiser la stabilité du coffre-fort et sa protection contre le vol, il est recommandé de le fixer au sol ou au mur. SA Consumer Products vous recommande de placer votre coffre-fort dans un garde-robe, un bureau, un sous-sol, une chambre ou tout autre emplacement qui vous convient, mais qui est hors de vue directe. -
Page 22: Fixation Du Coffre-Fort
10. FIXATION DU COFFRE-FORT AVERTISSEMENT : VOTRE COFFRE-FORT EST CONÇU POUR SE SOUTENIR LUI-MÊME LORSQUE LA PORTE EST OUVERTE. TOUTEFOIS, IL CONVIENT DE FAIRE PREUVE DE PRUDENCE POUR ÉVITER QU’IL NE BASCULE. LORSQUE VOUS FIXEZ VOTRE COFFRE-FORT, ASSUREZ-VOUS QU’UNE DEUXIÈME PERSONNE TIENNE ET STABILISE LE COFFRE-FORT POUR L’EMPÊCHER DE BASCULER, DE CAUSER DES BLESSURES ET/OU DES DOMMAGES AU COFFRE-FORT ET AUX STRUCTURES ENVIRONNANTES. -
Page 23: Remplir Votre Coffre-Fort
10. FIXATION DU COFFRE-FORT (Suite) Insérez et enfoncez les ancrages en plastique dans les trous de guidage. Vous pourriez avoir besoin d’un marteau pour les insérer complètement. Fixez le coffre-fort en enfilant les quatre boulons d’ancrage à travers les trous usinés dans le fond du coffre-fort et vissez-les jusqu’à... -
Page 24: Garantie De Vingt-Cinq Ans
GARANTIE DE VINGT-CINQ ANS SA Consumer Products, Inc. réparera ou remplacera, à son entière discrétion, tout Sanctuary endommagé par le feu, par un coffre-fort accès forcé, une attaque forcée ou une inondation naturelle pendant vingt cinq ans à compter de la date d’achat par le propriétaire initial.
Need help?
Do you have a question about the SA-DIA17-B-CC and is the answer not in the manual?
Questions and answers