
Related Manuals for Sanctuary SA-PV2M


Summary of Contents for Sanctuary SA-PV2M
- Page 1 HOME & OFFICE SECURITY VAULTS INSTRUCTION MANUAL FOR SA-PV2M and SA-PV3L IMPORTANT: Please read this information and follow all safety rules carefully before operating your gun safe. Failure to do so will void your warranty. 072921...
-
Page 2: Table Of Contents
TABLE OF CONTENTS IMPORTANT INFORMATION ....................2 1. REGISTRATION ........................ 3 2. UNDERSTANDING YOUR VAULT ..................4 3. INITIAL ENTRY ........................5 4. BATTERY INSTALLATION ....................5 5. ELECTRONIC LOCK SECURITY CODE SETUP ..............6 6. LOW BATTERY WARNING ....................7 7. -
Page 3: Important Information
SANCTUARY VAULT. DO NOT LOCK THIS MANUAL OR THE BACKUP KEYS IN YOUR VAULT. Thank you for choosing a Sanctuary vault to protect your valuables. We are committed to securing, organizing and protecting your most important documents, valuables and keepsakes. -
Page 4: Registration
REGISTRATION INFORMATION The information you record onto this page will be required in the event you cannot access the contents of your Sanctuary vault. Please fill out all the required information below and retain for your records and safe keeping. -
Page 5: Understanding Your Vault
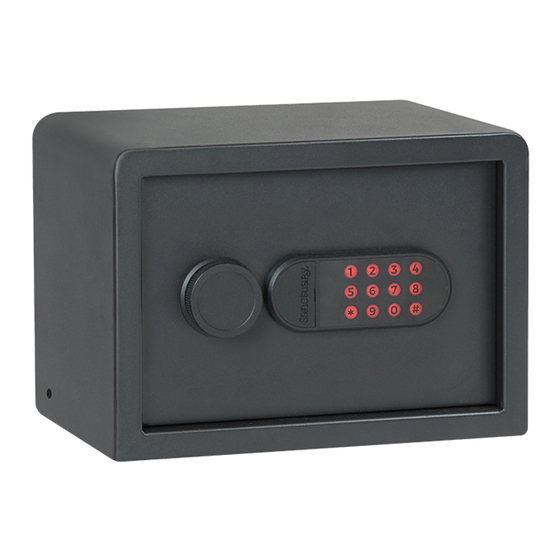
2. UNDERSTANDING YOUR VAULT SA-PV2M Electronic Knob Touch Pad Removable Battery Shelf Compartment Hooks Security Cable Port Entry Security Backup Key Entry Cable (Under Cover) Reset Button (Under Cover) Bolt Down Holes (Under Foam) Locking Bolts SA-PV3L Electronic Removable Battery... -
Page 6: Initial Entry
3. INITIAL ENTRY Locate the key cover on the lockface and remove carefully by pulling the key cover tab. In the future you may place a flat head screw driver in the slot and pry upwards. LOCK UNDER KEY COVER Insert the backup key. -
Page 7: Electronic Lock Security Code Setup
5. ELECTRONIC LOCK SECURITY CODE SETUP Important: Your vault comes with a factory preset code of 159#. It is necessary to re-program your vault with a new security code you have personally selected to provide maximum security. Be careful, in choosing your new security code, you’ll want to be sure that you can operate the unit quickly without making an error. -
Page 8: Low Battery Warning
6. LOW BATTERY WARNING Orange = Low Battery This electronic lock is equipped to alert you when the batteries are low by illuminating the orange light (center) on the touch pad for 10 seconds any time the touch pad is activated. 7. -
Page 9: Lockout Mode/Tamper Protection
8. LOCKOUT MODE / TAMPER PROTECTION 1. Three consecutive incorrect code entries will put the vault in “Basic Lockout” mode. Touch pad is deactivated for 30 seconds. 2. After “Basic Lockout” mode has ended, another three consecutive incorrect code entries will result in “Severe Lockout”... -
Page 10: Securing Your Vault
11. SECURING YOUR VAULT SECURING YOUR VAULT WITH PROVIDED CABLE A security cable is included with your vault. To secure the cable around a fixed object, first loop the cable around the object as shown in the figure to the right. Insert the cable’s metal peg end into the hole on the side of the vault while still open. -
Page 11: Maintaining Hinges And Internal Mechanisms
11. SECURING YOUR VAULT (CONTINUED) TOOLS AND HARDWARE NEEDED TO SECURE VAULT TO A WOOD OR CONCRETE SURFACE: • DRILL • 2 STEEL LAG BOLTS (NOT INCLUDED) - SIZE 1/4" X 1.50" TO 2.0" LONG • 2 STEEL WASHERS (NOT INCLUDED) •... -
Page 12: Three Year Warranty
SA Consumer Products will repair or replace, at their sole discretion, any Sports Afield vault damaged by fire, forced entry, forced attack or natural flood for the lifetime of the original owner. SA Consumer Products will repair or replace, at their sole discretion, any Sports Afield vault with defective parts, paint or lock for three years of the original owner purchase date.
Need help?
Do you have a question about the SA-PV2M and is the answer not in the manual?
Questions and answers