Table of Contents
Advertisement
ITM. / ART. 1671617
®
SANCTUARY RESERVE
SA5514S-IHS
INSTRUCTION MANUAL
IMPORTANT, RETAIN FOR FUTURE REFERENCE:
READ CAREFULLY
FOR DOMESTIC INDOOR USE ONLY, NOT FOR COMMERCIAL USE.
Please read this information and follow all safety rules carefully before
operating your gun safe. Failure to do so will void your warranty.
040924
Advertisement
Table of Contents

Related Manuals for Sanctuary RESERVE SA5514S-IHS


Summary of Contents for Sanctuary RESERVE SA5514S-IHS
- Page 1 ITM. / ART. 1671617 ® SANCTUARY RESERVE SA5514S-IHS INSTRUCTION MANUAL IMPORTANT, RETAIN FOR FUTURE REFERENCE: READ CAREFULLY FOR DOMESTIC INDOOR USE ONLY, NOT FOR COMMERCIAL USE. Please read this information and follow all safety rules carefully before operating your gun safe. Failure to do so will void your warranty.
-
Page 2: Table Of Contents
TABLE OF CONTENTS IMPORTANT INFORMATION ....................2 1. REGISTRATION ........................ 3 2. UNDERSTANDING YOUR SAFE ..................4 3. UNBOXING ........................4 4. INSPECTION ........................4 5. INITIAL ENTRY........................5 6. PROPER PLACEMENT AND MOVING OF SAFE ..............6 7. KEEPING YOUR SAFE DRY ....................6 8. -
Page 3: Important Information
SANCTUARY SAFE. DO NOT LOCK THIS MANUAL OR THE BACKUP KEYS IN YOUR SAFE. Thank you for choosing a Sanctuary Safe to protect your valuables. We are committed to securing, organizing and protecting your firearms and most important documents and valuables. -
Page 4: Registration
REGISTRATION INFORMATION The information you record onto this page will be required in the event you cannot access the contents of your Sanctuary Safe. Please fill out all the required information below and retain for your records and safe keeping. -
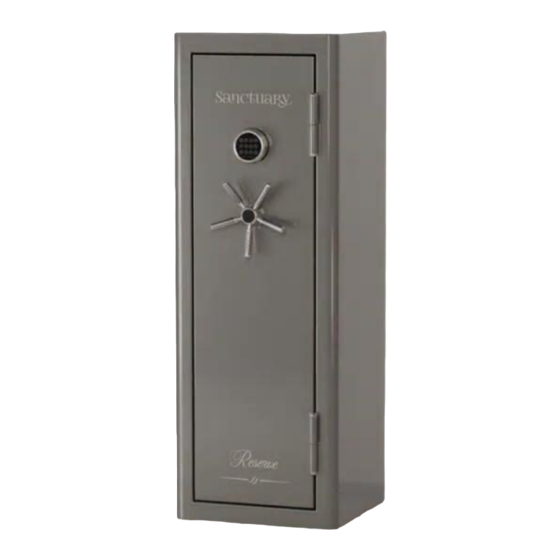
Page 5: Understanding Your Safe
2. UNDERSTANDING YOUR SAFE Electronic Lock face Backup With Illuminated Water Key Entry Key pad Seal (underneath UL Approved Organizational Lock Face) Electrical Outlet 9V Battery Bins Compartment Door Organizer Active Locking Bolts External Hinges Reset 5 Spoke Adjustable Button Bolt Down Handle Shelves... -
Page 6: Initial Entry
5. INITIAL ENTRY Locate the backup keys and single handle spoke inside the initial entry box. 2. Install the single handle spoke by inserting into one of the threaded openings and twisting clockwise. Locate the keyhole on the safe door. Insert and turn the backup key clockwise to unlock. -
Page 7: Proper Placement And Moving Of Safe
6. PROPER PLACEMENT AND MOVING OF SAFE WARNING: SAFES ARE VERY HEAVY AND AWKWARD TO HANDLE. PLEASE USE THE UTMOST CARE IN MOVING THE SAFE. UTILIZING A TRAINED PROFESSIONAL WITH PROPER MOVING EQUIPMENT IS HIGHLY RECOMMENDED. The location of the gun safe is very important and the utmost care should be taken during this consideration. -
Page 8: Securing Your Safe
8. SECURING YOUR SAFE WARNING: YOUR SAFE IS DESIGNED TO SUPPORT ITSELF WHEN THE DOOR IS OPENED. HOWEVER, CAUTION SHOULD BE USED TO AVOID TIPPING. WHILE SECURING YOUR SAFE BE SURE TO HAVE A SECOND PERSON HOLD AND STABILIZE THE SAFE TO KEEP IT FROM TIPPING, CAUSING INJURY, AND/OR DAMAGE TO THE SAFE AND SURROUNDING STRUCTURES. -
Page 9: Lock Face Installation
9. LOCK FACE INSTALLATION 1. Remove lock face from master box located inside the bottom of the safe. 2. The lock face requires 1x9V alkaline battery. Locate the battery compartment on the back of the lock face. Insert the battery in the proper orientation. -
Page 10: Lock Face Security Code Setup
10. LOCK FACE SECURITY CODE SETUP Important: It is necessary to reprogram your safe with a new security code you have personally selected to provide maximum household security. Be careful in choosing your new security code, you’ll want to be sure that you can operate the unit quickly without making an error. -
Page 11: Locked Out Of Your Safe
10. E-LOCK SECURITY CODE SETUP (Continued) 4. While the safe door is still Green = Successful Entry open, confirm your newly entered security code. Tap to wake up the keypad. Now enter your new 3-8 digit code followed by (#). If successful you will hear 2 beeps and the green light will illuminate, allowing you to open the safe. -
Page 12: Using The Barrel Rests
12. USING THE BARREL RESTS Our barrel rests provide flexibility to set up your safe in many ways that meet your specific needs and best match your particular firearm collection. Barrel rests can be oriented in 3 ways as follows: •... - Page 13 12. USING THE BARREL RESTS (CONTINUED) For forward facing barrel rest installation: 1. Unscrew the bracket with both screws to remove. 2. Locate the longer brackets in the hardware provided. 3. Screw bracket on the back of the barrel rest. 4.
-
Page 14: Interior Lighting
13. INTERIOR LIGHTING This safe comes with proximity based interior lighting installed. When the USB powered internal lighting is plugged into the USB power source, the lighting will function automatically when the door is open. Note: This equipment has been tested and found to comply with the limits for a Class B digital device, pursuant to part 15 of the FCC Rules. -
Page 15: Loading Your Safe
16. LOADING YOUR SAFE Store documents or heat sensitive items in the bottom of the safe for greatest protection against fire damage. Store ammunition separately from valuables. Do not put anything in your safe that will put pressure against the door when it is closed. -
Page 16: Lifetime Warranty
LIFETIME WARRANTY SA Consumer Products, Inc. will repair or replace, at their sole discretion, any Sanctuary Gun Safe damaged by fire, forced entry, forced attack or natural flood for the lifetime of the original owner. SA Consumer Products, Inc. will repair or replace, at their sole discretion, any Sanctuary Gun Safe with defective parts, paint or lock for the lifetime or the original owner. - Page 17 Distributed by: Costco Wholesale Corporation P.O. Box 34535 Seattle, WA 98124-1535 1-800-774-2678 www.costco.com MADE IN CHINA...
Need help?
Do you have a question about the RESERVE SA5514S-IHS and is the answer not in the manual?
Questions and answers