Table of Contents

Related Manuals for Sanctuary SA-DIA4


Summary of Contents for Sanctuary SA-DIA4
- Page 1 SECURITY SAFE INSTRUCTION MANUAL FOR SA-DIA1, SA-DIA2, SA-DIA3 AND SA-DIA4 IMPORTANT: Please read this information and follow all safety rules carefully before operating your security safe. Failure to do so will void your warranty. 033023...
-
Page 2: Table Of Contents
TABLE OF CONTENTS IMPORTANT INFORMATION ....................2 1. REGISTRATION ........................ 3 2. UNDERSTANDING YOUR SAFE ..................4 3. INITIAL ENTRY ........................5 4. ELECTRONIC LOCK SECURITY CODE SETUP............... 6 5. OPENING YOUR SAFE WITH PROGRAMMED SECURITY CODE.......... 8 6. LOCKED OUT OF THE SAFE....................8 7. -
Page 3: Important Information
SANCTUARY SAFE. DO NOT LOCK THIS MANUAL OR THE OVERRIDE KEYS IN YOUR SAFE. Thank you for choosing a Sanctuary safe to protect your valuables. We are committed to securing, organizing and protecting your most important documents, valuables and keepsakes. -
Page 4: Registration
REGISTRATION INFORMATION The information you record onto this page will be required in the event you cannot access the contents of your Sanctuary safe. Please fill out all the required information below and retain for your records and safe keeping. -
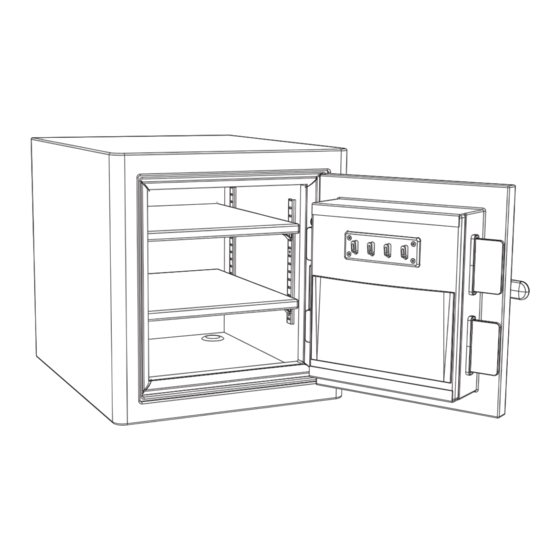
Page 5: Understanding Your Safe
2. UNDERSTANDING YOUR SAFE Override Key Entry (underneath keypad) Electronic Lock Face Handle Adjustable Shelves Interior Light (SA-DIA1 only has one shelf Reset SA-DIA4 has 3 shelves) Dead Button Locking Plates Hooks Active Bolt Locking Down Holes Door Organizer Lighting Plates... -
Page 6: Initial Entry
3. INITIAL ENTRY 1. Locate the override keys inside the plastic bag hanging on the front of the safe. Locate the override key entry on the door of the safe. Insert the key and turn clockwise from the 12 to 3 o'clock position. -
Page 7: Electronic Lock Security Code Setup
3. INITIAL ENTRY (Continued) Plug the electronic lock cable into the back of the lock face. The connector on the cable will only fit into the connector in the lock face in one way. Finally, we will install the keypad onto the safe. First, align the lock face to the backer plate and slide the top of the lock face up into the... - Page 8 4. ELECTRONIC LOCK SECURITY CODE SETUP (Continued) NEW 3-8 DIGIT SECURITY CODE Enter your new 3 to 8 digit security code followed by the [ * ] symbol. If programming is is successful: Keypad will beep 2 times and green LED will flash 2 times.
-
Page 9: Opening Your Safe With Programmed Security Code
5. OPENING SAFE WITH PROGRAMMED SECURITY CODE With keys in hand, close and lock the door. Enter your security code followed by the (#) button. If the security code is accepted, the yellow LED will flash 2 times followed by the green LED illuminating. You now have access to your safe. -
Page 10: Internal Lighting
7. INTERNAL LIGHTING When the safe door is opened, internal lighting activates for 30 seconds. If you need to activate your light longer, you can press the green light Internal Light activation button on the inner door panel. This will activate the internal lighting for an additional 30 seconds each time it is pressed. -
Page 11: Silent Entry Mode
10. SILENT ENTRY MODE By activating the silent entry mode, the safe will no longer make audible sounds. Swipe keypad to activate and illuminate keypad. To turn on silent entry mode, press and hold the (*) for 3 seconds. The yellow LED will flash 2 times indicating the safe is now in silent entry mode. -
Page 12: Securing Your Safe
13. SECURING YOUR SAFE WARNING: YOUR SAFE IS DESIGNED TO SUPPORT ITSELF WHEN THE DOOR IS OPENED. HOWEVER, CAUTION SHOULD BE USED TO AVOID TIPPING. WHILE SECURING YOUR SAFE BE SURE TO HAVE A SECOND PERSON HOLD AND STABILIZE THE SAFE TO KEEP IT FROM TIPPING, CAUSING INJURY, AND/OR DAMAGE TO THE SAFE AND SURROUNDING STRUCTURES. -
Page 13: Loading Your Safe
14. LOADING YOUR SAFE Store documents or heat sensitive items in the bottom of the safe for greatest protection against fire damage. Store ammunition separately from valuables. Do not put anything in your safe that will put pressure against the door when it is closed. -
Page 14: Lifetime Warranty
LIFETIME WARRANTY SA Consumer Products, Inc. will repair or replace, at their sole discretion, any Sanctuary Safe damaged by fire, forced entry, forced attack or natural flood for the lifetime of the original owner. SA Consumer Products, Inc. will repair or replace, at their sole discretion, any Sanctuary Safe with defective parts, paint or lock for the lifetime or the original owner.
Need help?
Do you have a question about the SA-DIA4 and is the answer not in the manual?
Questions and answers