Table of Contents
Advertisement
Advertisement
Table of Contents

Related Manuals for Sanctuary PLATINUM SA-PLAT1


Summary of Contents for Sanctuary PLATINUM SA-PLAT1
- Page 1 SECURITY SAFE INSTRUCTION MANUAL FOR SA-PLAT1, SA-PLAT2, SA-PLAT3, SA-PLAT4 SA-PLAT1-DP, SA-PLAT2-DP, SA-PLAT3-DP AND SA-PLAT4-DP IMPORTANT: Please read this information and follow all safety rules carefully before operating your security safe. Failure to do so will void your warranty. 110521...
-
Page 2: Table Of Contents
TABLE OF CONTENTS IMPORTANT INFORMATION ....................2 1. REGISTRATION ........................ 3 2. UNDERSTANDING YOUR SAFE ..................4 3. INITIAL ENTRY ........................5 4. ELECTRONIC LOCK SECURITY CODE SETUP............... 7 5. OPENING YOUR SAFE WITH PROGRAMMED SECURITY CODE.......... 8 6. LOCKED OUT OF THE SAFE....................8 7. -
Page 3: Important Information
SANCTUARY SAFE. DO NOT LOCK THIS MANUAL OR THE BACKUP KEYS IN YOUR SAFE. Thank you for choosing a Sanctuary safe to protect your valuables. We are committed to securing, organizing and protecting your most important documents, valuables and keepsakes. -
Page 4: Registration
REGISTRATION INFORMATION The information you record onto this page will be required in the event you cannot access the contents of your Sanctuary safe. Please fill out all the required information below and retain for your records and safe keeping. -
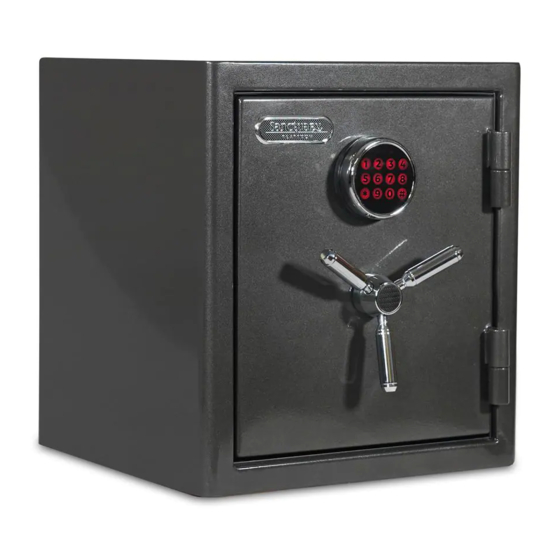
Page 5: Understanding Your Safe
2. UNDERSTANDING YOUR SAFE Electronic Lock Face Backup Key Entry (underneath lock face) 3-Spoke Handle (SA-PLAT1 has one spoke) Interior Light Tempered Glass Shelves Reset Hooks (SA-PLAT1 only has one shelf ) Button Dead Locking Bolts Bolt Active Down Holes Locking Door Organizer Acrylic... -
Page 6: Initial Entry
vertical 3. INITIAL ENTRY 1. Locate the backup keys and single spoke inside the plastic bag hanging on the front of the safe. Install the single spoke by inserting into one of the threaded openings and twisting clockwise until you feel the spoke fully lock into place. - Page 7 3. INITIAL ENTRY (Continued) Locate the 1x9V battery. FRONT OF LOCK FACE Install into the battery compartment on the back of the lock face in the proper orientation. The touch pad will beep when batteries are successfully installed. BACK OF LOCK FACE WARNING: The batteries must be inserted with the correct polarity.
-
Page 8: Electronic Lock Security Code Setup
4. ELECTRONIC LOCK SECURITY CODE SETUP Important: Your safe comes programmed with a factory code of [ 1 5 9 # ]. It is necessary to re-program your safe with a new security code you have personally selected to provide maximum household security. -
Page 9: Opening Your Safe With Programmed Security Code
5. OPENING SAFE WITH PROGRAMMED SECURITY CODE With keys in hand, close and lock the door. Swipe finger(s) across the touch pad to “wake up” and activate the lockface. Two random numbers will illuminate when the touch pad wakes up. Individually press both of the two numbers, in any order, to allow full access to the touch pad. -
Page 10: Glass Shelf Installation
7. GLASS SHELF INSTALLATION First, remove the protective film from the acrylic mirror back wall. Then, remove the tempered glass shelving from the protective packaging located at the bottom of the safe and gather all provided hardware. Screw all provided shelving brackets into place on both the left and the right walls of the safe using a Phillips head screwdriver. - Page 11 7. GLASS SHELF INSTALLATION (Continued) Maneuver the top shelf into the safe, positioned just below the top brackets. Pull the shelf towards you, passing the shelf through both of the front top brackets. Note: During this step, be sure the shelf slides below and does not make contact with the key hooks located on right wall of the safe.
- Page 12 7. GLASS SHELF INSTALLATION (Continued) Insert the bottom shelf into your safe, in between the top and bottom brackets Move this shelf towards the top of your safe, then slide the shelf down into the front brackets. Note: The PLAT1 model only has one shelf Once the bottom shelf has passed through the front...
-
Page 13: Internal Lighting
8. INTERNAL LIGHTING Internal Light When the safe door is opened, internal lighting activates for 30 seconds. If you need to activate your light longer, you can press the green light activation button on the inner door panel. This will activate the internal lighting for an additional 30 seconds each time it is pressed. -
Page 14: Silent Entry Mode
11. SILENT ENTRY MODE By activating the silent entry mode, the safe will no longer make audible sounds. Swipe finger(s) across the touch pad to “wake up” and activate the lockface. Two random numbers will illuminate when the lock face wakes up. Individually press both of the two numbers, in any order, to allow full access to the touch pad. -
Page 15: Securing Your Safe
14. SECURING YOUR SAFE WARNING: YOUR SAFE IS DESIGNED TO SUPPORT ITSELF WHEN THE DOOR IS OPENED. HOWEVER, CAUTION SHOULD BE USED TO AVOID TIPPING. WHILE SECURING YOUR SAFE BE SURE TO HAVE A SECOND PERSON HOLD AND STABILIZE THE SAFE TO KEEP IT FROM TIPPING, CAUSING INJURY, AND/OR DAMAGE TO THE SAFE AND SURROUNDING STRUCTURES. -
Page 16: Loading Your Safe
15. LOADING YOUR SAFE Store documents or heat sensitive items in the bottom of the safe for greatest protection against fire damage. Store ammunition separately from valuables. Do not put anything in your safe that will put pressure against the door when it is closed. -
Page 17: Lifetime Warranty
LIFETIME WARRANTY SA Consumer Products, Inc. will repair or replace, at their sole discretion, any Sanctuary Safe damaged by fire, forced entry, forced attack or natural flood for the lifetime of the original owner. SA Consumer Products, Inc. will repair or replace, at their sole discretion, any Sanctuary Safe with defective parts, paint or lock for the lifetime or the original owner.
Need help?
Do you have a question about the PLATINUM SA-PLAT1 and is the answer not in the manual?
Questions and answers
I have a Sanctuary Platinum safe (Non-Bio). Can I just replace the batteries? Or do I need to do anything else first? Will it keep your number combination?
Yes, you can replace the batteries in a Sanctuary Platinum safe (PLATINUM SA-PLAT1) without losing the combination. The safe uses a 9V battery to power the electronic lock, and replacing the battery does not reset or erase the programmed security code.
This answer is automatically generated
@Mr. Anderson
@Christopher Paris
@Christopher Paris @Christopher Paris I have 4 AA batteries in the top of the door. What are they for? Is the 9 volt battery under the number plate on the front of the safe? If so, how do you get the face off? Thank you. NOTE: My safe is not shown when I search for the Platinum model. The model number is J055SA035A1670 SA-H4
I have a Sanctuary Platinum DT5812A safe which has a dead battery. I cannot get in the safe. How do I change the battery?