Table of Contents
Advertisement
Quick Links
Advertisement
Table of Contents

Related Manuals for Fermax SEE-U F01394


Summary of Contents for Fermax SEE-U F01394
- Page 1 SEE-U WIFI KIT 7'' 1L ADVANCED INSTALLATION MANUAL...
- Page 2 Technical publication for information purposes released by FERMAX ELECTRÓNICA S.A.U. FERMAX ELECTRÓNICA applies a continuous improvement policy, therefore it reserves the right to modify the contents of this document, as well as the product features hereof at any time and without prior notice.
-
Page 3: Table Of Contents
CONTENTS 1. DESCRIPTION 2. INSTALLATION 2.1 Monitor Installation 2.2 Installation of the Panel 2.3 Connection Diagrams 3. CONFIGURATION AND USE 3.1 Monitor Configuration 3.1.1 Notification LEDs 3.1.2 Main screen navigation 3.1.3 Settings screen navigation 3.2 Configuration Panel 3.3 Mobile telephone pairing 3.3.1 WIFI 3.3.2 Telephone synchronisation 3.3.3 App navigation sections... -
Page 4: Description
1. DESCRIPTION PRODUCT AND CONTENT REF: F01394 7” Monitor REF: F01395 Panel REF: F01390 Power Adapter SEE-U WIFI KIT 7'' 1L... -
Page 5: Installation
2. INSTALLATION 2.1. INSTALLATION OF THE MONITOR Location of the monitor installation The standard installation height of the monitor is approximately 1700 mm, where the centre of the screen is at eye level; in this case, the centre of the metal installation fixture is 1650 mm above the floor. -
Page 6: Connection Diagrams
2.3. CONNECTION DIAGRAMS 1 panel 1 monitor 15 Vdc / 1.5A 22.5W Panel 1 NTSC BUS BUS COM NO/NC EXIT GND S+ CCTV GND Doorbell BELL Hallway exit button Lock 12 Vdc SOURCE Max.250mA automatic gate Note: - Compatible with PAL encoding system cameras. - Do not connect door locks with an operating voltage other than 12 Vdc or higher than 250mA. -
Page 7: Configuration And Use
4 cables per terminal In the following link, you will find some tutorial videos explaining the elements and materials that make up the kit, how to set up the monitor and how to pair the See-U by Fermax mobile app. -
Page 8: Main Screen Navigation
3.1.2 Navigation main screen Touching the screen activates it and displays the different monitor options. There is also a drop-down menu at the top where additional information is displayed: Volume settings, monitor mute, WiFi connection and the different screenshot modes. The following image shows the different icons that appear: drop-down Auto-on: Executes an AutoOn of both the panel and the connected analogue... -
Page 9: Settings Screen Navigation
You may be required to place a sign next to the outdoor panel stating that the monitor can capture images. You can download it at the following link [NOTE: sign is in Spanish only -Translator]: https://www.fermax.com/dam/jcr:28d0c22e-9a82-4f1b-b393-933934f62835/AdhesivoZonaVig_ESP_ED.pdf 3.1.3 Navigating the settings screen From the main screen, swipe left to access the settings screen: Allows you to return to the previous screen, in this case the main screen. - Page 10 NOTE: The QR code for pairing with the See-U by Fermax mobile app will appear only when the monitor has previously established a connection to a wireless network.
- Page 11 Mute: Allows you to activate or deactivate the "Do not disturb" function with timer, and to set the time period. Note: This setting has a lower priority than the one entered via the quick menu. Address: Enable intercom call reception: - Intercom address: sets the monitor's intercom address: main, ext1, ext2 or ext3.
- Page 12 Language: Sets the language of the monitor. Time: Allows you to manually set the date and time of the monitor, and to select the date format. It is also possible to adjust the time and date directly from the application. Report: You may delete all the photos and videos from the Micro SD card or the internal memory, copy all of the images from the internal memory to the Micro SD card and format the Micro SD card.
-
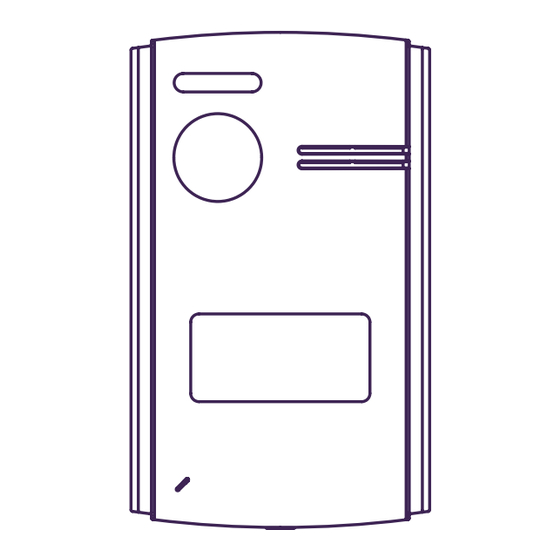
Page 13: Configuration Panel
3.2 PANEL CONFIGURATION Illumination LEDs Loudspeaker Camera Call button / Card holder Microphone DOOR 2 DOOR 1 RELAY DOOR Bus: For the connection of the communication bus. Relay connection: For connecting the door relay with an additional power supply. For example: For a Gate. -
Page 14: Mobile Telephone Pairing
The monitor can work as an active WiFi zone which is connected to the home WiFi router. The WiFi settings are controlled from the See-U by Fermax app, which you can download from Google Play (Android) or from the Apple Store (iOS). Search for the 'See-U by Fermax' application. - Page 15 If the connection is not successful, the SSID will be displayed in red with an exclamation mark: Download the See-U by FERMAX app: Open the previously downloaded 'See-U by Fermax' app, it is necessary to pair the mobile device to the monitor.
- Page 16 - The camera will be activated; focus on the QR code on the left side of the monitor. - You will note that the camera will offer options to enable the flash and to extract an image featuring a QR pairing code from the album. It also has the ability to auto-adjust the zoom of the camera to get the QR pairing code.
-
Page 17: App Navigation Sections
- Press the "Next" button to confirm and the monitor added to the main screen will appear. 3.3.3 App navigation sections On the main screen, you will have access to the following sections: Name Configuration of the monitor AutoOn Door Lock or Relay Panel 1 Panel 1 Main... - Page 18 Main screen The paired monitor window will appear, as shown in the image above. The different connected devices, such as PANEL1, PANEL2, CAM1 and CAM2, also appear in the same window. Lastly, there is an Advanced Settings icon. House settings: Enter the submenu to modify: Monitor Name, Push Notifications and Advanced Parameters (you can also view monitor details).
- Page 19 Push settings: You can Enable or Disable pop-up notifications every time you receive a call. Advanced settings: Allows you to enter the extra settings where you can customise features such as: Change password: You can change the door opening password. The current and new passwords must be entered, and the new one confirmed.
- Page 20 Unlock Settings: Within this section, three parameters can be modified: - Quick release: If enabled, you will only be prompted to open the door once. For future calls, it will not ask for the door release password again. If the option is deactivated, you will always be asked for the door release password.
- Page 21 Thumbnails setting: This allows you to change the preview image of the main screen monitor window within the App. Preview mode: This allows you to select the Audio and Video quality. By default, it is set to High Quality. Cancel: When you press this button, a pop-up window will appear to confirm whether you want to delete the monitor.
- Page 22 Gallery It is possible to view screenshots or recordings that are made through the external panel. It is possible to filter by device, type of capture (image or video) and by date. Pressing the edit icon at the bottom of the screen will display 3 editing options: Select All, Store In Device or Delete Selection.
- Page 23 As with the Album option, the events Additionally, the edit icon allows you section can be filtered by device, event to individually select each event, select type and date. all and delete. When you select the Delete button, a pop-up window will appear to confirm whether you want to delete events via individual selection, or simply delete all events.
- Page 24 RADIO FREQUENCY MODULE EC DECLARATION OF CONFORMITY FERMAX ELECTRÓNICA, S.A.U. declares that this product complies with the requirements of the RED Directive 2014/53/EU on Radio Frequency Equipment. https://www.fermax.com/spain/pro/documentacion/documentacion-tecnica/DT-13-declaraciones-de-conformidad.html Radio frequency module: Frequency: 2.4GHz / Maximum power: 14 ± 0.6 dBm APPENDIX A EXAMPLE OF SUPPLIER'S DECLARATION OF CONFORMITY —...
- Page 25 FERMAX ELECTRONICA S.A.U Avenida Tres Cruces, 133 46017 Valencia, Spain...
Need help?
Do you have a question about the SEE-U F01394 and is the answer not in the manual?
Questions and answers