Table of Contents
Advertisement
Quick Links
Advertisement
Table of Contents

Related Manuals for HIKVISION DS-K5603-Z


Summary of Contents for HIKVISION DS-K5603-Z
- Page 1 Face Recognition Terminal Quick Start Guide...
- Page 2 This Manual is subject to domestic and international copyright protection. Hangzhou Hikvision Digital Technology Co., Ltd. (“Hikvision”) reserves all rights to this manual. This manual cannot be reproduced, changed, translated, or distributed, partially or wholly, by any means, without the prior written permission of Hikvision.
- Page 3 Face Recognition Terminal·Quick Start Guide USED WITH ILLEGITIMATE PURPOSES. IN THE EVENT OF ANY CONFLICTS BETWEEN THIS MANUAL AND THE APPLICABLE LAW, THE LATER PREVAILS. Support Should you have any questions, please do not hesitate to contact your local dealer.
- Page 4 Face Recognition Terminal·Quick Start Guide Regulatory Information FCC Information Please take attention that changes or modification not expressly approved by the party responsible for compliance could void the user’s authority to operate the equipment. FCC compliance: This equipment has been tested and found to comply with the limits for a Class B digital device, pursuant to part 15 of the FCC Rules.
- Page 5 Face Recognition Terminal·Quick Start Guide 2006/66/EC (battery directive): This product contains a battery that cannot be disposed of as unsorted municipal waste in the European Union. See the product documentation for specific battery information. The battery is marked with this symbol, which may include lettering to indicate cadmium (Cd), lead (Pb), or mercury (Hg).
- Page 6 Face Recognition Terminal·Quick Start Guide Cautions Do not drop the device or subject it to physical shock, and do not expose it to high electromagnetism radiation. Avoid the equipment installation on vibrations surface or places subject to shock (ignorance can cause equipment damage). ...
-
Page 7: Table Of Contents
Face Recognition Terminal·Quick Start Guide Table of Contents Chapter 1 Overview ......................... 1 Introduction ......................... 1 Main Features ........................1 Chapter 2 Appearance ......................3 Chapter 3 Installation ......................4 Chapter 4 Wiring ........................7 Wiring Access Control Terminal ................... 7 Wiring the Third-Party Turnstile .................. - Page 8 Face Recognition Terminal·Quick Start Guide 6.12.2 Authenticating via 1:N Matching ................23 6.13 Linking Access Control Device .................... 23 Appendix A Tips When Collecting/Comparing Face Picture ............25 A.1 Expression .......................... 25 A.2 Posture ..........................25 A.3 Size ............................ 25...
-
Page 9: Chapter 1 Overview
Face Recognition Terminal·Quick Start Guide Chapter 1 Overview 1.1 Introduction DS-K5603-Z and DS-K5603-Z (32 G) face recognition terminal, designed with TX1 system, can be applied in the scenarios of examination hall, railway station, bank, building, hotel, etc., which needs identity verification. - Page 10 Face Recognition Terminal·Quick Start Guide Imports face pictures to the device via the USB interface Exports face pictures and events from the device via the USB interface Communication with access controller via RS-232 communication mode and communication with the third party devices via RS-485 communication mode ...
-
Page 11: Chapter 2 Appearance
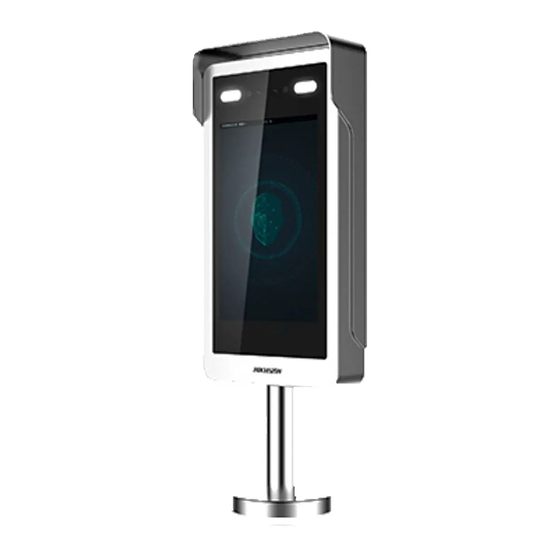
Face Recognition Terminal·Quick Start Guide Chapter 2 Appearance The device appearance, dimensions and descriptions are as follows. Table 2-1 Appearance Description Description Supplement Light Display Screen Power Button Cameras... -
Page 12: Chapter 3 Installation
Face Recognition Terminal·Quick Start Guide Chapter 3 Installation Installation Environment: Avoid backlight and direct sunlight. If installing outdoors, install a sun shield over the device. The device should be installed on the pedestals of the barriers. Before you start: ... - Page 13 Face Recognition Terminal·Quick Start Guide 2. Wire the cable with the terminals in the barrier pedestal. 3. Raise the pipe and make sure the pipe and the pedestal top panel are vertical. 4. Secure the pipe with hex socket screws. 1) Rotate the pipe and align the four holes on the round panel with the holes on the pedestal top panel.
- Page 14 Face Recognition Terminal·Quick Start Guide 1) Move the cover on the round panel. 2) Rotate the cover and hide the hole on the cover and align the hole with one of the four small parts on the round panel. 3) Secure the cover and the round panel with one supplied M2 screw.
-
Page 15: Chapter 4 Wiring
Face Recognition Terminal·Quick Start Guide Chapter 4 Wiring 4.1 Wiring Access Control Terminal The picture displayed below describes the access control terminal’s wiring. 4.2 Wiring the Third-Party Turnstile... - Page 16 Face Recognition Terminal·Quick Start Guide Notes: For details about I/O output module, see User Manual of I/O Output Module or scan the QR code below to view the manual via your mobile device. The device can also access to the third-party turnstile via RS-485 to Wiegand module. For details, see User Manual of RS-485 to Wiegand Module or scan the QR Code below to view the manual via your mobile device.
-
Page 17: Chapter 5 Device Activation
Face Recognition Terminal·Quick Start Guide Chapter 5 Device Activation Purpose: You are required to activate the device first before using it. Activation via device, activation via SADP, and activation via client software are supported. The default values of the control terminal are as follows. ... - Page 18 Face Recognition Terminal·Quick Start Guide password. Get the SADP software from the supplied disc, and install the SADP according to the prompts. Follow the steps to activate the control panel. Steps: 1. Run the SADP software to search the online devices. 2.
-
Page 19: Activating Via Client Software
Face Recognition Terminal·Quick Start Guide 6. Input the password and click the Modify button to activate your IP address modification. 5.3 Activating via Client Software The client software is versatile video management software for multiple kinds of devices. Get the client software from the supplied disc, and install the software according to the prompts. Follow the steps to activate the control panel. - Page 20 Face Recognition Terminal·Quick Start Guide 2. Click Device Management to enter the Device Management interface. 3. Check the device status from the device list, and select an inactive device. 4. Check the device status from the device list, and select an inactive device. 5.
- Page 21 Face Recognition Terminal·Quick Start Guide 7. Click OK button to start activation. 8. Click the Modify Netinfor button to pop up the Network Parameter Modification interface. 9. Change the device IP address to the same network segment with your computer by either modifying the IP address manually.
-
Page 22: Chapter 6 Basic Operation
Face Recognition Terminal·Quick Start Guide Chapter 6 Basic Operation Purpose: After entering the administrative backend, you can manage users, set communication parameters, change device password, manage and maintain data, and view device information. 6.1 Application Mode Settings Purpose: After activating the device, you should select an application mode for better device application. Steps: 1. -
Page 23: Setting Com Parameters
Face Recognition Terminal·Quick Start Guide 4. Tap Logout to exit the page and save the parameters. 6.3.2 Setting COM Parameters Purpose: The device can be connected to other access control device via the COM interface. After selecting the baud rate, you can connect the device to other access control devices via RS-232 protocol or RS-485 protocol. - Page 24 Face Recognition Terminal·Quick Start Guide Parameter Item Description If swiping card, the device will starts 1:1 authentication according to the face picture on the card. Face Picture: Authenticate via face picture only. Card + Face Authenticate via face picture and card Picture: Note: If you require a higher security level, do not use single...
-
Page 25: User Management
Face Recognition Terminal·Quick Start Guide Parameter Item Description IR Light Brightness Set the IR light’s brightness. 0 represents the IR light is turned off. White Light Brightness Set the white light’s brightness. 100 represents the most brightness, and 1 represents the darkest. 0 represents off. Max. -
Page 26: Searching User
Face Recognition Terminal·Quick Start Guide 5. Add face picture. 1) Tap Not Added on the right of the Face Picture item to enter the face picture adding page. 2) Position the face looking at the device camera. Make sure the face picture is in the blue square on this page and wait for the device recognition. -
Page 27: Setting Face Picture Parameters
Face Recognition Terminal·Quick Start Guide 6.6 Setting Face Picture Parameters Purpose: You can set the face picture’s parameters for recognizing the face. The parameters include 1:N matching threshold, 1:1 matching threshold, Min. detection area (width), Min. detection area (height), Min. detection width (close to), margin (left), margin (top), margin (right), margin (bottom), pitch angle, yaw angle, pupillary distance, and score. -
Page 28: Changing Password
Face Recognition Terminal·Quick Start Guide Parameter Item Description Margin (Top) The distance from the face top side to the top margin in the recognition area. The actual distance should be larger than the configured value when face picture authentication. Other percentages, distances, and angles should also meet their conditions. -
Page 29: Managing Data
Face Recognition Terminal·Quick Start Guide better protect your product. 6.8 Managing Data Purpose: You can export added face pictures, and the authentication events and exception data from the system. You can also import the face information in batch to the system. Steps: 1. -
Page 30: Viewing System Information
Face Recognition Terminal·Quick Start Guide If there is new version available or the current firmware version is too low, you can upgrade the device firmware via the USB interface. Steps: 1. Plug an USB flash drive in the device USB interface. Note: Make sure there are upgrading file in the USB flash drive. - Page 31 Face Recognition Terminal·Quick Start Guide camera to authenticate via QR code. 2. (Optional) If the Blacklist Authentication Mode function is enabled, the device will compare the authentication information with the blacklist. If the user is in the blacklist, a prompt of identity exception will pop up on the auxiliary screen and the device will send a blacklist alarm to the control center.
- Page 32 Face Recognition Terminal·Quick Start Guide control device. The access control device will control the door status according to the result. And it will also send the related events to the client or other systems. Note: For details about access control device’s authentication mode, see the user manual of the related access control device.
- Page 33 Face Recognition Terminal·Quick Start Guide Appendix ATips When Collecting/Comparing Face Picture A.1 Expression Keep your expression naturally when collecting or comparing face pictures, just like the expression in the picture below. Do not wear hat, sunglasses, or other accessories that can affect the facial recognition function. ...
- Page 34 Face Recognition Terminal·Quick Start Guide UD11040B...
Need help?
Do you have a question about the DS-K5603-Z and is the answer not in the manual?
Questions and answers