HIKVISION DS-K5032 Series User Manual
Visitor terminal
Hide thumbs
Also See for DS-K5032 Series:
- Quick start manual (2 pages) ,
- Quick start manual (2 pages) ,
- User manual (35 pages)
Table of Contents
Advertisement
Quick Links
Advertisement
Table of Contents

Related Manuals for HIKVISION DS-K5032 Series


Summary of Contents for HIKVISION DS-K5032 Series
- Page 1 DS-K5032 Series Visitor Terminal User Manual...
- Page 2 WITHOUT LIMITATION, MERCHANTABILITY, SATISFACTORY QUALITY, OR FITNESS FOR A PARTICULAR PURPOSE. THE USE OF THE PRODUCT BY YOU IS AT YOUR OWN RISK. IN NO EVENT WILL HIKVISION BE LIABLE TO YOU FOR ANY SPECIAL, CONSEQUENTIAL, INCIDENTAL, OR INDIRECT DAMAGES,...
- Page 3 During the use of device, personal data will be collected, stored and processed. To protect data, the development of Hikvision devices incorporates privacy by design principles. For example, for device with facial recognition features, biometrics data is stored in your device with encryption method;...
- Page 4 DS-K5032 Series Visitor Terminal User Manual Regulatory Information FCC Information Please take attention that changes or modification not expressly approved by the party responsible for compliance could void the user’s authority to operate the equipment. FCC compliance: This equipment has been tested and found to comply with the limits for a Class B digital device, pursuant to part 15 of the FCC Rules.
- Page 5 DS-K5032 Series Visitor Terminal User Manual under the EMC Directive 2014/30/EU, RE Directive 2014/53/EU,the RoHS Directive 2011/65/EU 2012/19/EU (WEEE directive): Products marked with this symbol cannot be disposed of as unsorted municipal waste in the European Union. For proper recycling, return this product to your local supplier upon the purchase of equivalent new equipment, or dispose of it at designated collection points.
- Page 6 DS-K5032 Series Visitor Terminal User Manual Safety Instruction These instructions are intended to ensure that user can use the product correctly to avoid danger or property loss. The precaution measure is divided into Dangers and Cautions: Dangers: Neglecting any of the warnings may cause serious injury or death.
- Page 7 DS-K5032 Series Visitor Terminal User Manual Do not connect several devices to one power adapter as adapter overload may cause over-heat ● or fire hazard. Please make sure that the power has been disconnected before you wire, install or dismantle the ●...
- Page 8 DS-K5032 Series Visitor Terminal User Manual Available Model Product Name Model Visitor Terminal DS-K5032 DS-K5032-D...
-
Page 9: Table Of Contents
DS-K5032 Series Visitor Terminal User Manual Contents Chapter 1 Overview ........................1 1.1 Overview ..........................1 1.2 Main Features ........................1 Chapter 2 Appearance ........................ 2 Chapter 3 Installation ......................... 4 3.1 Installation Environment ......................4 3.2 Installation ..........................4 Chapter 4 Wiring ........................ - Page 10 DS-K5032 Series Visitor Terminal User Manual 7.3 Self-Service Visitor System ....................22 7.3.1 Login ..........................22 7.3.2 System Settings ......................23 7.4 Staff-Service Visitor System ....................39 7.4.1 View and Search Visitor Information ................39 7.4.2 Login ..........................39 7.4.3 System Settings ......................40 Chapter 8 Operation via Web Browser ..................
- Page 11 DS-K5032 Series Visitor Terminal User Manual Appendix B. Tips for Installation Environment ................79 Appendix C. Dimension ......................80 Appendix D. Communication Matrix and Device Command ............81...
-
Page 12: Chapter 1 Overview
DS-K5032 Series Visitor Terminal User Manual Chapter 1 Overview 1.1 Overview The visitor terminal is designed for visitor management, which is mainly applied to enterprises, stations, university campuses, factories, etc. 1.2 Main Features Android operation system with single or dual screen design. -
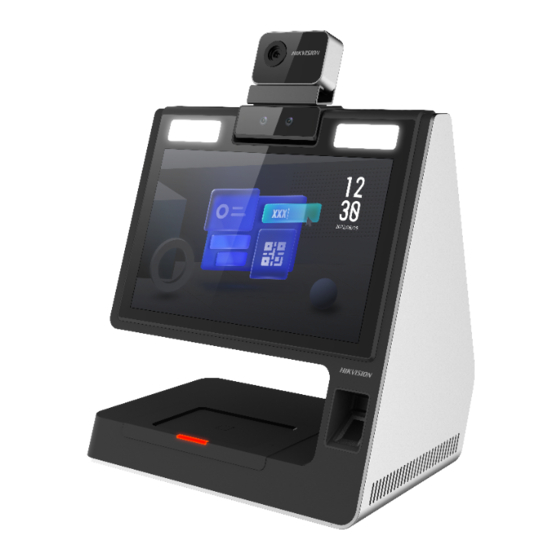
Page 13: Chapter 2 Appearance
DS-K5032 Series Visitor Terminal User Manual Chapter 2 Appearance Refer to the following contents for detailed information of the visitor terminal: Figure 2-1 Visitor Terminal Diagram Table 2-1 Description of Face Recognition Terminal Description Power Switch Hold: Power On/Power Off/ R eboot... - Page 14 DS-K5032 Series Visitor Terminal User Manual Description Note Both white light and IR light are supported. Visitor Screen Note The models, which contains only one screen, do not support the visitor screen. Bottom Camera Card Presenting Area Indicator for Card Presenting USB 2.0 (Sub Interface)
-
Page 15: Chapter 3 Installation
DS-K5032 Series Visitor Terminal User Manual Chapter 3 Installation 3.1 Installation Environment Avoid backlight, direct sunlight, and indirect sunlight. ● For better recognition, there should be light source in or near the installation environment. ● The minimum bearing weight of the wall or other places should be 3 times heavier than the ●... -
Page 16: Chapter 4 Wiring
DS-K5032 Series Visitor Terminal User Manual Chapter 4 Wiring The suggested wiring diagram is as follows: Figure 4-1 Wiring Diagram... -
Page 17: Chapter 5 Activation
DS-K5032 Series Visitor Terminal User Manual Chapter 5 Activation You should activate the device before the first login. After powering on the device, the system will switch to Device Activation page. Activation via the device, SADP tool and the client software are supported. -
Page 18: Activate Via Web Browser
DS-K5032 Series Visitor Terminal User Manual Caution The password strength of the device can be automatically checked. We highly recommend you change the password of your own choosing (using a minimum of 8 characters, including at least three kinds of following categories: upper case letters, lower case letters, numbers, and special characters) in order to increase the security of your product. -
Page 19: Activate Via Sadp
Get the SADP software from the supplied disk or the official website http:// ● www.hikvision.com/en/ , and install the SADP according to the prompts. The device and the PC that runs the SADP tool should be within the same subnet. - Page 20 DS-K5032 Series Visitor Terminal User Manual Status of the device becomes Active after successful activation. 5. Modify IP address of the device. 1) Select the device. 2) Change the device IP address to the same subnet as your computer by either modifying the IP address manually or checking Enable DHCP.
-
Page 21: Chapter 6 Quick Operation
DS-K5032 Series Visitor Terminal User Manual Chapter 6 Quick Operation 6.1 Select Language You can select a language for the device system. After the device activation, you can select a language for the device system. Figure 6-1 Select System Language By default, the system language is English. -
Page 22: Set Network Parameters
DS-K5032 Series Visitor Terminal User Manual Figure 6-2 Time Zone Settings Note The time zone will affect the device time. ● 2. Tap Next. 3. Optional: Tap Skip to skip time zone settings. 4. Optional: Tap PREVIOUS to back to the previous page. - Page 23 DS-K5032 Series Visitor Terminal User Manual Figure 6-3 Select Network Wired Network Note Make sure the device has connected to a network. If enable DHCP, the system will assign the IP address and other parameters automatically. If disable DHCP, you should set the IP address, the subnet mask, and the gateway.
-
Page 24: Chapter 7 Basic Operation
DS-K5032 Series Visitor Terminal User Manual Chapter 7 Basic Operation 7.1 Visitor Check In 7.1.1 Reserved Visitor Check In Visitors can make appointments on the platform in advance and check in by phone number or the visitor code generated for successful reservation. -
Page 25: Non-Reserved Visitor Check In
DS-K5032 Series Visitor Terminal User Manual When authentication is completed, you will enter the visitor check-in information page. 3. Optional: If authentication fails, tap to retry authentication, or tap to capture face picture. Figure 7-2 Failed Authentication 4. Fill in the rest of the visitor information. - Page 26 DS-K5032 Series Visitor Terminal User Manual Steps 1. Enroll visitor information. 1) Tap Unreserved Check In in the lower right corner of the home page to enter the visitor check-in page. Figure 7-3 Visitor Check In...
- Page 27 DS-K5032 Series Visitor Terminal User Manual Figure 7-4 Visitor Check In 2) Present the card on the card presenting area for authentication. When authentication is completed, you will enter the visitor check-in information page. Note If authentication fails, tap to retry authentication, or tap...
- Page 28 DS-K5032 Series Visitor Terminal User Manual Figure 7-5 Failed Authentication 3) Add face picture according to the instruction on the visitor screen. Note The system will perform recognition according to the configurations in Settings → Basic ● Settings . Refer to Set Basic Parameters for details.
-
Page 29: Offline Check In
DS-K5032 Series Visitor Terminal User Manual 7.1.3 Offline Check In Check-in for visitors when the device is unconnected to network. Before You Start Complete the basic settings and visitor parameter settings. Refer to Set Basic Parameters and Visitor Check In Settings for details. - Page 30 DS-K5032 Series Visitor Terminal User Manual Figure 7-7 Person and ID Comparison 2) Present the card on the card presenting area for authentication. Note If authentication fails, tap to retry authentication, or tap to capture face picture.
- Page 31 DS-K5032 Series Visitor Terminal User Manual Figure 7-8 Failed Authentication 3) Add face picture according to the instruction on the visitor screen. Note The system will perform recognition according to the configurations in Settings → Basic ● Settings . Refer to Set Basic Parameters for details.
-
Page 32: Visitor Check Out
DS-K5032 Series Visitor Terminal User Manual 7.2 Visitor Check Out 7.2.1 Check Out via QR Code Scan scan the QR code on the receipt to check out. Steps 1. Scan the QR code on the visitor receipt. Note Visitors should scan the QR code on the receipt. Refer to Printing Receipt Settings for receipt content details. -
Page 33: Check Out Via Card
DS-K5032 Series Visitor Terminal User Manual 7.2.2 Check Out via Card Check out via card. Steps 1. Present the card. The check-out window will pop up on the operator screen. 2. Tap Check Out. 7.2.3 Check Out via Search Record You can search and view the visitor record and check out the visitors. -
Page 34: System Settings
DS-K5032 Series Visitor Terminal User Manual 7.3.2 System Settings Set Privacy Policy You can set privacy policy for the device. Before You Start Only single-screen devices support privacy policy settings. Steps 1. Tap in the top right corner of the home page. Tap Privacy Policy Settings. - Page 35 DS-K5032 Series Visitor Terminal User Manual Figure 7-10 Wired Network If enable DHCP, the system will assign the IP address and other parameters automatically. If disable DHCP, you should set the IP address, the subnet mask, and the default gateway, DNS1 and DNS2.
- Page 36 DS-K5032 Series Visitor Terminal User Manual Figure 7-11 Wi-Fi Select a Wi-Fi and enter the Wi-Fi's password to get connected. Or tap Add Wi-Fi and enter the Wi-Fi's name and the password to get connected. Set Basic Parameters You can set basic parameters for the device.
- Page 37 DS-K5032 Series Visitor Terminal User Manual Figure 7-12 Basic Parameters...
- Page 38 DS-K5032 Series Visitor Terminal User Manual Table 7-1 Basic Parameters Parameter Description Visitor Parameters Set visitor parameters. Refer to Set Visitor Parameters for details. Settings Change Password Enter old password and confirm new password. The password here is the activation password.
- Page 39 DS-K5032 Series Visitor Terminal User Manual in the top right corner of the home page. Tap Basic Settings → Visitor Parameters Settings to enter the page. Figure 7-13 Visitor Parameters Settings Tap to enable the functions. Manually Enter Visitor Information When the function is enabled, the staff can input visitor information manually.
- Page 40 DS-K5032 Series Visitor Terminal User Manual Saving Visitor Records When the function is enabled, visitor information will be recorded for the first-time visit. When revisits, the visitor only need to present his/her credential for the device to read and the information will be displayed on screen.
- Page 41 DS-K5032 Series Visitor Terminal User Manual 2. Tap Export Captured Picture or Export Visitor Records to export the picture captured or visitor information recorded on the device to your USB flash drive. System Maintenance You can view the device system information, restore the system to factory settings or default settings, reboot the device, exit the system and start wizard.
- Page 42 DS-K5032 Series Visitor Terminal User Manual About You can view the device information. Note The page may vary according to different device models. Refer to the actual page for details. Exit Tap Exit to exit the application. Start Wizard Tap Start Wizard for language settings, time zone settings and network settings. Refer to Quick Operation for details.
- Page 43 DS-K5032 Series Visitor Terminal User Manual Note After you change the system language, the device will reboot automatically. Tap Next. Set Time Zone Figure 7-17 Set Time Zone Select a time zone according to your actual needs. Note The time zone will affect the device time.
- Page 44 DS-K5032 Series Visitor Terminal User Manual Set Network Figure 7-18 Set Network Select Wired or Wireless. Note Disconnect the wired network before connecting a Wi-Fi. Wired Note Make sure the device has connected to a network. If enable DHCP, the system will assign the IP address and other parameters automatically.
- Page 45 DS-K5032 Series Visitor Terminal User Manual Steps 1. Tap in the top right corner of the home page. Tap Custom Settings → Visitor Check in Settings .
- Page 46 DS-K5032 Series Visitor Terminal User Manual Figure 7-19 Visitor Check in Settings Page 2. Set the target items as Required, Not Required or Hide.
- Page 47 DS-K5032 Series Visitor Terminal User Manual Visitor Name Visitor name that the visitor needs to fill in when checking in. Gender Visitor's gender that the visitor needs to fill in when checking in. Phone Visitor's phone No. that the visitor needs to fill in when checking in.
- Page 48 DS-K5032 Series Visitor Terminal User Manual Customize visitor's check in information. Printing Receipt Settings Set the printing contents on the receipt. Steps 1. Tap in the top right corner of the home page. Tap Custom Settings → Printing Receipt Settings .
- Page 49 DS-K5032 Series Visitor Terminal User Manual Note The supported USB flash drive format is FAT32. 3. Tap Add and select a logo picture from the USB flash drive. Note The supported file size is less than 100 KB. The added picture will be cropped to 400 × 400.
-
Page 50: Staff-Service Visitor System
DS-K5032 Series Visitor Terminal User Manual Note The supported file size is less than 120 kb. The added picture will be cropped to 1280 × 800. 4. Optional: Tap Restore Default, the device will use the default picture for the screen saver. -
Page 51: System Settings
DS-K5032 Series Visitor Terminal User Manual 7.4.3 System Settings Set Network Parameters You can set wired network or Wi-Fi for the device. Steps 1. Tap in the top right corner of the home page. Tap Communication Settings → Wired Network or Communication Settings →... - Page 52 DS-K5032 Series Visitor Terminal User Manual Figure 7-23 Wi-Fi Select a Wi-Fi and enter the Wi-Fi's password to get connected. Or tap Add Wi-Fi and enter the Wi-Fi's name and the password to get connected. Set Basic Parameters You can set basic parameters for the device.
- Page 53 DS-K5032 Series Visitor Terminal User Manual Figure 7-24 Basic Parameters...
- Page 54 DS-K5032 Series Visitor Terminal User Manual Table 7-2 Basic Parameters Parameter Description Visitor Parameters Set visitor parameters. Refer to Set Visitor Parameters for details. Settings Change Password Enter old password and confirm new password. The password here is the activation password.
- Page 55 DS-K5032 Series Visitor Terminal User Manual in the top right corner of the home page. Tap Basic Settings → Visitor Parameters Settings to enter the page. Figure 7-25 Visitor Parameters Settings Tap to enable the functions. Manually Enter Visitor Information When the function is enabled, the staff can input visitor information manually.
- Page 56 DS-K5032 Series Visitor Terminal User Manual Saving Visitor Records When the function is enabled, visitor information will be recorded for the first-time visit. When revisits, the visitor only need to present his/her credential for the device to read and the information will be displayed on screen.
- Page 57 DS-K5032 Series Visitor Terminal User Manual 2. Tap Export Captured Picture or Export Visitor Records to export the picture captured or visitor information recorded on the device to your USB flash drive. System Maintenance You can view the device system information, restore the system to factory settings or default settings, reboot the device, exit the system and start wizard.
- Page 58 DS-K5032 Series Visitor Terminal User Manual About You can view the device information. Note The page may vary according to different device models. Refer to the actual page for details. Exit Tap Exit to exit the application. Start Wizard Tap Start Wizard for language settings, time zone settings and network settings. Refer to Quick Operation for details.
- Page 59 DS-K5032 Series Visitor Terminal User Manual Note After you change the system language, the device will reboot automatically. Tap Next. Set Time Zone Figure 7-29 Set Time Zone Select a time zone according to your actual needs. Note The time zone will affect the device time.
- Page 60 DS-K5032 Series Visitor Terminal User Manual Set Network Figure 7-30 Set Network Select Wired or Wireless. Note Disconnect the wired network before connecting a Wi-Fi. Wired Note Make sure the device has connected to a network. If enable DHCP, the system will assign the IP address and other parameters automatically.
- Page 61 DS-K5032 Series Visitor Terminal User Manual Steps 1. Tap in the top right corner of the home page. Tap Custom Settings → Visitor Check in Settings .
- Page 62 DS-K5032 Series Visitor Terminal User Manual Figure 7-31 Visitor Check in Settings Page 2. Set the target items as Required, Not Required or Hide.
- Page 63 DS-K5032 Series Visitor Terminal User Manual Visitor Name Visitor name that the visitor needs to fill in when checking in. Gender Visitor's gender that the visitor needs to fill in when checking in. Phone Visitor's phone No. that the visitor needs to fill in when checking in.
- Page 64 DS-K5032 Series Visitor Terminal User Manual Customize visitor's check in information. Printing Receipt Settings Set the printing contents on the receipt. Steps 1. Tap in the top right corner of the home page. Tap Custom Settings → Printing Receipt Settings .
- Page 65 DS-K5032 Series Visitor Terminal User Manual Note The supported USB flash drive format is FAT32. 3. Tap Add and select a logo picture from the USB flash drive. Note The supported file size is less than 100 KB. The added picture will be cropped to 400 × 400.
- Page 66 DS-K5032 Series Visitor Terminal User Manual Note The supported file size is less than 120 kb. The added picture will be cropped to 1280 × 800. 4. Optional: Tap Restore Default, the device will use the default picture for the screen saver.
-
Page 67: Chapter 8 Operation Via Web Browser
DS-K5032 Series Visitor Terminal User Manual Chapter 8 Operation via Web Browser 8.1 Login You can login via the web browser or the remote configuration of the client software. Note Make sure the device is activated. For detailed information about activation, see Activation . - Page 68 DS-K5032 Series Visitor Terminal User Manual Figure 8-1 Add User Add the person's basic information, including the employee ID, the person's name, the role, and the organization. Click Save to save the settings.
-
Page 69: Configuration
DS-K5032 Series Visitor Terminal User Manual 8.3 Configuration 8.3.1 View Device Information View the device name, language, model, serial No., firmware version, web version, plugin version, number of channels, number of alarm output, device capacity, etc. Click Configuration → System → System Settings → Basic Information to enter the configuration page. -
Page 70: Set Dst
DS-K5032 Series Visitor Terminal User Manual You should set the NTP server's IP address, port No., and interval. Manual By default, the device time should be synchronized manually. You can set the device time manually or check Sync. with Computer Time to synchronize the device time with the computer's time. - Page 71 DS-K5032 Series Visitor Terminal User Manual Figure 8-4 Upgrade and Maintenance Page Click Reboot to reboot the device. Restore Parameters Click Configuration → System → Maintenance → Upgrade & Maintenance . Restore All All parameters will be restored to the factory settings. You should activate the device before usage.
-
Page 72: Security Mode Settings
DS-K5032 Series Visitor Terminal User Manual Note Do not power off during the upgrading. 8.3.6 Security Mode Settings Set the security mode for logging in the client software. On the Device for Management page, click Configuration → System → Security → Security Service . -
Page 73: View Device Arming/Disarming Information
DS-K5032 Series Visitor Terminal User Manual your password regularly, especially in the high security system, changing the password monthly or weekly can better protect your product. Proper configuration of all passwords and other security settings is the responsibility of the installer and/or end-user. - Page 74 DS-K5032 Series Visitor Terminal User Manual Figure 8-5 TCP/IP Settings Page Set the parameters and click Save to save the settings. DHCP If uncheck the function, you should set the IPv4 address, IPv4 subnet mask, IPv4 default gateway, Mac address, and MTU.
- Page 75 DS-K5032 Series Visitor Terminal User Manual Set the preferred DNS server and the Alternate DNS server according to your actual need. Set Port Parameters Set the HTTP, RTSP, HTTPS and Server port parmaeters. Click Configuration → Network → Basic Settings → Port .
- Page 76 DS-K5032 Series Visitor Terminal User Manual Figure 8-6 Wi-Fi Settings Page 2. Check Wi-Fi. 3. Select a Wi-Fi - Click of a Wi-Fi in the list and enter the Wi-Fi password. - Click Add and enter a Wi-Fi's name, password, and encryption type. Click Connect. When the Wi-Fi is connected, click OK.
-
Page 77: Set Audio Parameters
DS-K5032 Series Visitor Terminal User Manual Figure 8-7 WLAN Settings 2) Set the IP address, subnet mask, and default gateway. Or check Enable DHCP and the system will allocate the IP address, subnet mask, and default gateway automatically. 5. Click Save. -
Page 78: Set Image Parameters
DS-K5032 Series Visitor Terminal User Manual Figure 8-8 Set Audio Parameters Drag the block to adjust the output volume. Click Save to save the settings after the configuration. You can also enable Voice Prompt. Note The functions vary according to different models. Refers to the actual device for details. -
Page 79: Set Authentication Parameters
DS-K5032 Series Visitor Terminal User Manual Start/end recording video. Capture the image. 3. Click Default to restore the parameters to the default settings. 8.3.12 Set Authentication Parameters Click Configuration → General → Authentication Settings . Note The functions vary according to different models. Refers to the actual device for details. -
Page 80: Privacy Policy Settings
DS-K5032 Series Visitor Terminal User Manual You can set the interval between 2 continuous recognition of a same person during the authentication. In the configured interval, Person A can only recognized once. If another person (Person B) has recognized during the interval, Person A can recognized again. - Page 81 DS-K5032 Series Visitor Terminal User Manual Note The functions vary according to different models. Refers to the actual device for details. Figure 8-11 Smart Settings Page Click Save to save the settings after the configuration. Face Anti-spoofing Enable or disable the live face detection function. If enabling the function, the device can recognize whether the person is a live one or not.
-
Page 82: Visitor Settings
DS-K5032 Series Visitor Terminal User Manual Set the pupillary distance when starting face authentication. Rating Enable rating to start rating for face authentication. Rating Threshold Set the rating threshold when authenticating. The larger the value, the smaller the false accept rate and the larger the false rejection rate. - Page 83 DS-K5032 Series Visitor Terminal User Manual Figure 8-12 Logo Management 2. Click to add a local image. 3. Click Import to import the selected logo image. Note The logo image shall be no larger than 100 kb with a resolution of 400 × 400.
- Page 84 DS-K5032 Series Visitor Terminal User Manual Figure 8-13 Visitor Basic Parameters Configure parameters and click Save. Manually Enter Visitor Information...
- Page 85 DS-K5032 Series Visitor Terminal User Manual You can enter visitor information manually when the function is enabled. ID Card Comparison Threshold Drag the block or enter the value to adjust the card comparison threshold. The higher the value is, the more unlikely for device to mismatch.
- Page 86 DS-K5032 Series Visitor Terminal User Manual Custom Item List 1/2/3 Set custom information for visitor check-in. Set Check In Information Select items that will be displayed on the visitor check-in page. Click Configuration → Visitor → Visitor Check In Settings .
-
Page 87: Set Screen Saver Picture
DS-K5032 Series Visitor Terminal User Manual Set Printing Receipt Information Select items to be printed on the receipt. Click Configuration → Visitor → Printing Receipt Settings . Figure 8-15 Printing Receipt Settings Select the information items to be printed at the Print column. - Page 88 DS-K5032 Series Visitor Terminal User Manual Figure 8-16 Notice Page Screen Saver Picture Click to add a local picture. Note Only JPG and MP4 format are allowed. No more than 10 pictures can be added. Click Upload. Slide Show Interval Drag the block or enter the number to set the slide show interval.
-
Page 89: Appendix A. Tips When Collecting/Comparing Face Picture
DS-K5032 Series Visitor Terminal User Manual Appendix A. Tips When Collecting/Comparing Face Picture The position when collecting or comparing face picture is as below: Expression Keep your expression naturally when collecting or comparing face pictures, just like the ● expression in the picture below. - Page 90 DS-K5032 Series Visitor Terminal User Manual Appendix B. Tips for Installation Environment 1. Light Source Illumination Reference Value Candle: 10Lux Bulb: 100~850Lux Sunlight: More than 1200Lux 2. Install the device at least 2 meters away from the light, and at least 3 meters away from the window or door.
- Page 91 DS-K5032 Series Visitor Terminal User Manual Appendix C. Dimension...
- Page 92 Device Command Scan the following QR code to get the device common serial port commands. Note that the command list contains all commonly used serial ports commands for all Hikvision access control and video intercom devices. Figure D-2 Device Command...
- Page 93 UD20585B-A...
Need help?
Do you have a question about the DS-K5032 Series and is the answer not in the manual?
Questions and answers