Advertisement
Quick Links
Contents
2x Furniture escutcheons
1x Lockbody
2x Plastic screw caps
1x Fitting bag
1x Strike plate
In fitting bag:
1x Snib pair
1x #10x38mm cylinder screw
1x Snib plug
2x Spigots
2x #8x13mm lockbody screws
2x #8x22mm furniture screws
2x #10x13mm strike fixing screws
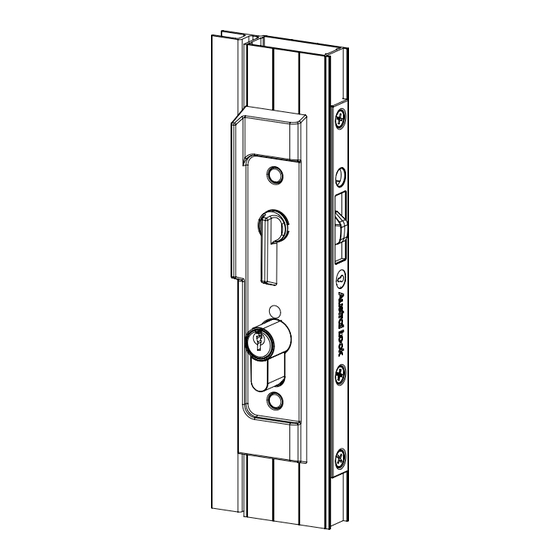
2. Lockbody installation
• Detach the strike from the lockbody and
keep it aside — insert one of the levers in
the square hole of the lockbody and rotate
to retract the beak to disengage the strike.
• Insert the lockbody into the door cutout.
• Secure the lockbody with the two #8x13mm
lockbody screws.
4. Interior furniture preparation
• Select the interior escutcheon to
suit your door, then punch out
the snib hole cover.
• Place the punch on the depression
on the front of the escutcheon and
punch out hole for snib.
• Break the snib lever pair into two
by placing the supplied pair on a
flat suface and pushing in the
middle.
Forge Security Sliding Lock
Installation Instructions
Door preparation
139
mm
3. Cylinder installation
• Orientate the cylinder such that the cam
is facing the edge of the door as shown
in the diagram.
• Assemble the cylinder through the lock
so the cylinder protrudes equally from
both sides.
• Insert the key and turn to locked
position.
• While applying pressure on the snib
lever towards the unlocked direction,
turn the cylinder key towards the locked
direction, until the snib lever starts to
move. Continue rotating the key and
allow the snib lever to rotate into the
locked position.
• Test the beak, it should not depress.
• Insert #10x38mm cylinder screw and
tighten.
• Turn key to unlocked position and
remove key.
• Select the correct snib lever
according to the below image.
• Hold the snib vertical and insert
it into the escutcheon. Secure
by rotating the snib 90° to the
position shown.
LH escutcheon
setup for
Interior.
1. Lockbody preparation
IMPORTANT: If using this lock with a
multipoint kit, follow the instructions
supplied with the the multipoint kit first.
25mm
• Do not remove
the sticker on
the rear of the
lockbody, it is
to assist in easy
installation.
• If the sticker has
156mm
been broken or
removed, ensure
that the rear
slide is pushed
completely
down before
16mm
assembling the
lockbody into
the door cutout.
19mm
5. Exterior furniture preparation
• Select the exterior escutcheon
assembly.
• Fit the snib plug in behind the
depression of the exterior escutcheon.
RH escutcheon
setup for
Interior.
LH escutcheon
assembly is
shown here.
lockbody
sticker
rear slide
cylinder
cylinder
cam
cylinder
screw
Advertisement

Subscribe to Our Youtube Channel
Related Manuals for Allegion Gainsborough Austral Lock Forge Sliding Security Door Lock


Summary of Contents for Allegion Gainsborough Austral Lock Forge Sliding Security Door Lock
- Page 1 Forge Security Sliding Lock Installation Instructions Door preparation 1. Lockbody preparation Contents 2x Furniture escutcheons IMPORTANT: If using this lock with a 1x Lockbody multipoint kit, follow the instructions 2x Plastic screw caps supplied with the the multipoint kit first. 25mm 1x Fitting bag •...
- Page 2 Allegion (New Zealand) Pty Ltd Phone: 0800 477 869 Email: info.au@allegion.com Email: nzinfo@allegion.com 1800 098 094 ausloc.com allegion.co.nz info.au@allegion.com ausloc.com © Allegion 2024 All rights reserved. No part of this document can be copied or used without permission...
Need help?
Do you have a question about the Gainsborough Austral Lock Forge Sliding Security Door Lock and is the answer not in the manual?
Questions and answers