Table of Contents
Advertisement
Quick Links
Advertisement
Table of Contents

Related Manuals for CEM BLADE


Summary of Contents for CEM BLADE
- Page 1 BLADE Microwave Digestion System Manual...
- Page 2 THIS PAGE INTENTIONALLY LEFT BLANK...
-
Page 3: Table Of Contents
Contents Percent (%) to PPM Level – DI Water Rinse Safety Low PPM Level – 10 % Acid Soak Safety Notations PPB Level – Microwave Clean Run Instrument Safety Notations Sub PPB Level– Multiple Microwave Clean Runs General Notes Introduction Product Overview Data Results Intended Use... - Page 4 Perform a Digestion - HF Applications Recovery From Vessel Failure -HF Applications System Specifications Location Requirements Electrical Requirements Environmental Requirements Warranty Limited Warranty Information Technical Assistance Applications Support Technical Support Contact Information CEM Corporation Headquarters CEM International Subsidiaries CEM Distributors...
-
Page 5: Safety
Safety Safety Notations This manual uses safety alert words at points in the documentation where the user should be aware of potential hazards. The safety alert words indicate differing levels of observation or action as described below: NOTE A NOTE is intended to provide emphasis on procedures that may be misinterpreted or overlooked, or to clarify confusing situations. -
Page 6: Introduction
Introduction Product Overview The BLADE is a fully automated microwave digestion system that is capable of sequentially preparing up to 24 individual organic or inorganic samples. The sample is prepared in a CEM vessel, capped, and then placed into one (1) of the two (2) twelve position transferable racks. -
Page 7: Compounds Unsuitable For Closed Vessel Microwave Digestion
• Not be impaired by the consumption of drugs, alcohol or medication. • Participate in the installation of the instrument and be trained by CEM Corporation or its authorized dealer. Compounds Unsuitable for Closed Vessel Microwave Digestion Acid decomposition of certain chemical compounds or types of samples constitutes unreasonable, hazardous misuse of CEM microwave digestion systems. -
Page 8: Important Safeguards
Replace fuses with fuses of the size and rating specified by the text adjacent to the fuse holder or in the System Specifications section of this manual. WARNING High voltages and microwave irradiation. Service can only be performed by an authorized CEM service technician. WARNING Electrical shock hazard. - Page 9 WARNING Proper precautions must be taken to avoid contact with acid or acid vapors. Personal protective equipment (PPE) should be worn as outlined in the user’s safety program for hazardous materials and the manufacturer’s safety data sheet. Refer to these guidelines for proper handling and disposal.
-
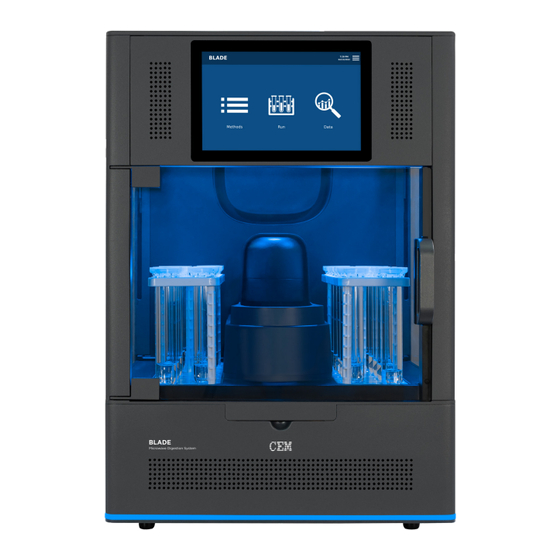
Page 10: Instrument Overview
Instrument Overview Front and Side View Item Description Touch Screen Display Shows menus, method parameters, etc. Speakers Audio for instrument Door Handle Permits ease of opening instrument door to access fume cabinet Cooling Fan Draws room air past the electronics LED Indicator During a run, the LED shows the status of the currently loaded method. -
Page 11: Back And Side View
Back and Side View Item Description Power Cord Receptacle Receives the female end of the power cord Fuses Prevent electrical power overload Power Switch Turns AC power on and off to the instrument Exhaust Outlet Exhausts fumes from the fume cabinet and vented vessels Air Intaker Air intake for vessel vent blower and vessel cooling blower Cooling Fan... -
Page 12: Fume Cabinet
Volume-independent sensor that accurately measures the temperature during the run. AutoCal The AutoCal is an optional temperature calibration device. A CEM representative will need to verify or calibrate the temperature sensor if the AutoCal option is not available. See Routine Maintenance for a suggested maintenance schedule. -
Page 13: Software Overview
List Stop Admin Down Logout System Menu Alert Edit Loop Temperature Back Export Pause Undo Blower Forward Play CEM Method Full screen Power User Check Full screen Exit Pressure User Method Close Gesture Question Users Copy Home Queue Video Cross-hair... -
Page 14: Home Screen
Home Screen The Home screen is the first screen that appears when the system is turned on. Four areas are accessible from this screen: Methods, Run, Data, and System Menu. Methods Screen Methods are created or imported by a user with administrative privileges and can be recalled for future use. Data associated with a method can also be recalled if the method has not been edited. -
Page 15: Data Search Screen
Data Search Screen Provides the result log for each digestion performed and contains a complete list of time-stamped events. System Menu Screen The following is a basic review of each section of the System Menu to be used as a quick guide for locating software items and instrument functions. - Page 16 Settings Users can define and adjust necessary settings prior to running samples. • System: Instrument settings for the audio and visual selections for the individual user • Localization: Regional adjustments, including language and the preferred date and time format • Date/Time: Location for setting the correct date and time •...
- Page 17 • Contact Us: Contact information for CEM Headquarters and Subsidiaries • Legal Notice: Legal information concerning the use and distribution of the instrument and other CEM products • Software Notice: System notification pertaining to the software currently loaded on the system...
- Page 18 Logout Protects the current user’s access or prevent unauthorized actions on the current login session Software Overview...
-
Page 19: System Installation
2. Carefully inspect the shipping carton, the instrument, and accessories for any damage that may have occurred during shipping. If the instrument or accessories have damage, contact the freight carrier to report the damage and file a damage report. Contact your CEM Representative for assistance. WARNING If any damage to the instrument is noted, DO NOT attempt instrument operation. - Page 20 6. Remove the foam from the top of the system. 7. Lay the sides of the box flat and remove the foam from the top of the system. 8. Open the plastic surround the instrument to allow access to the instrument. DO NOT leave the plastic under the system.
-
Page 21: Hardware Setup
1.1. Locate the exhaust hose and the hose clamp in the accessory kit. 1.2. Place the hose clamp onto the exhaust port located at the top of the BLADE. 1.3. Connect one end of the hose to the exhaust port. - Page 22 2.1. Remove the two (2) fuse holders from the back of the instrument by twisting counter clockwise. 2.2. Locate the correct fuses inside the accessory kit. • 120 VAC: 15 A fuse (F15AH250V) • 200 & 240 VAC: 10 A fuse (F10AH250V) WARNING Incorrect fuse size may result in fire or inadequate equipment protection.
-
Page 23: Software Setup
2. Remove the blue tape from the door and interlock cover. 3. Follow the instructions on the BLADE display once the system is powered on to remove the packing foam with- in the fume cabinet. DO NOT REMOVE any packing material until instructed to do so. Retain all packing materi- al for use if returning the instrument. - Page 24 8. Perform a “QC Test”. View the “QC Test” method notes for details regarding sample preparation and the “Per- form a Digestion” section of this manual for details about vessel assembly, loading and performing the meth- 9. Watch instructional videos found within the BLADE software as outlined below to customize system and user settings.
-
Page 25: Perform A Digestion
Perform a Digestion WARNING For digestions using hydrofluoric acid (HF), see “Appendix A: Hydrofluoric acid (HF) Applications.” A TFM liner is required for HF applications. WARNING Proper precautions must be taken to avoid contact with acid or acid vapors. Personal protective equipment (PPE) should be worn as outlined in the user’s safety program for hazardous materials and the manufacturer’s safety data sheet. -
Page 26: Load And Perform A Method
8. Repeat procedure above to prepare additional vessels. Load and perform a Method The LED’s at the bottom of the BLADE will change color during each step of the digestion: idle = blue, loading/ unloading = purple, ramp/hold = white, cooling= teal, error = orange. -
Page 27: Vessel Removal
method. 4. To remove a method, follow one of the procedures as outlined below. • Select the rack position. • To delete all methods in the rack, select the Delete icon at the bottom of the rack. 5. Press the play icon in the top right corner of the screen. All vessels must be added to the racks and the sam- ple queue before Play is pressed in the next step. -
Page 28: Vessel Cleaning
The spectroscopic technique used, and level of analytes reported, will dictate how clean your vessels should be. CEM recommends the following cleaning protocols based on level of analysis but each lab must determine their own cleaning protocol. Running method blanks will help determine if the cleaning protocol is sufficient. -
Page 29: Data Results
Data Results View Data for Specific Method 1. Install a USB in the USB port on the right side of the BLADE. 2. From the Home screen, press the Methods icon. 3. Press the method with the data to view. -
Page 30: Methods
CEM methods will appear in blue, whereas user created methods will appear in gray. Create Method If there is not a current CEM Method to digest a sample, a method can be programmed as outlined below. The operating parameters are included in the “Perform a Digestion” section of this manual. Only users with administrator or standard privileges can create methods. -
Page 31: Edit Method
6. Press “Vent” on the left side of the screen. 7. Select the appropriate “Vent Profile.” Parameters for each profile are defined in the software. • QV (Quartz Vessel): Organic (QV), Inorganic (QV), or Custom (QV). Contact CEM for more information regarding Custom (QV). -
Page 32: Delete Method
Export Method Only users with administrator or standard privileges can export methods. 1. Insert a flash drive into a USB port on the BLADE. 2. From the Home screen, press the Methods icon. 3. Select the method(s) to export to the flash drive. Multiple methods can be exported at a time by long holding a method and then highlighting additional methods. - Page 33 4. Select the method(s) to import from the flash drive. 5. Press the Import icon. 6. Press “OK” once finished. Methods...
-
Page 34: Users
• If Auto Login is set to “ON”, the Home Screen will be displayed once the BLADE completes the initial power 5. Press the Save icon. The next time the power is cycled, a log-in screen will appear. -
Page 35: User Groups
User Groups User groups privileges are determined by the administrator(s); therefore, an administrator must be logged in as the current user. 1. Ensure that a user with administrative privileges is logged in. 2. From the Home screen, press the System Menu icon in the top right corner of the screen. 3. -
Page 36: System Settings
3. If English is not the preferred language, press Language to scroll through and select the applicable system language. NOTE If the language is changed, the BLADE will reboot once the Save icon is selected. 4. Press Date Format to enter the desired format for displaying the date (MM/DD/YYYY, DD/MM/YYYY or YYYY/ MM/DD). -
Page 37: Validations
“System Specifications” section of this manual. If the exhaust requirements have been met, contact CEM Service. WARNING DO NOT attempt unit operation if the “Exhaust Validation” test fails. Verify that exhaust requirements have been met and then contact CEM Service. Temperature Contact CEM Corporation or one of its authorized dealers. Autosampler The Autosampler validation test verifies the calibration of all rack positions and the attenuator. -
Page 38: Calibrations
Contact CEM Corporation or one of its authorized dealers. Pressure Pressure can only be calibrated by CEM Corporation. Contact CEM Corporation or one of its authorized dealers. Autosampler An administrator must be logged in as the current user to perform the autosampler calibration. - Page 39 4. Position the red box so that the vessel and stir bar can be seen. Use the toggle bar on the right to zoom the image in and out. 5. Press “OK” to save the position. 6. Remove the vessel from the attenuator. Calibrations...
-
Page 40: Software Update
1. Using a computer, create a folder titled “CEM” on the USB. 2. Download the BLADE software and copy into the “CEM” folder on the USB. 3. Insert the USB containing the software update bundle (*.cib) into the USB port located on the side of the unit. -
Page 41: Maintenance Overview
Maintenance Overview A routine maintenance protocol is vital for the long-term operation of the BLADE. CEM suggests that you perform the routine maintenance on your instrument as outlined below, along with having a CEM Certified Technician to inspect your system annually. -
Page 42: Routine Maintenance
CEM suggests that you perform the routine maintenance procedures as outlined below. See the “Maintenance Overview” section for quarterly, semiannual and as needed schedules. A complete listing of spare and replacement parts with part numbers and images can be found on the CEM website (www.cem.com). -
Page 43: Clean Surfaces Of The Instrument
3. Wipe the inside of the fume cabinet and exterior of the instrument with a clean, lint-free cloth dampened with warm soapy water. DO NOT use organic solutions to clean the BLADE. 4. Allow the fume cabinet to dry. -
Page 44: System Repacking
6. If needed, wipe the inside of the fume cabinet and exterior of the instrument with a clean, lint-free cloth damp- ened with warm soapy water. Allow the fume cabinet to dry. DO NOT use organic solutions to clean the BLADE. - Page 45 12.4. Using 2 people, place the BLADE onto the foam, making sure the unit aligns with the cutout. 12.5. Neatly place the plastic sheeting over the top of the unit. 12.6. Slide the unit and foam into the box. 12.7. Close the remaining side of the inner carton using tape.
-
Page 46: Troubleshooting
Wrong vessel type selected: QV (Quartz Vessel) or QVL (Quartz Vessel with Liner) Temperature needs to be calibrated. Calibrate using AutoCal device. If AutoCal not available, contact CEM Corporation or its Authorized Dealer. Play icon grayed out on Instrument door is open... -
Page 47: Recovery From Vessel Failure
Recovery From Vessel Failure In the event that a vessel breaks within the microwave cavity, proceed with the steps outlined below. In the event that vessel failure occurred and the vessel lost pressure, the plenum is inoperable and requires replacement. WARNING Proper precautions must be taken to avoid contact with acid or acid vapors. - Page 48 7. Remove the landing by lifting straight up. 8. Remove the plenum as outlined below. 8.1. Pull the red pins located on the sides of the attenuator away from the attenuator. 8.2. Place hands beneath the plenum and pull straight up. If the vessel lost pressure during the vessel failure, discard the plenum.
- Page 49 9. Remove the attenuator and spill cup from the cavity as outlined below. 9.1. Remove the interlock cover. 9.2. Pull the interlock lever out and slide the lever all the way to the left. 9.3. Lift the attenuator straight up. The spill cup is attached to the attenuator and will come out of the cavity as well.
- Page 50 14. Inspect the inside of the cavity. If debris or liquid are located, remove the debris and wipe the cavity with a clean, dry lint-free cloth. Contact CEM Corporation or its authorized dealer for additional support if debris or liquid are noted in the cavity or on the IR lens.
- Page 51 16. Allow components to dry. 17. Once dry, place the spill cup onto the attenuator as outlined below. 17.1. Locate the notch on the attenuator and lay the attenuator on its side so the notch is facing up. 17.2. Position the spill cup on its side with the lens is facing up. 17.3.
- Page 52 18.2. Push the attenuator all the way down. 18.3. Lock the attenuator into place by pushing the lever to the right and then push the lever so its hidden beneath the cavity. 18.4. Place the interlock cover back into place. 19.
- Page 53 21. Place the plenum cover into position. 22. If needed, wipe the inside of the trap with a lint-free cloth. 23. Re-install the trap cover by placing it onto the trap and twist clockwise until resistance is felt. Troubleshooting...
-
Page 54: Appendix A: Hydrofluoric Acid (Hf) Applications
Hydrofluoric Acid (HF) is a highly corrosive inorganic acid; therefore, it must be handled with extreme caution. The BLADE instrument requires the use of TFM liners purchased from CEM Corporation or its authorized dealer and “QVL” must be selected as the vessel type when using HF. - Page 55 3. Place an appropriately sized, coated stir bar into vessel. WARNING Always use a coated stir bar that adequately mixes the reaction contents in the microwave. 4. Weigh and place the sample into the vessel. The maximum sample weight varies per sample type. A vessel weighing stand is provided.
- Page 56 Load and perform a Method - HF Applications The LED’s at the bottom of the BLADE will change color during each step of the digestion: idle = blue, loading/ unloading = purple, ramp/hold = white, cooling= teal, error = orange.
-
Page 57: Recovery From Vessel Failure -Hf Applications
Vessel Removal - HF Applications WARNING To prevent the possibility of severe burns, ensure that gloves and PPE as outlined in your safety program are worn. 1. Once all methods in the queue have been run, the fume cabinet door can be opened and the racks can be removed. - Page 58 Parts Required: • Replacement plenum • Boric Acid • Secondary containment bin 1. Ensure instrument is off and mains power disconnected. 2. Place an HF compatible secondary containment bin in the nearest available vent hood. 3. Place HF compatible container beneath the trap located at the back of th instrument. 4.
- Page 59 10. Remove the plenum as outlined below. 10.1. Pull the red pins located on the sides of the attenuator away from the attenuator. 10.2. Place hands beneath the plenum and pull straight up. If the vessel lost pressure during the vessel fail- ure, the plenum will be discarded but first must be neutralized.
- Page 60 12.2. Pull the interlock lever out and slide the lever all the way to the left. 12.3. Lift the attenuator straight up. The spill cup is attached to the attenuator and will come out of the cavity as well. 13. Remove the spill cup from the attenuator twisting counter-clockwise and then pull straight down. 14.
- Page 61 20.3. Using water, dampen paper towels and wipe down the cavity walls. 20.4. Wipe the cavity with a clean, dry lint-free cloth. Contact CEM Corporation or its authorized dealer for additional support if debris or liquid are noted in the cavity or on the IR lens.
- Page 62 24.2. Position the spill cup on its side with the lens is facing up. 24.3. Align the long, vertical notch on the spill cup with the cutout on the attenuator. 24.4. Push the spill cup onto the attenuator and rotate the spill cup clockwise. Turn until the lens is cen- tered beneath the post on the attenuator.
- Page 63 25.4. Place the interlock cover back into place. 26. Install the plenum as outlined below. 26.1. Ensure the red pins located on the attenuator as positioned away from the attenuator. 26.2. Place the new plenum into place by pushing it all the way down. 26.3.
- Page 64 29. If needed, wipe the inside of the trap with a lint-free cloth. 30. Discard contents of the beaker located beneath the trap into a HF specific waste bottle. 31. Re-install the trap cover by placing it onto the trap and twist clockwise until resistance is felt. Appendix A: Hydrofluoric acid (HF) Applications...
-
Page 65: System Specifications
• Minimum counter space: 35 in (88.9 cm) W x 25 in (63.5 cm) D x 29.5 in (75 cm) H • BLADE Dimensions: 19 in (48.3 cm) W x 24 in (61 cm) D x 29.5 in (75 cm) H •... -
Page 66: Warranty
Limited Warranty Information What Is Covered: CEM Corporation warrants that the instrument will be free of any defect in parts or workmanship and will, at its option, replace or repair any defective part (excluding consumables) or instrument. For How Long: This warranty remains in effect for 365 days from date of delivery to the original purchaser. - Page 67 CEM Corporation hereby excludes and disclaims any warranty of merchantability or fitness for any particular purpose. No warranty, express or implied, extends beyond the face hereof. CEM Corporation shall not be liable for loss of use of instrument or other incidental or consequential costs, expenses or damages incurred by the purchaser or any other user.
-
Page 68: Technical Assistance
Technical Support CEM is proud to provide technical support for the BLADE from a team of specially trained Service Technicians. For technical support in the US and Canada, call (800) 726-5551 or (704) 821-7015 and ask for “BLADE Service” or email service@cem.com. For technical support outside the US and Canada, contact your local CEM Subsidiary or Distributor. -
Page 69: Contact Information
Address: Via Dell Artigianato, 6/8 24055 Cologno Al Serio (BG) Italy Web Address: https://cem.com/it Email: info.srl@cem.com Japan: CEM Japan K.K. Phone: +81-3-5793-8542 Fax: +81-3-5793-8543 Address: 2-18-10 Takanawa Minato-Ku Tokyo 108-0074 Japan Web Address: http://www.cemjapan.co.jp Email: info.jp@cem.com UK: CEM Microwave Technology Ltd. Phone: +44-1-280-822873 Fax: +44-1-280-822342 Contact Information... -
Page 70: Cem Distributors
Email: info.ireland@cem.com CEM Distributors For a complete list of distributors of CEM products, including contact information, go to the CEM website (http:// www.cem.com), select Contact, and then select your region to see a list of distributors by country. Contact Information... - Page 71 THIS PAGE INTENTIONALLY LEFT BLANK...
- Page 72 CEM® is a registered trademark Part Number 601477 by CEM Corporation this manual is the official version. of CEM Corporation. BLADE and November 16, 2022 All Rights Reserved. This guide In the event that this manual is SMC are a trademark of CEM Rev.
Need help?
Do you have a question about the BLADE and is the answer not in the manual?
Questions and answers