Table of Contents
Advertisement
Quick Links
Advertisement
Table of Contents

Subscribe to Our Youtube Channel
Related Manuals for SGM G-PROFILE TURBO


Summary of Contents for SGM G-PROFILE TURBO
- Page 1 USER MANUAL M O V I N G H E A D S S E R I E S G-P R O F I L E T U R B O...
- Page 2 The SGM logo, the SGM name, and all other trademarks in this document pertaining to SGM services or SGM products are trademarks owned or licensed by SGM, its affiliates and subsidiaries.
-
Page 3: Table Of Contents
Contents Safety information ........................4 Overview ..........................5 Preparing for installation ......................6 Installing / Rigging the G-Profile Turbo ..................6 Connecting AC power ........................8 Configuring the device .......................8 Using stand-alone operation .......................9 Connecting to a DMX control device ..................10 Configuring the device for DMX control ..................10 Full color calibration and Color Temperature Correction (CTC) ............11... -
Page 4: Safety Information
Read the safety precautions in this section before installing, powering, or operating this product. SGM luminaries are intended for professional use only. They are not suitable for household use. Les luminaires SGM sont impropre à l’usage domestique. Uniquement à usage professionnel. -
Page 5: Overview
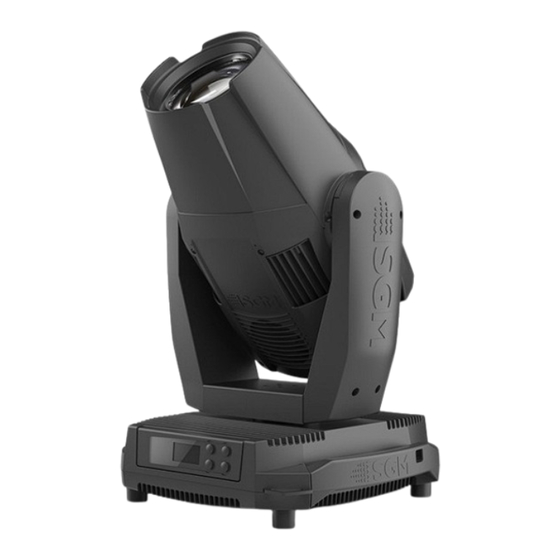
B: Head fan grid (one of two shown) C: Base handle D: Pan lock E: Display Panel achment point F: Safety wire attachment point G: DMX in H: Fuse I: Power in J: DMX out K: Power cord Figure 1: G-Profile Turbo parts and terminology... -
Page 6: Preparing For Installation
Two omega brackets with 1/4-turn fasteners. Location / application The G-Profile Turbo is IP65-rated and designed for both indoor and outdoor events. This means that it is protected from: • Smoke fluid, dust, dirt, and airborne pollution to the degree that they cannot enter the device in sufficient quantities to interfere with its operation. - Page 7 B: Pan Lock Figure 3: Pan and tilt locks WARNING! Always secure an elevated G-Profile Turbo with a safety wire Always fasten the safety wires (not included) between the load-bearing support structure and the safety wire attachment points of the device - not shown.
-
Page 8: Connecting Ac Power
For assistance with alternative configurations, contact your SGM representative. After connecting the G-Profile Turbo to power, run the on-board test by pressing OK → TEST → AUTOMATED TEST in the menu, to ensure that the fixture and each LED are functioning correctly. Please see “Control menu” on page 14. -
Page 9: Using Stand-Alone Operation
Using stand-alone operation In a stand-alone operation mode the fixture is not running connected to a control device, but it is pre-programmed with a series of up to 24 scenes, playing continuously in a loop. This program can be set up to run by default whenever the fixture is powered on. Manual control / Internal sequence editor The editor option offers the ability to adjust all DMX parameters of the fixture. -
Page 10: Connecting To A Dmx Control Device
For independent control, each fixture must have a DMX start address configured. For example, if the first G-Profile Turbo is set to a start DMX address of 10 and it is in 25-channel DMX mode, then it uses channels from 10 to 34. The following G-Profile Turbo in the DMX chain could then be set to a DMX address of 35, as the first fixture uses all the first 25 DMX channels (10+25 >>... -
Page 11: Full Color Calibration And Color Temperature Correction (Ctc)
Setting the LED refresh rate (frequency) via DMX The G-Profile Turbo offers the ability to adjust the refresh rate (frequency) of the LEDs via DMX, by using the ‘Control Channel’. To find all 'Control Channel' settings, see the DMX charts available at www.sgmlight.com under G-Profile Turbo, or upon request via support@sgmlight.com. -
Page 12: Led Frequency Settings
LED Frequency Settings CONTROL CHANNEL CONTROL CHANNEL LED Frequency (kHz) LED Freq. LED Freq. LED Freq. (kHz) (Step) (kHz) (Step) (kHz) 100,00 17,6% 100,00 31,8% 2,70 18,0% 50,00 32,2% 2,63 18,4% 33,33 32,5% 2,56 18,8% 25,00 32,9% 2,50 90,00 19,2% 20,00 33,3% 2,44... -
Page 13: Fixture Properties
Colors The G-Profile Turbo has an extended color palette due to the usage of Lime LEDs instead of the Green LEDs used in the G-Profile. With the Lime LEDs, it is possible to achieve warmer pastel colors, richer yellows, and a wider variety of green shades. -
Page 14: Control Menu
Control menu Level 1 Level 2 Level 3 Level 4 Function DMX MODE Standard Select Standard DMX mode. Extended Select Extended DMX mode. Standard Comp. Select Standard Compatible mode, for compatibility with regular G-Profile. Extended Comp. Select Extended Compatible mode, for compatibility with regular G-Profile. INFO GENERAL INFO Product... -
Page 15: Control Menu - Continued
Press ‘OK’ to reset all.* *When the G-Profile Turbo is subjected to extreme exposure it might not reset correctly. Should this be the case, the fixture will automatically heat up the gobo bearings at maximum light output for approx. five minutes and attempt to reset the fixture again. If this not solve the issue, disconnect the fixture from power and power it back, to... -
Page 16: Control Menu - Continued
Control menu - continued Level 1 Level 2 Level 3 Level 4 Function MANUAL Editor Scene 1 → 24 Display current scene. Press 'OK' and scroll 'UP' and 'DOWN' to choose a scene (1 to 24). Confirm with 'OK'. Wait Time (Sec.) 0 →... -
Page 17: Rdm
Supported RDM functions The G-Profile Turbo features support for various RDM functions. RDM (Remote Device Management) is a protocol enhancement to USITT DMX512 that allows bi-directional communication between the fixtures and the controller over a standard DMX line. This protocol will allow configuration, status monitoring, and management. -
Page 18: Troubleshooting
TRUE1 connector is inserted and turned to its locked position. Main fuse is blown. Contact SGM support or certified SGM service partner. Fixture suddenly turned off. Power was turned off. Check the power supply, switches and breakers. -
Page 19: Gobo Replacement
Gobo replacement Identification of gobo wheel Gobo Wheel Gobo Wheel Description Part No. Open Open gobo 37000001 Breakup bricks 37005006 Dots 37005003 Fire up close 37005001 Breakup foliage 37005011 Kaleidoscope gems 37002001 Figure 11: Identification of gobo wheel Replacing gobos To replace one or more rotating gobos: 1. -
Page 20: Gore-Tex® Membrane
Membrane SGM Vacuum Test-Kit The Vacuum Test Kit is an accessory suitable for all SGM IP-rated fixtures, made for testing the IP validity after having reassembled the fixture. In order to ensure the IP-rating of the G-Profile Turbo, it’s highly recommended that the fixture is always vacuum tested after installing or swapping any part that might compromise the IP-rating, e.g., replacing gobos. -
Page 21: Maintenance
To maintain adequate cooling, fans must be cleaned periodically. Whenever necessary, clean the G-Profile Turbo using a soft cloth dampened with a solution of water and a mild detergent. Do not use products that contain solvents, abrasives, or caustic agents for cleaning, as they can cause damage to both hardware, cables, and connectors. -
Page 22: Fixtures And Accessories
Fixtures and accessories Contact your local SGM dealer to get latest pricing and news about the fixtures and available accessories. Please note: the listed below are subject to change without notice. Included items 2 m power cable with Neutrik TRUE1 power connector..................... P/N: 07860040 2 x Omega brackets, BL / WH......................... -
Page 23: User Notes
User Notes ________________________________________________________________________________________________________ ________________________________________________________________________________________________________ ________________________________________________________________________________________________________ ________________________________________________________________________________________________________ ________________________________________________________________________________________________________ ________________________________________________________________________________________________________ ________________________________________________________________________________________________________ ________________________________________________________________________________________________________ ________________________________________________________________________________________________________ ________________________________________________________________________________________________________ ________________________________________________________________________________________________________ ________________________________________________________________________________________________________ ________________________________________________________________________________________________________ ________________________________________________________________________________________________________ ________________________________________________________________________________________________________ ________________________________________________________________________________________________________ ________________________________________________________________________________________________________ ________________________________________________________________________________________________________ ________________________________________________________________________________________________________ ________________________________________________________________________________________________________ ________________________________________________________________________________________________________ ________________________________________________________________________________________________________ ________________________________________________________________________________________________________ ________________________________________________________________________________________________________ ________________________________________________________________________________________________________ ________________________________________________________________________________________________________ ________________________________________________________________________________________________________ ________________________________________________________________________________________________________ ________________________________________________________________________________________________________ ________________________________________________________________________________________________________ ________________________________________________________________________________________________________ ________________________________________________________________________________________________________ ________________________________________________________________________________________________________ ________________________________________________________________________________________________________ ________________________________________________________________________________________________________ ________________________________________________________________________________________________________ ________________________________________________________________________________________________________ ________________________________________________________________________________________________________ ________________________________________________________________________________________________________ ________________________________________________________________________________________________________ ________________________________________________________________________________________________________... -
Page 24: User Notes
User Notes ________________________________________________________________________________________________________ ________________________________________________________________________________________________________ ________________________________________________________________________________________________________ ________________________________________________________________________________________________________ ________________________________________________________________________________________________________ ________________________________________________________________________________________________________ ________________________________________________________________________________________________________ ________________________________________________________________________________________________________ ________________________________________________________________________________________________________ ________________________________________________________________________________________________________ ________________________________________________________________________________________________________ ________________________________________________________________________________________________________ ________________________________________________________________________________________________________ ________________________________________________________________________________________________________ ________________________________________________________________________________________________________ ________________________________________________________________________________________________________ ________________________________________________________________________________________________________ ________________________________________________________________________________________________________ ________________________________________________________________________________________________________ ________________________________________________________________________________________________________ ________________________________________________________________________________________________________ ________________________________________________________________________________________________________ ________________________________________________________________________________________________________ ________________________________________________________________________________________________________ ________________________________________________________________________________________________________ ________________________________________________________________________________________________________ ________________________________________________________________________________________________________ ________________________________________________________________________________________________________ ________________________________________________________________________________________________________ ________________________________________________________________________________________________________ ________________________________________________________________________________________________________ ________________________________________________________________________________________________________ ________________________________________________________________________________________________________ ________________________________________________________________________________________________________ ________________________________________________________________________________________________________ ________________________________________________________________________________________________________ ________________________________________________________________________________________________________ ________________________________________________________________________________________________________ ________________________________________________________________________________________________________ ________________________________________________________________________________________________________ ________________________________________________________________________________________________________... -
Page 25: User Notes
User Notes ________________________________________________________________________________________________________ ________________________________________________________________________________________________________ ________________________________________________________________________________________________________ ________________________________________________________________________________________________________ ________________________________________________________________________________________________________ ________________________________________________________________________________________________________ ________________________________________________________________________________________________________ ________________________________________________________________________________________________________ ________________________________________________________________________________________________________ ________________________________________________________________________________________________________ ________________________________________________________________________________________________________ ________________________________________________________________________________________________________ ________________________________________________________________________________________________________ ________________________________________________________________________________________________________ ________________________________________________________________________________________________________ ________________________________________________________________________________________________________ ________________________________________________________________________________________________________ ________________________________________________________________________________________________________ ________________________________________________________________________________________________________ ________________________________________________________________________________________________________ ________________________________________________________________________________________________________ ________________________________________________________________________________________________________ ________________________________________________________________________________________________________ ________________________________________________________________________________________________________ ________________________________________________________________________________________________________ ________________________________________________________________________________________________________ ________________________________________________________________________________________________________ ________________________________________________________________________________________________________ ________________________________________________________________________________________________________ ________________________________________________________________________________________________________ ________________________________________________________________________________________________________ ________________________________________________________________________________________________________ ________________________________________________________________________________________________________ ________________________________________________________________________________________________________ ________________________________________________________________________________________________________ ________________________________________________________________________________________________________ ________________________________________________________________________________________________________ ________________________________________________________________________________________________________ ________________________________________________________________________________________________________ ________________________________________________________________________________________________________ ________________________________________________________________________________________________________... - Page 26 SGM Light A/S Sommervej 23 8210 Aarhus V Tel: +45 70 20 74 00 info@sgmlight.com www.sgmlight.com...
Need help?
Do you have a question about the G-PROFILE TURBO and is the answer not in the manual?
Questions and answers