Nederman PAK-M Installation And Service Manual
With standard dust separator
Hide thumbs
Also See for PAK-M:
- Installation and service manual (30 pages) ,
- Program manual (27 pages) ,
- User manual (26 pages)

Related Manuals for Nederman PAK-M


Summary of Contents for Nederman PAK-M
- Page 1 Installation and Service Manual PAK-M with Standard Dust Separator PAK-M Original installation and service manual INSTALLATION AND SERVICE MANUAL 2024-05-28 2130517 (00)
- Page 2 PAK-M Trace back information: Workspace Main version a152 Checked in 2024-05-28 Skribenta version 5.6.016...
-
Page 3: Table Of Contents
PAK-M Table of contents Figures ..................................... 1 Preface and safety ................................ PAK-M specifics ..............................Overall PAK-M safety ............................2 Installation ..................................Transport and delivery check ........................... Pre-installation ..............................Main installation ..............................Duct installation ..............................Electrical installation ............................Compressed air installation .......................... -
Page 4: Figures
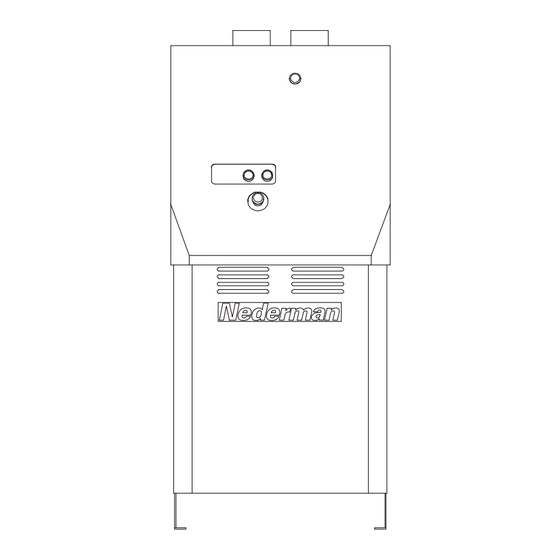
PAK-M Figures... - Page 5 PAK-M 579 mm (22.8") 1161 mm (45.7") 530 mm 576 mm 122 mm (20.9") (22.7") (4.8") 111 mm (4.4")
- Page 6 PAK-M...
- Page 7 PAK-M...
- Page 8 PAK-M...
- Page 9 PAK-M...
- Page 10 PAK-M Capacity Pressure drop...
- Page 11 PAK-M On dust separator Cooling valve cylinder (TAV50) Cleaning valve cylinder (CV) Cleaning solenoid valve Cooling solenoid valve Ø6 rapid fitting 6-10 Bar...
-
Page 12: Preface And Safety
Nederman representative immediately. 1.1 PAK-M specifics The Vacuum and Control unit can be used as a standalone vacuum source or be part of a complete PAK-M fitted with different dust separators, filters and accessories. PAK-M comes in three main configurations: A stand alone Vacuum and Control unit. -
Page 13: Installation
Tilting is used to access the main filter when PAK-M is placed in an area with little access above the unit. It is only recommended as a last resort when it cannot be placed in another location. Tilting requires the support leg to be fitted. -
Page 14: Main Installation
"flush valve", a high amount of air will flush the system clean. • Do not connect several PAK-M or other vacuum sources to the same duct system. This will cause errors in the vacuum regulation and undesired behaviour. -
Page 15: Compressed Air Installation
• As new ducts may contain dirt/particles/debris, the compressed air duct should be blown clean before con- necting PAK-M. • A compressed air filter must be installed to ensure safe operation of PAK-M. A main valve that bleeds the re- maining pressure should be installed. -
Page 16: Pressure Measuring Points And Connections
6,16 m (66.3 sqft) - Material 3 layer, polyester/glass fibre/polyester - Efficiency HEPA H14 (99.995% MPPS) Protection class PAK-M IP54 Weight Dust Separator, approx: 70 kg (154 lb) Weight PAK-M with Standard Dust Separator, ap- 253 kg (558 lb) prox:... - Page 17 PAK-M PAK-M with Standard Dust Separator Dimensions: Figure 2 - Inlet, Dust Separator (A) Ø 100 mm (3.94 ") - Outlet, Dust Separator (B) Ø 100 mm (3.94 ") - Inlet, Vacuum and Control unit (C) Ø 100 mm (3.94 ") - Outlet, Vacuum and Control unit (D) Ø...
-
Page 18: Service And Maintenance
3.2 Inspections At least yearly: Inspect all parts of PAK-M and pay special attention to the seals for the collecting bin and main filter. Also in- spect the steel clamping rings holding together the housing/inlet/cone-modules. Replace damaged parts. Check all parts of all attachments. Tighten bolts if necessary. -
Page 19: Changing The Main Filter Package
3.4 Tilting the Dust Separator WARNING! Risk of personal injury • Avoid placing PAK-M in an area that requires the Dust Separator to be tilted to access the main filter, consider it a last resort. Do a risk assessment before tilting. -
Page 20: Changing The Secondary Filter
PAK-M Tilt the Dust Separator back into an upright position and fit the four M12 bolts on each side. See Figure items A. 10 Reconnect the ducting to the inlet. 3.5 Changing the secondary filter Figure Disconnect the outlet hose, item 4C, from the Dust Separator. -
Page 21: Appendix A: Installation Protocol
PAK-M 4 Appendix A: Installation protocol Type (PAK-M, PAK-M DX or PAK-M VAC): Performed by: Date: Art. No.: Serial No.: Control item Comment Transport damages All components delivered Machine label matches the order Required User Manuals included Required Installation and Service Manuals included... - Page 22 PAK-M Control item Comment Measuring tubes, P1, P2 and P3 are functioning Emergency stop works as expected Reset works as intended Vacuum reads expected value Filter cleaning works as intended Temperature reads expected value Date & time is set (if week timer is used)
-
Page 23: Appendix B: Service Protocol
PAK-M 5 Appendix B: Service protocol Type (PAK-M, PAK-M DX or PAK-M VAC): Performed by: Date: Art. No.: Serial No.: Control item Comment Radiation heat from surroundings is low Protection from wind, rain, snow, dust, etc. is good Foundation is according to specifications (can with-... - Page 24 PAK-M Vacuum levels Main filter DPS1 set point (kPa): Measured duct pressure (kPa): Secondary filter DPS2 set point, if used (kPa): Measured pressure (P3B/DPS2) at fan (kPa) Vacuum level (PID) setting (kPa): * Compare with max in technical data and installation protocol...
- Page 25 www.nederman.com...
Need help?
Do you have a question about the PAK-M and is the answer not in the manual?
Questions and answers