Advertisement
Quick Links
USE AND CARE GUIDE
TM
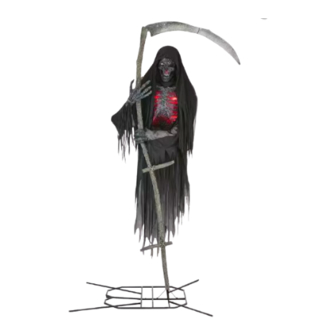
12 FT. LEVITATING REAPER
Questions, problems, missing parts? Before returning to the store, please have a copy of your receipt
ready and email the SVI customer experience team (customerservice@svius.com) within 90 days of
the date of purchase or call Home Accents Holiday Customer Service 8 a.m. - 7 p.m., EST,
Monday - Friday, 9 a.m. - 6 p.m., EST, Saturday
1-855-HD-HOLIDAY (1-855-434-6543)
HOMEDEPOT.COM
PARTS LIST
A. Right Base Half x 1
B. Left Base Half x 1
C. Support Pole 1 x 1
D. Scythe 1 x 1
E. Receiver Box x 1
F. Support Pole 2 x 1
G. Scythe 2 x 1
H. Scythe 3 x 1
I. Support Pole 3 x 1
J. Left Arm x 1
K. Left Hand x 1
L. Scythe 4 x 1
M. Support Pole 4 x 1
N. Costume x 1
O. Upper Body Form x 1
P. Support Pole 5 x 1
Q. Right Arm x 1
R. Lower Body Frame with Control Box x 1
S. Rib Plate x 1
T. Head x 1
U. Hood x 1
V. Right Hand x 1
W. Scythe 5 x 1
X. Blade 1 x 1
Y. Blade 2 x 1
Z. Base Stabilizers x 5
Z1. Lower Support Frame x 1
Z2. Small Parts Bag x 1
Z3. Stakes x 4
Z4. Adapter * x 1
Power Adapter * Spec
Input: 120V~60Hz
Output: 5.9V 3.0A
Wattage: 17.7W
NOTE: Throughout the instructions, Right and
Left are from the character's point of view.
RIGHT
A
Locking Pin
Click
Means It's
Locked
FRONT
B
LEFT
NOTE: Feed the
cables of the (E)
Receiver Box
E
through the (D)
Scythe pole
before sliding
onto the frame.
Do this with all
scythe poles.
D
B
A
N
V
W
NOTE: Secure the (A) Right Base Half and
(B) Left Base Half together by using an M6
screw from the (Z2) Small Parts Bag. Use
another M6 screw from the (Z2) Small
Parts Bag to secure (C) Support Pole 1 to
the (B) Left Base Half.
Z
2
BACK
C
A
B
M6*12mm
1.1
D
D
E
E
F
C
1.3
ASSEMBLY REQUIRES AT LEAST 2 ADULTS, 3 ADULTS ARE
RECOMMENDED. PLEASE FOLLOW THE STEP BY STEP GUIDE AND
ENJOY YOUR
12 FT. LEVITATING REAPER
IMPORTANT TIPS:
• Ensure that item's adapter is plugged in with the screw cap tightened at the
Function Control Box and plugged in the wall.
• Ensure that the switch on the function control box is on the desired setting.
• If not functioning properly (ex: head and hands don't light up, head doesn't
move), ensure that cables are connected to their corresponding cable as shown
in the instruction sheet.
• Be sure nothing is blocking movement or caught in moving parts.
• Ensure that the floor or surface that the item sits on is flat and level.
• Ensure that the volume is not all the way down.
• Be sure nothing is blocking the sensor. Prop only speaks on Sensor Timer Mode
or when activated with a Step Pad. See Operations Instructions page 5 for
complete details.
C
D
E
F
O
P
Q
X
Y
Z
Z
2
1.2
G
C
1.4
Video assembly
instructions
available online
!
I
G
H
J
R
S
Z
2
M4 hex
wrench
Z
1
(included)
X1 Screw
M6*25mm
X2 Screw
M6*12mm
Outer Box
F
USA Item 1010830999
Canada Item 1001852746
Mexico Item 214757
Model 24SV24287
K
L
M
T
U
Z
3
Z
4
2.1
2.2
1/5
Advertisement

Summary of Contents for Home Accents Holiday 24SV24287
- Page 1 • Ensure that the volume is not all the way down. the date of purchase or call Home Accents Holiday Customer Service 8 a.m. - 7 p.m., EST, • Be sure nothing is blocking the sensor. Prop only speaks on Sensor Timer Mode Monday - Friday, 9 a.m.
- Page 2 NOTE: Slide the left sleeve of the Costume over the (J) Left Arm. The (N) Costume has a NOTE: Slide the (N) Costume over (P) hook and loop closure opening at the back, the sleeve to the left of this is the left Support Pole 5.
- Page 3 NOTE: Do not apply too much pressure to the (T) Head. Make sure the reaper's (T) Head is not making contact with the box. Cable pairs are color-coded to ensure proper color-matching connections. NOTE: If you cannot find the corresponding Sensor cable, it is attached to the inner-front surface of the (N) Costume.
- Page 4 NOTE: Lift up on the assembly when attaching (X) Blade 1 to (M) Support Pole 4. 11.1 12.1 NOTE: It is strongly recommended that 2-3 adults assist with setting up the 12 ft. Levitating Reaper. Plug the adapter into the Function Control Box.
- Page 5 SVI customer experience team (customerservice@svius.com) within 90 days of the date of purchase or call Home Accents Holiday Customer Service 8 a.m. - 7 p.m., EST, Monday - Friday, 9 a.m. - 6 p.m., EST, Saturday 1-855-HD-HOLIDAY (1-855-434-6543) HOMEDEPOT.COM...


Need help?
Do you have a question about the 24SV24287 and is the answer not in the manual?
Questions and answers