
Subscribe to Our Youtube Channel
Related Manuals for Clean Logix ALX-ELITE


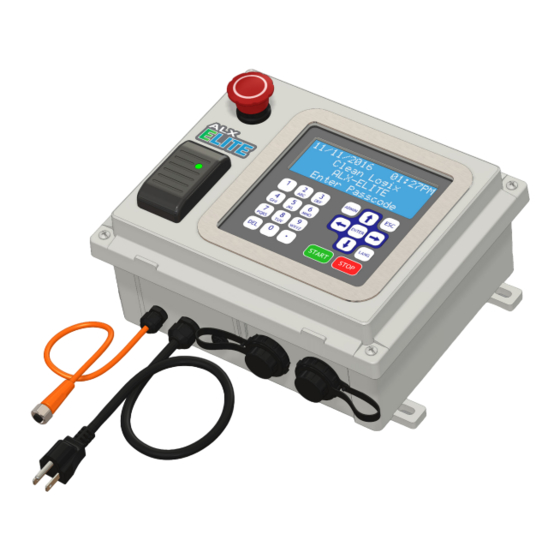
Summary of Contents for Clean Logix ALX-ELITE
- Page 1 USER MANUAL MODEL: ALX-ELITE Chemical Allocation Controller English (Original Instructions) Updated: 03/24/21...
-
Page 2: Table Of Contents
USER MANUAL: ALX-ELITE READ ALL INSTRUCTIONS BEFORE OPERATING EQUIPMENT Table of Contents General Configuration (continued) Overview Unit Configuration Terminology Unit Info Specifications Set Date & Time Installation USB Options Installation Requirements Network Setup Mounting Controller Reporting Operation Connecting Ethernet Dispensing An Application... -
Page 3: Overview
USB flash drive for immediate viewing. All configuration of the ALX-ELITE can be performed using the built-in keypad and character display. The ALX-ELITE will also broadcast a local WiFi Hardware network which allows access to the web-browser based System Editor for configuration using a laptop. -
Page 4: Installation Requirements
USER MANUAL: ALX-ELITE READ ALL INSTRUCTIONS BEFORE OPERATING EQUIPMENT Installation Requirements Electrical • 110 VAC, 5A, Single Phase, 50-60 Hz • NEMA 5-15 GFCI Protected Outlet • Surge suppression recommended Network • Cat 5e or higher Ethernet cable connection (field-... -
Page 5: Mounting Controller
USER MANUAL: ALX-ELITE READ ALL INSTRUCTIONS BEFORE OPERATING EQUIPMENT Mounting Controller Connecting Devices 1. Determine mounting location, with consideration The following types of Devices are compatible with of the following: the ALX-ELITE: • CAN-SO-4 • User accessibility : A four output, 3-way solenoid valve pack for controlling 1/2"... - Page 6 USER MANUAL: ALX-ELITE READ ALL INSTRUCTIONS BEFORE OPERATING EQUIPMENT Connecting Devices (continued) 1. Mount and connect Devices in a daisy-chain fashion using the orange M12 cables. They can be installed in any order. (NOTE: If purchased as a -KIT, the Devices will be supplied pre-mounted and connected) 2.
- Page 7 USER MANUAL: ALX-ELITE READ ALL INSTRUCTIONS BEFORE OPERATING EQUIPMENT Notes: Page 7 of 33 ALX-ELITE User Manual Last Update: 03/24/2021...
-
Page 8: Administrator Login
USER MANUAL: ALX-ELITE READ ALL INSTRUCTIONS BEFORE OPERATING EQUIPMENT This section explains how to setup the ALX-ELITE using the built-in keypad and screen. Alternatively, a laptop or tablet can be used. For more information, refer to Appendix A - System Editor. - Page 9 USER MANUAL: ALX-ELITE READ ALL INSTRUCTIONS BEFORE OPERATING EQUIPMENT Users (continued) Edit Users 00-Add New User Editing a User 01-administrator 1. Select a user in the list and press ENTER. >02-Jason 2. Edit the user settings as necessary 3. Press the ESC key to exit.
-
Page 10: Devices
USER MANUAL: ALX-ELITE READ ALL INSTRUCTIONS BEFORE OPERATING EQUIPMENT Edit Devices Devices >0555-CONFIG PUMP Adding a Device 0875-CONFIG PUMP 1. Make sure devices are connected and green lights 0689-Water (Red) are illuminated. 2. Log in as an administrator. Editing Device #0555 3. - Page 11 USER MANUAL: ALX-ELITE READ ALL INSTRUCTIONS BEFORE OPERATING EQUIPMENT Edit Devices Devices (continued) >0555-Demo Chemical Calibrating a Device 0875-CONFIG PUMP 1. Select a device from the list and press ENTER. 0689-Water (Red) 2. Use the ↓ key to select Edit Calibration and press ENTER.
- Page 12 USER MANUAL: ALX-ELITE READ ALL INSTRUCTIONS BEFORE OPERATING EQUIPMENT Devices (continued) Edit Devices >0555-CONFIG PUMP Editing a Device Calibration 0875-CONFIG PUMP Calibration points can be manually edited or deleted 0689-Water (Red) after they have been created: 1. Select a device from the list and press ENTER.
- Page 13 USER MANUAL: ALX-ELITE READ ALL INSTRUCTIONS BEFORE OPERATING EQUIPMENT Devices (continued) Edit Devices >0555-CONFIG PUMP Replacing a Device 0875-CONFIG PUMP This function allows you to replace an existing Device 0689-Water (Red) and migrate Device information to a new one (Device Name, Type, and Calibrations): 1.
-
Page 14: Applications
USER MANUAL: ALX-ELITE READ ALL INSTRUCTIONS BEFORE OPERATING EQUIPMENT Applications Edit Applications >000-Add New App Adding an Application 001-Demo App 1 1. Log in as an administrator. 2. Use ↑ and ↓ keys to select Applications and press ENTER. 3. Select 00-Add New App and press ENTER. - Page 15 USER MANUAL: ALX-ELITE READ ALL INSTRUCTIONS BEFORE OPERATING EQUIPMENT Applications (continued) Edit Applications 000-Add New App Deleting a Dispense Step 001-Demo App 1 1. Select an Application in the list and press ENTER. >123-Demo App 2 2. Select the Step# you wish to delete and press the DEL key.
-
Page 16: Permissions
USER MANUAL: ALX-ELITE READ ALL INSTRUCTIONS BEFORE OPERATING EQUIPMENT ALX-ELITE Admin Menu Permissions Devices 1. Log in as an administrator. Applications 2. Use ↑ and ↓ keys to select Permissions and >Permissions press ENTER. 3. Select a user and press ENTER. -
Page 17: Unit Configuration
USER MANUAL: ALX-ELITE READ ALL INSTRUCTIONS BEFORE OPERATING EQUIPMENT Unit Configuration (continued) • User Login: Turns the user login 01/11/2017 01:27PM requirement ON or OFF CleanLogix ELITE NOTE: When User Login is turned OFF, the Welcome! bottom of the home screen will read Press Press START To Begin START To Begin. -
Page 18: Usb Options
READ ALL INSTRUCTIONS BEFORE OPERATING EQUIPMENT USB Options USB Options Export Settings The ALX-ELITE includes a 8GB USB drive already plugged into the port on the bottom of the Import Settings controller. The controller will store dispense logs on Update Dispense Lo this USB drive, which can be retrieved manually or automatically via e-mail. -
Page 19: Network Setup
USER MANUAL: ALX-ELITE READ ALL INSTRUCTIONS BEFORE OPERATING EQUIPMENT Network Setup Network Setup Ethernet Status 1. Login as an administrator. Ethernet Config 2. Use ↑ and ↓ keys to select Network Setup WiFi Status and press ENTER. WiFi Config 3. Select an option and press ENTER:... -
Page 20: Reporting
USER MANUAL: ALX-ELITE READ ALL INSTRUCTIONS BEFORE OPERATING EQUIPMENT Reporting Reporting Menu 1. Login as an administrator. Enabled: 2. Use ↑ and ↓ keys to select Reporting and Report Timing press ENTER. Report Addresses 3. Select Enabled: and use → and ← keys to... - Page 21 USER MANUAL: ALX-ELITE READ ALL INSTRUCTIONS BEFORE OPERATING EQUIPMENT USB Reporting USB Options Export Settings Export Dispense Logs Import Settings 1. Make sure a USB drive is plugged into the >Update Dispense Lo controller port. Update Software 2. Log in as an administrator.
-
Page 22: Dispensing An Application
USER MANUAL: ALX-ELITE READ ALL INSTRUCTIONS BEFORE OPERATING EQUIPMENT Dispensing an Application 11/11/2016 01:27PM CleanLogix 1. If the screen says Press START to Begin, Press START. ALX-ELITE Enter Passcode 2. If the screen says Enter Passcode, Type in a 4-digit passcode or swipe a valid RFID card. -
Page 23: Retrieving Reports On Usb
USER MANUAL: ALX-ELITE READ ALL INSTRUCTIONS BEFORE OPERATING EQUIPMENT Notes: Page 23 of 33 ALX-ELITE User Manual Last Update: 03/24/2021... -
Page 24: Troubleshooting
USER MANUAL: ALX-ELITE READ ALL INSTRUCTIONS BEFORE OPERATING EQUIPMENT Troubleshooting Permissions The user logged in has exceeded their Cause count exceeded! permissions to use the application Log in as an Administrator and increase Solution the permission count for that user or... - Page 25 USER MANUAL: ALX-ELITE READ ALL INSTRUCTIONS BEFORE OPERATING EQUIPMENT Troubleshooting (continued) Select App#--- Cause No Applications are setup No applications Login as an Administrator and create Solution new Applications (Page 14) Action Failed Export Settings was attempted, but Cause there is no USB drive in the USB port...
-
Page 26: System Editor
Editor that provides a user-friendly interface for configuring Users, Applications, etc. Accessing the System Editor via WiFi 1. Make sure the ALX-Elite system is powered up and is less than 20 feet away 2. On a laptop or tablet, view the list of available... - Page 27 System Editor 6. Changes take effect on the ALX-ELITE immediately CAUTION: DO NOT use the ALX-ELITE while using the System Editor! NOTE: Due to small screen sizes, Applications cannot be edited while viewing the System Editor on a smart phone.
-
Page 28: Parts Callout
USER MANUAL: ALX-ELITE READ ALL INSTRUCTIONS BEFORE OPERATING EQUIPMENT Appendix B - Parts Callout Page 28 of 33 ALX-ELITE User Manual Last Update: 03/24/2021... - Page 29 USER MANUAL: ALX-ELITE READ ALL INSTRUCTIONS BEFORE OPERATING EQUIPMENT Appendix B - Parts Callout Part No. Description F1158 SCREW MACHINE M2.5 X 5 SS PHILLIPS PAN HD F1160 SCREW MACHINE 4-40 X 7/8 ZN PHILLIPS PAN HD F1163 NUT KEPS LOCK 6-32 ZN...
-
Page 30: Device Calibrations
USER MANUAL: ALX-ELITE READ ALL INSTRUCTIONS BEFORE OPERATING EQUIPMENT Appendix C - Device Calibrations Explained Calibrating a Device is advantageous because it allows the Device to be used in multiple different Applications and Calibrated type Dispense Steps with different volume targets and the controller will automatically calculate the necessary run time to achieve the target volume each time. -
Page 31: Replacing Keypad / Protector
USER MANUAL: ALX-ELITE READ ALL INSTRUCTIONS BEFORE OPERATING EQUIPMENT Appendix D - Replacing Keypad or Keypad Protector Replacing the keypad protector or the keypad itself for an ALX ELITE controller is a simple process that can be accomplished in a short amount of time. - Page 32 7. Plug in, power up the controller and test prior to re-installing for normal operation. More Information Please contact Clean Logix at: (616)-438-9200 or sales@clean-logix.com Page 32 of 33 ALX-ELITE User Manual Last Update: 03/24/2021...
- Page 33 USER MANUAL: ALX-ELITE READ ALL INSTRUCTIONS BEFORE OPERATING EQUIPMENT Appendix D - Replacing Keypad or Keypad Protector (cont.) Replacing Keypad: 1. Unplug the keypad ribbon from the circuit board by sliding the locking pins up using a fingernail or small flathead screwdriver [Figure 33.1 - 33.2].
Need help?
Do you have a question about the ALX-ELITE and is the answer not in the manual?
Questions and answers