Table of Contents
Advertisement
Available languages
Available languages
Quick Links
Advertisement
Chapters
Table of Contents

Related Manuals for Homematic IP HmIP-VDMOT


Summary of Contents for Homematic IP HmIP-VDMOT
- Page 1 Stellantrieb – motorisch Valve Drive – motorised HmIP-VDMOT Installations- und Manual de instalación Bedienungsanleitung y uso Installation and operating Istruzioni per l‘installazione manual e l‘uso Notice d‘installation et Installatie- en d‘emploi bedieningshandleiding...
-
Page 2: Table Of Contents
Installations- und Bedienungsanleitung Inhaltsverzeichnis Lieferumfang ....................3 Hinweise zur Anleitung ................3 Gefahrenhinweise ..................3 Funktion und Geräteübersicht ..............4 Montage ......................4 Anschluss an einen Fußbodenheizungscontroller Wartung und Reinigung ................5 Entsorgung .....................6 Technische Daten ..................7 Dokumentation © 2018 eQ-3 AG, Deutschland Alle Rechte vorbehalten. Ohne schriftliche Zustimmung des Herausgebers darf diese Anleitung auch nicht auszugs- weise in irgendeiner Form reproduziert werden oder unter Verwendung elektronischer, mechanischer oder chemi- scher Verfahren vervielfältigt oder verarbeitet werden. -
Page 3: Lieferumfang
Lieferumfang Lieferumfang anderer Wärmeeinstrahlung, Kälte und keinen mechanischen Belas- 1x Stellantrieb – motorisch tungen aus. Ventiladapter VA 80 (Gewinde- Das Gerät ist kein Spielzeug! Er- maß M30 x 1,5 mm) lauben Sie Kindern nicht damit zu 1x Bedienungsanleitung spielen. Lassen Sie das Verpa- ckungsmaterial nicht achtlos lie- 2 Hinweise zur Anleitung gen. -
Page 4: Funktion Und Geräteübersicht
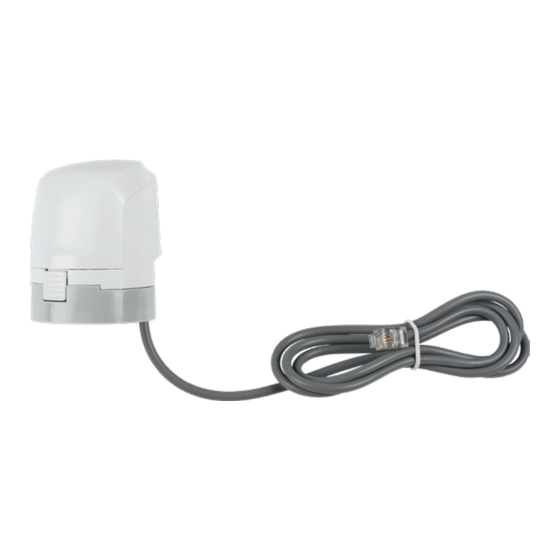
Funktion und Geräteübersicht 4 Funktion und 5 Montage Geräteübersicht Der Stellantrieb kann in beliebiger Der Homematic IP Stellantrieb – mo- Position (z. B. über Kopf) montiert torisch ermöglicht die Einstellung der werden. Ventilposition und somit die Wasser- Für die Montage sind keinerlei Durchflussmenge, wodurch die Raum- Werkzeuge erforderlich. -
Page 5: Anschluss An Einen Fußbodenheizungscontroller
Anschluss an einen Fußbodenheizungscontroller 6 Anschluss an einen Fußbo- • Setzen Sie den Stellantrieb auf den Adapter auf. Achten Sie darauf, denheizungscontroller dass der Stellantrieb vollständig Zur Regelung der Raumtemperatur einrastet. müssen Sie den Stellantrieb direkt an den Homematic IP Fußbodenhei- zungsaktor –... -
Page 6: Entsorgung
Entsorgung 8 Entsorgung Entsorgungshinweis Dieses Zeichen bedeutet, dass das Gerät nicht mit dem Hausmüll, der Restmülltonne oder der gelben Tonne bzw. dem gelben Sack entsorgt werden darf. Sie sind verpflichtet, zum Schutz der Gesundheit und der Umwelt das Produkt und alle im Lieferumfang enthaltenen Elektronikteile zur ord- nungsgemäßen Entsorgung bei einer kommunalen Sammelstelle für Elektro-... -
Page 7: Technische Daten
Technische Daten 9 Technische Daten Geräte-Kurzbezeichnung: HmIP-VDMOT Versorgungsspannung: 3,3 VDC, SELV Stromaufnahme: 120 mA max. Schutzart: IP20 Schutzklasse: Umgebungstemperatur: 0 bis 50 °C Wirkungsweise: Typ 1 Anschluss: M30 x 1,5 mm Verschmutzungsgrad: Linearer Hub: 4,3 ±0,3 mm Abmessungen: 44 x 54 x 50 mm (ohne Anschlusska-... - Page 8 Installation and operating manual Table of contents Package contents..................9 Information about this manual ..............9 Hazard information ..................9 Function and device overview ..............10 Installation ....................10 Connection to the floor heating controller Maintenance and cleaning ................ 11 Disposal ......................12 Technical specifications ................13 Documentation ©...
-
Page 9: Package Contents
Package contents Package contents The device may only be operated in dry and dust-free environment 1x Valve Drive – motorised and must be protected from the Valve adapter VA 80 (thread size effects of moisture, vibrations, M30 x 1.5 mm) solar or other methods of heat 1x User manual radiation, cold and mechanical... -
Page 10: Function And Device Overview
4 Function and device 5 Installation overview The valve drive can be installed in With the Homematic IP Valve Drive – any position (e.g. upside down). motorised you can control the valve For installation, no tools are requi- position and thus regulate the water red. -
Page 11: Connection To The Floor Heating Controller
6 Connection to the floor heating controller For the regulation of the room tempe- rature, the valve drive must be connec- ted directly to the Homematic IP Floor Heating Actuator – 12 channels, moto- rised (HmIP-FALMOT-C12). To do this, please proceed as follows: •... -
Page 12: Disposal
Disposal 8 Disposal Instructions for disposal This symbol means that the device must not be disposed of as household waste, general waste, or in a yellow bin or a yellow sack. For the protection of health and the environment, you must take the pro- duct and all electronic parts included in the scope of delivery to a municipal collection point for old electrical and... -
Page 13: Technical Specifications
Technical specifications 9 Technical specifications Device short name: HmIP-VDMOT Supply voltage: 3.3 VDC, SELV Current consumption: 120 mA max. Degree of protection: IP20 Protection class: Ambient temperature: 0 to 50 °C Method of operation: Type 1 Connection: M30 x 1.5 mm... - Page 14 Notice d‘installation et d‘emploi Table des matières Contenu de la livraison ................15 Remarques sur le mode d’emploi ............15 Mises en garde .....................15 Fonction et aperçu de l’appareil ..............16 Montage ......................16 Raccordement à un contrôleur de chauffage par le sol Entretien et nettoyage ................17 Élimination ....................18 Caractéristiques techniques ..............19 Documentation ©...
-
Page 15: Contenu De La Livraison
Contenu de la livraison Contenu de la livraison Utilisez l’appareil uniquement dans un environnement sec et 1x Actionneur – motorisé non poussiéreux. Ne l’exposez pas Adaptateur de vanne VA 80 (file- à l’humidité, à des vibrations, aux tage M30 x 1,5 mm) rayons du soleil et à... -
Page 16: Fonction Et Aperçu De L'appareil
4 Fonction et aperçu de nécessaire. l’appareil Pour monter l’actionneur, procédez Le Homematic IP Actionneur – mo- comme suit : torisé permet de régler la position de • Vérifiez si votre vanne correspond la vanne et donc, le débit de l’eau, qui à... -
Page 17: Raccordement À Un Contrôleur De Chauffage Par Le Sol
Pour réguler la température ambiante, vous devez raccorder l’actionneur di- rectement à l’actionneur de chauffage par le sol Homematic IP - 12 voies, mo- torisé (HmIP-FALMOT-C12). Procédez comme suit : click • Raccordez le câble de raccorde- ment de l’actionneur aux bornes de... -
Page 18: Élimination
Élimination 8 Élimination Avis d’élimination Ce symbole signifie que l’appareil ne doit en aucun cas être éliminé avec les ordures ménagères, les déchets résiduels ou les déchets recy- clables. Afin de protéger la santé et l’environ- nement, vous êtes tenu de rapporter le produit et toutes les pièces élec- troniques comprises dans la livraison auprès d’un point de collecte commu-... -
Page 19: Caractéristiques Techniques
Caractéristiques techniques 9 Caractéristiques techniques Désignation abrégée de l’appareil : HmIP-VDMOT Tension d’alimentation : 3,3 VCC, SELV Courant absorbé : 120 mA max. Type de protection : IP20 Classe de protection : Température ambiante : de 0 à 50 °C Mode d’action : Type 1 Raccordement : M30 x 1,5 mm Degré... - Page 20 Manual de instalación y uso Índice Volumen de suministro ................21 Advertencias sobre estas instrucciones ..........21 Advertencias de peligro ................21 Funciones y esquema del dispositivo ............22 Montaje ......................22 Conexión a un controlador de suelo radiante Mantenimiento y limpieza .................23 Eliminación ....................24 Datos técnicos .....................25 Documentación ©...
-
Page 21: Volumen De Suministro
Volumen de suministro Volumen de suministro Utilice este dispositivo únicamen- te en entornos secos y sin polvo. 1x Actuador – motorizado No lo exponga a los efectos de Adaptador de válvula VA 80 (rosca humedad, vibraciones, radiación M30 x 1,5 mm) solar u otra radiación térmica 1x Instrucciones de uso permanente, frío o cargas mecá-... -
Page 22: Funciones Y Esquema Del Dispositivo
Funciones y esquema del dispositivo 4 Funciones y esquema del 5 Montaje dispositivo El actuador se puede montar en Homematic IP Actuador – motorizado cualquier posición (p. ej., median- ajusta la posición de la válvula y regula te el cabezal). la temperatura ambiente mediante el Para el montaje no se necesitan caudal de agua. -
Page 23: Conexión A Un Controlador De Suelo Radiante
Conexión a un controlador de suelo radiante 6 Conexión a un controlador • Coloque el actuador en el adapta- dor. Asegúrese de que el actuador de suelo radiante encaje por completo. Para regular la temperatura ambiente deberá conectar el actuador directa- mente al Homematic IP Actuador de suelo radiante de 12 posiciones y mo- torizado (HmIP-FALMOT-C12). -
Page 24: Eliminación
Eliminación 8 Eliminación Indicaciones sobre la eliminación Este símbolo significa que el dis- positivo no debe desecharse con la basura doméstica, en el conte- nedor de residuos ni el contenedor amarillo o el saco amarillo. Con el fin de proteger la salud y el medioambiente, está... -
Page 25: Datos Técnicos
Datos técnicos 9 Datos técnicos Nombre abreviado del dispositivo: HmIP-VDMOT Tensión de alimentación: 3,3 VDC, SELV Consumo de corriente: máx. 120 mA Tipo de protección: IP20 Clase de protección: Temperatura ambiente: de 0 a 50 °C Modo de funcionamiento: tipo 1 Conexión:... - Page 26 Istruzioni per l‘installazione e l‘uso Indice Fornitura .......................27 Indicazioni su queste istruzioni ..............27 Indicazioni di pericolo................27 Funzioni e vista d’insieme dell’apparecchio Montaggio ....................28 Collegamento al regolatore per riscaldamento a pavimento Manutenzione e pulizia ................29 Smaltimento ....................30 Dati Tecnici ....................31 Documentazione ©...
-
Page 27: Fornitura
Leggere attentamente queste istruzioni essere fonte di pericolo per i bam- prima di mettere in funzione i disposi- bini. tivi Homematic IP. Conservare questo L’azienda declina qualsiasi respon- manuale per poterlo consultare anche sabilità per danni a cose o persone in futuro! Se l’utilizzo dell’apparecchio... -
Page 28: Funzioni E Vista D'insieme Dell'apparecchio
Funzioni e vista d’insieme dell’apparecchio 4 Funzioni e vista d’insieme 5 Montaggio dell’apparecchio L’attuatore può essere montato in Il dispositivo Homematic IP Attuatore – qualsiasi posizione (ad es. capo- motorizzato consente di impostare la volto). posizione della valvola e quindi la por- Per il montaggio non occorrono tata dell’acqua per regolare la tempe-... -
Page 29: Collegamento Al Regolatore Per Riscaldamento A Pavimento
Collegamento al regolatore per riscaldamento a pavimento 6 Collegamento al regolatore per riscaldamento a pavimento Per regolare la temperatura ambiente, è necessario collegare l’attuatore diret- tamente all’attuatore del riscaldamento click a pavimento Homematic IP – 12 canali, motorizzato (HmIP-FALMOT-C12). In tal caso procedere come segue: Figura 3 •... -
Page 30: Smaltimento
Smaltimento 8 Smaltimento Avvertenze per lo smaltimento Questo simbolo significa che l’ap- parecchio non va smaltito con i rifiuti domestici, nel bidone dei rifiuti o nel bidone o sacco giallo. Ai fini della tutela della salute e dell’ambiente, per un corretto smalti- mento siete tenuti a conferire il pro- dotto e tutte le parti elettroniche in- cluse in dotazione presso un centro... -
Page 31: Dati Tecnici
Dati Tecnici 9 Dati Tecnici Sigla dell’apparecchio: HmIP-VDMOT Tensione di alimentazione: 3,3 VDC, SELV Corrente assorbita: 120 mA max. Grado di protezione: IP20 Classe di protezione: Temperatura ambiente: tra 0 e 50 °C Modalità funzionamento: Tipo 1 Attacco: M30 x 1,5 mm... - Page 32 Installatie- en bedieningshandleiding Inhoudsopgave Leveringsomvang ..................33 Instructies bij deze handleiding ...............33 Gevarenaanduidingen ................33 Werking en overzicht van het apparaat ..........34 Montage ....................... 34 Aansluiting op een vloerverwarmingscontroller Onderhoud en reiniging ................35 Verwijdering als afval ................. 36 Technische gegevens .................37 Documentatie ©...
-
Page 33: Leveringsomvang
Laat verpakkingsma- riaal niet rondslingeren. Plas- Lees deze handleiding zorgvuldig door tic- folie en plastic zakken, stuk- voordat u uw Homematic IP-apparaten piepschuim enz. kunnen voor in gebruik neemt. Bewaar de handlei- kin- deren tot gevaarlijk speel- ding om deze ook later nog te kunnen goed worden. -
Page 34: Werking En Overzicht Van Het Apparaat
Werking en overzicht van het apparaat 4 Werking en overzicht van 5 Montage het apparaat De stelaandrijving kan in elke Met de Homematic IP Stelaandrijving – positie worden gemonteerd (bij- gemotoriseerd kan de kraanpositie voorbeeld boven het hoofd). worden ingesteld, waardoor de water-... -
Page 35: Aansluiting Op Een Vloerverwarmingscontroller
Controleer of de stelaan- vloerverwarmingscontroller drijving volledig vastklikt. Om de kamertemperatuur te regelen, moet u de stelaandrijving rechtstreeks op de Homematic IP-vloerverwar- mingsactuator - 12-voudig, gemotori- seerd (HmIP-FALMOT-C12) aansluiten. Ga hiervoor als volgt te werk: • Sluit de aansluitkabel van de ste-... -
Page 36: Verwijdering Als Afval
Verwijdering als afval 8 Verwijdering als afval Informatie over verwijdering als afval Dit symbool betekent dat het apparaat niet weggegooid mag worden met het huishoudelijk afval of restafval en niet in de gele afvalcontainer of gele afvalzak mag worden gedaan. Om de gezondheid en het milieu te beschermen, bent u verplicht om het product en alle meegeleverde elektro-... -
Page 37: Technische Gegevens
Technische gegevens 9 Technische gegevens Apparaatcode: HmIP-VDMOT Voedingsspanning: 3,3 VDC, SELV Stroomopname: 120 mA max. Beschermingsgraad: IP20 Beschermklasse: Omgevingstemperatuur: 0 tot 50 °C Werkwijze: type 1 Aansluiting: M30 x 1,5 mm Verontreinigingsgraad: Lineaire slaglengte: 4,3 ± 0,3 mm Afmetingen: 44 x 54 x 50 mm (zonder aansluitkabel) - Page 38 Kostenloser Download der Homematic IP App! Free download of the Homematic IP app! Bevollmächtigter des Herstellers: Manufacturer’s authorised representative: eQ-3 AG Maiburger Straße 29 26789 Leer / GERMANY www.eQ-3.de...
Need help?
Do you have a question about the HmIP-VDMOT and is the answer not in the manual?
Questions and answers