Advertisement
Quick Links
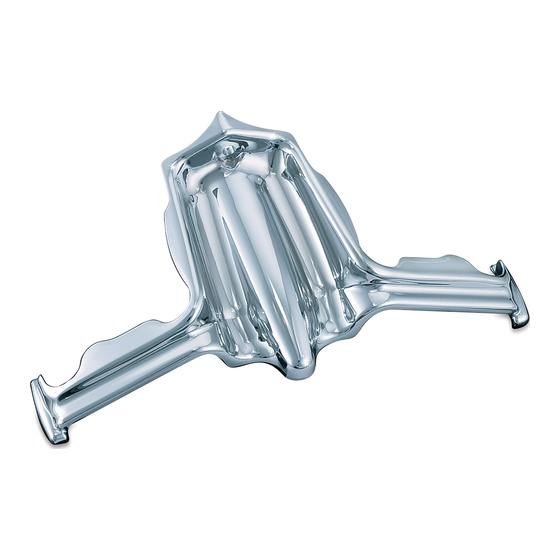
TAPPET BLOCk ACCENT fOR TWIN CAM
fIT S : A LL '9 9- UP TW IN CAM ENGINES
PARTS INCLUDED
1
Tappet Accent
1
Hardware Kit, including:
1
10-24 x 1/2 Button Socket Cap Screw (BSCS)
1
Bracket
8
1/4 Hot Spots
8
Hollow Point Sleeves
1
Installation Instructions
Please read and understand entire instructions before starting installation.
ThANk YOU fOR ChOOSING küRYAkYN!
IN ORDER TO PROTECT YOU AND OThERS fROM POSSIBLE INjURY
AND/OR PROPERTY DAMAGE OR LOSS, PLEASE PAY CLOSE ATTENTION
TO ALL INSTRUCTIONS, WARNINGS, CAUTIONS AND ATTENTION NOTES
REGARDING ThE USE AND CARE Of ThIS PRODUCT.
WARNING! THIS INDICATION ALERTS YOU TO THE FACT THAT IGNORING THE
CONTENTS DESCRIBED HEREIN CAN RESULT IN POTENTIAL DEATH OR
SERIOUS INJURY.
ATTENTION!
This indication alerts you to the fact that ignoring the contents described
herein may negatively affect product performance and functionality.
TOOLS SUGGESTED
Set of hex wrenches, inch pound (in. lbs.) torque wrench with hex bits, soapy water
and a clean rag
STRICTLY OBSERVE ThE fOLLOWING GUIDELINES IN ORDER TO USE ThE
PRODUCT PROPERLY AND AVOID POTENTIALLY DANGEROUS ACCIDENTS.
PROCEDURE
STEP 1
Park the motorcycle on a hard, level surface; turn off the ignition and allow
the engine to cool.
WARNING! YOU WILL BE WORKING AROUND THE ENGINE AND EXHAUST SYSTEM
DURING INSTALLATION. ENSURE THAT THE ENGINE AND EXHAUST SYSTEM
HAVE FULLY COOLED TO PREVENT
STEP 2
Remove the two stock socket head cap screws shown in PIC. 1; set these
aside, they will be re-used.
STEP 3
Hold the included bracket in place (See PIC. 2) and install the two stock
screws removed in STEP 2; leave the screws finger tight to allow for adjustment of the
bracket.
-cont.-
8389-12HD-0508
INJURY.
I N S TA L L AT I O N
8389
CUSTOMER SERVICE
877.370.3604 (toll free)
INSTALLATION QUESTIONS
techsupport@kuryakyn.com
or call 715.247.2983
LIMITED WARRANTY
Küryakyn warrants that any Küryakyn products sold
hereunder, shall be free of defects in materials and
workmanship for a period of one (1) year from the
date of purchase by the consumer excepting the
•
Küryakyn shall have no obligation in the event
the customer is unable to provide a receipt showing
the date the customer purchased the product(s).
•
The product must be properly installed,
maintained and operated under normal conditions.
•
Küryakyn makes no warranty, expressed or
implied, with respect to any gold plated products.
•
Küryakyn shall not be liable for any consequential
and incidental damages, including labor and
paint, resulting from failure of a Küryakyn product,
failure to deliver, delay in delivery, delivery in non-
conforming condition, or for any breech of contract
or duty between Küryakyn and a customer.
•
Küryakyn products are often intended for use
in specific applications. Küryakyn makes no
warranty if a Küryakyn product is used in
applications other than intended.
•
Küryakyn electrical products are warranted for one
(1) year from the date of purchase by the consumer.
Components of Küryakyn products containing L.E.D.s
will be warranted for defects in materials and
workmanship for 3 years from the date of purchase.
•
Küryakyn makes no warranty of any kind in
regard to other manufacturer's products distributed
by Küryakyn. Küryakyn will pass on all warranties
made by the manufacturer and where possible, will
expedite the claim on behalf of the customer,
but ultimately, responsibility for disposition of the
warranty claim lies with the manufacturer.
ABOUT OUR CATALOG
following provisions:
Advertisement

Related Manuals for Kuryakyn 8389


Summary of Contents for Kuryakyn 8389
- Page 1 I N S TA L L AT I O N TAPPET BLOCk ACCENT fOR TWIN CAM 8389 CUSTOMER SERVICE 877.370.3604 (toll free) fIT S : A LL ‘9 9- UP TW IN CAM ENGINES PARTS INCLUDED INSTALLATION QUESTIONS Tappet Accent techsupport@kuryakyn.com...
- Page 2 Remove any grease or debris from the area in front of the tappet covers STEP 4 (See PIC. 2) with soapy water and a clean rag; allow the area to dry completely. ATTENTION! Thoroughly clean the area of grease, oil, dirt, or other debris to ensure proper adhesion.
Need help?
Do you have a question about the 8389 and is the answer not in the manual?
Questions and answers