Advertisement
Quick Links
INSTALLATION INSTRUCTIONS
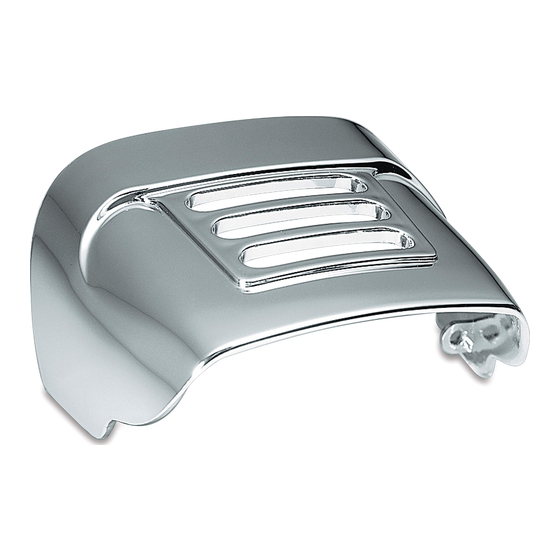
SLOTTED TAILLIGHT COVER, CHROME
THANK YOU FOR CHOOSING KURYAKYN!
Protect yourself and others from possible injury and property damage or loss. Pay close attention to all instructions, warnings, cautions, and notices regarding the installation, use, and care of this product.
THIS INDICATION ALERTS YOU TO THE FACT THAT IGNORING THE CONTENTS DESCRIBED HEREIN CAN RESULT IN POTENTIAL DEATH OR SERIOUS INJURY.
THIS INDICATION ALERTS YOU TO THE FACT THAT IGNORING THE CONTENTS DESCRIBED HEREIN CAN RESULT IN MINOR OR MODERATE POTENTIAL INJURY.
THIS INDICATION ALERTS YOU TO THE FACT THAT IGNORING THE CONTENTS DESCRIBED HEREIN MAY NEGATIVELY AFFECT PRODUCT PERFORMANCE AND FUNCTIONALITY OR
DAMAGE THE PRODUCT ITSELF OR THE PRODUCT TO WHICH IT IS BEING ATTACHED.
ENSURE THAT THE FOLLOWING PARTS HAVE BEEN INCLUDED IN THE KIT:
1
Chrome Taillight Cover with Slots
2
Nylon Spacers
2
#8-32 x1-1/4" Phillips Pan Head Screws
YOU WILL ALSO NEED:
Phillips head screwdriver
THESE INSTALLATION INSTRUCTIONS CONTAIN IMPORTANT INFORMATION. ENSURE THE END USER RECEIVES THIS COPY AND IS AWARE
OF ITS IMPORTANCE FOR FUTURE USE.
STEP 1
Read and understand all steps in the instructions before starting the
installation. Park the motorcycle on a hard, level surface and turn off
the ignition. Let motorcycle cool.
STEP 2
Remove the two screws that secure the taillight lens to the base. PIC 1
Set these aside, they may be reused.
STEP 3
Test fit the cover in place over the taillight lens, and check for clearance
between the cover and the fender. PIC 2 If the cover touches the
fender, it may cause damage to the paint; the spacers have been
included to prevent the visor from contacting the fender.
Note: If the cover does touch the fender, install the nylon spacers on the
backside of the installation tabs by removing the adhesive backing on
the spacer and placing them on the tabs as shown in PIC 3.
ENSURE THAT THE COVER WILL NOT TOUCH THE FENDER, WHICH MAY
RESULT IN DAMAGE TO THE PAINT. KURYAKYN IS NOT RESPONSIBLE
FOR DAMAGE TO PAINT/FENDER DUE TO IMPROPER INSTALLATION.
STEP 4
If the spacers are not needed place the cover over the taillight lens and
secure the cover and lens with the OEM screws removed in Step 2. If
the OEM screws DO NOT snug up the lens and cover in at LEAST three
full turns, or if the spacers from Step 3 are used, use the included
#8-32 x1-1/4" Phillips Head screws; DO NOT OVER TIGHTEN them or
you may damage the cover or taillight lens.
PAGE 1
308130
DPF-MRK-003 REV A 9/5/18
PIC 2
ENSURE THE COVER
DOES NOT CONTACT
THE FENDER ALL THE
WAY AROUND
866 277 9598 | INFO@KURYAKYN.COM
454 COUNTY ROAD VV SOMERSET, WI 54025
8130
PIC 1
REMOVE
SCREWS
PIC 3
SPACER INSTALLED TO
BACKSIDE OF TAB
K U R YA K Y N . C O M
Advertisement

Related Manuals for Kuryakyn 8130


Summary of Contents for Kuryakyn 8130
- Page 1 PIC 3. ENSURE THAT THE COVER WILL NOT TOUCH THE FENDER, WHICH MAY RESULT IN DAMAGE TO THE PAINT. KURYAKYN IS NOT RESPONSIBLE FOR DAMAGE TO PAINT/FENDER DUE TO IMPROPER INSTALLATION.
- Page 2 ©2015 KURYAKYN HOLDINGS, LLC ALL RIGHTS RESERVED KURYAKYN, KURYAKYN K logo and the marks appearing on this instruction sheet are registered and common law trademarks of Kuryakyn Holdings except noted third-party trademarks. A full listing of trademarks and trademark registrations owned by Kuryakyn Holdings can be found at www.kuryakyn.com/legal-notice.
Need help?
Do you have a question about the 8130 and is the answer not in the manual?
Questions and answers