Zeta Simplicity Plus Installation Manual
One or two loop analogue addressable fire alarm control panel
Hide thumbs
Also See for Simplicity Plus:
- User manual, maintenance manual & log book (23 pages) ,
- Installation manual (32 pages)

Subscribe to Our Youtube Channel
Related Manuals for Zeta Simplicity Plus


Summary of Contents for Zeta Simplicity Plus
- Page 1 SIMPLICITY PLUS INSTALLATION MANUAL ONE OR TWO LOOP ANALOGUE ADDRESSABLE FIRE ALARM CONTROL PANEL INSTALLATION MANUAL www.acornfiresecurity.com...
-
Page 2: Table Of Contents
SIMPLICITY PLUS INSTALLATION MANUAL TABLE OF CONTENTS 1. SAFETY INFORMATION ..................................3 1.1 INSTALLATION INFORMATION ............................3 1.2 SAFETY PRECAUTIONS DURING NORMAL OPERATION OF PANEL ................3 1.3 BATTERY INFORMATION ..............................3 1.4 PRODUCT DISPOSAL AT THE END OF ITS WORKING LIFE ....................3 2. - Page 3 20. STANDBY BATTERY REQUIREMENTS ............................43 20.1 STANDBY BATTERY CALCULATION ..........................44 21. PCB TERMINATION CONNECTIONS ............................. 45 21.1 SIMPLICITY PLUS CIE TERMINATION PCB ........................45 21.2 CONNECTIONS ................................45 21.3 SIMPLICITY PLUS POWER SUPPLY PCB ........................46 21.4 SIMPLICITY PLUS POWER SUPPLY CONNECTIONS ..................... 46 21.5 SIMPLICITY PLUS POWER SUPPLY FUSES ........................
-
Page 4: Safety Information
1.2 SAFETY PRECAUTIONS DURING NORMAL OPERATION OF PANEL NOTE: When the Simplicity Plus panel is operating normally, i.e. not being tended by service personnel, the access door must be closed and locked. After locking, the key MUST be removed and ONLY held by the responsible person and / or the service personnel. -
Page 5: Product Design Information
2. PRODUCT DESIGN INFORMATION 2.1 FIRE ALARM CONTROL SECTION The Simplicity Plus Fire Alarm Control and Indicating Equipment (CIE) Has been designed to EN54-2:1998 A1 + A2 - Fire Detection & Fire Alarm Systems – Control & Indicating Equipment. As well as meeting the requirements of EN54-2:1998 A1 + A2, the Simplicity Plus also has the following options with requirements:- Clause 7.8... -
Page 6: Introduction To The Simplicity Panel
The original simplicities had basic operation & no event log. The 2 versions had different PCBs, so a 64 is not upgradeable to a 126 version Version 2: Simplicity Plus – plastic box This had the following enhancements:- Real time clock... -
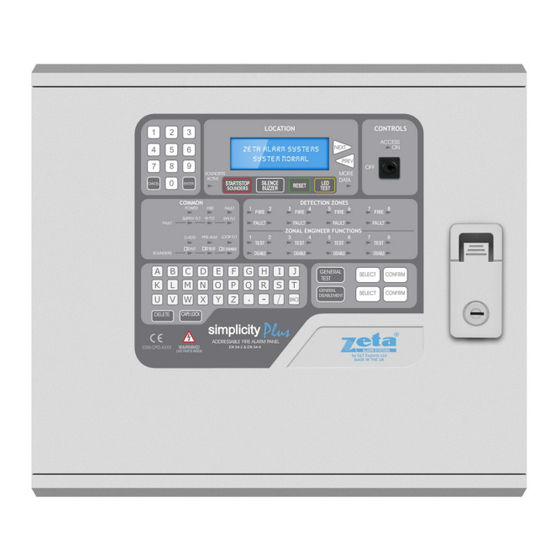
Page 7: Panel Description & Design Concept
3.2 PANEL DESCRIPTION & DESIGN CONCEPT The Simplicity Plus is a one or two loop analogue addressable fire alarm control panel designed to EN54 part 2 & 4. It is available in three versions. Simplicity 64 allows 64 devices to be connected to one loop, and divided into 4 zones. -
Page 8: Using This Manual
Design, Installation, commissioning and maintenance of systems in non-domestic premises” available from the BSI, or at your local reference library. Other national regulations will also give similar guidance. This manual explains, in a step-by-step manner, the procedure for the basic design and installation of the Simplicity Plus Range of Fire Alarm Control Panels. -
Page 9: Designing A System
5.1 DESIGNING A SIMPLICITY SYSTEM Designing a Simplicity Plus System is a fairly straightforward matter. It just takes a bit of thought to zone allocation during the system design stage. We believe that the default configuration of 16 devices per zone (for Simplicity Plus 64 & 126), and common alarm operation are suitable for most applications. -
Page 10: Installing The System
On the Simplicity Panel the general recommendation would be to use standard fire resistant cable, such as Zeta Alarm Systems Fire Defence Cable, Firetuff™ , FP200 or any equivalent. These cables are screened, and will provide good EMC shielding when properly grounded at the panel. -
Page 11: First Fix
SIMPLICITY PLUS INSTALLATION MANUAL 6.2 FIRST FIX 6.2.1 MOUNTING THE FIRE ALARM PANEL The Simplicity comes with many cable entry holes. If another entry hole is required, it is strongly recommended that the panels door be removed to avoid accidental damage. Also, the termination and Power Supply PCBs should be removed and stored in a safe place. -
Page 12: Connecting The Mains Power
SIMPLICITY PLUS INSTALLATION MANUAL 6.2.4 CONNECTING THE MAINS POWER Figure 3: Power Supply PCB layout and Mains connection details The panel should be connected to 230V AC by a 3A rated spur to the fuse box with 1mm2 to 2.5mm2 3-core cable. -
Page 13: Connecting The Batteries
SIMPLICITY PLUS INSTALLATION MANUAL 6.2.5 CONNECTING THE BATTERIES Figure 4: Battery location and connection details Although there are many sizes of suitable battery, the sizes we usually recommend for the SIMPLICITY are 12V 7Ah or 12V 12 Ah, depending on the load. -
Page 14: Addressable Loop Wiring
DEVICES CAN BE CONNECTED TO THE LOOP WHEN POWERED BY THE SIMPLICITY 64 PANEL, AND 126 DEVICES WHEN POWERED BY THE SIMPLICITY 126 PANEL. The Simplicity Plus 252 panel can connect to one or two loops. A MAXIMUM OF 126 DEVICES CAN BE CONNECTED TO EACH OF THE TWO LOOPS. We recommend that the first and last devices on a loop have isolator bases fitted. -
Page 15: Specific Device Wiring Instructions
7.1 SPECIFIC DEVICE WIRING INSTRUCTIONS All products will come with their own wiring instructions. This should be used when connecting a product. But as a general guideline, here are the connection details of most Zeta Addressable products. 7.1.1 CP3/AD Manual Call Point The CP3/AD call point has a built in isolator which can be wired in circuit or not used. -
Page 16: Zai - Mi Input Module
SIMPLICITY PLUS INSTALLATION MANUAL 7.1.3 ZAI - MI Input Module The end of line resistor value is 20KΩ and the trigger resistor value is 1 KΩ 7.1.4 ZAIO – MI Input/output Module The end of line resistor value is 20KΩ and the trigger resistor value is 1K 7.1.5 ZASC –... -
Page 17: Zazm - Mi Conventional Zone Module
SIMPLICITY PLUS INSTALLATION MANUAL 7.1.6 ZAZM – MI Conventional Zone Module The ZAZM powers the conventional zone from the addressable systems loop, so no external power supply is required. The EOL for the zone is 6.2KΩ. 7.1.7 Xtratone Sounder/Sounder Flasher The Xtratone sounder or sounder flasher is a wall mount sounder. -
Page 18: Isolator Base
SIMPLICITY PLUS INSTALLATION MANUAL Cconnections for a ceiling mount version remote LED Connections for a wall mount version remote LED 7.1.10 Isolator Base Fyreye MKII Loop Isolator Base Note that on the Fyreye Loop Isolator Base, the loop wiring connects MKII-IB to the terminal block on the PCB and NOT to the Base Spring Screws. -
Page 19: Address - Zone Table
SIMPLICITY PLUS INSTALLATION MANUAL 7.4 ADDRESS - ZONE TABLE On the Simplicity 64 and 126, each available address corresponds to a zone, with 1-16 being in zone 1 by default, 17-32 being in zone 2 by default, 33-48 in zone 3 by default etc. On the Simplicity 252, by default addresses 1-32 are in zone 1, 33-64 in zone 2 etc. -
Page 20: Sounders
8.4 ADDRESSABLE SOUNDER CIRCUIT CONTROLLER If conventional sounders or bells need to be fitted, then a sounder circuit controller can be used (Zeta Addressable Sounder Circuit Controller Unit). It will need to be separately powered. In operation, it will behave the same as an addressable sounder 8.5 COMPARISON OF SOUNDER TYPES... -
Page 21: Sounder Start & Stop Times
SIMPLICITY PLUS INSTALLATION MANUAL 8.6 SOUNDER START & STOP TIMES On a Fyreye MKII system, sounders are normally started with a group start command, so the panel will start all sounders together. When using Sandwich sounder in detector triggered mode, the panel will start all sounders instantly using the group start command. -
Page 22: Auxiliary Inputs & Outputs
SIMPLICITY PLUS INSTALLATION MANUAL 9. AUXILIARY INPUTS & OUTPUTS 9.1 AUXILIARY INPUT WIRING EXAMPLES There is one non-latching auxiliary input connection on the Fire Alarm Panel. Class Change Input (CC): This will energise all alarm outputs continuously when the CC terminals are shorted together. -
Page 23: Field Device Termination
SIMPLICITY PLUS INSTALLATION MANUAL 10. FIELD DEVICE TERMINATION 10.1 TERMINATING THE WIRING Figure 6: Cable connections All cables entering the enclosure should have cable glands, which will prevent unwanted openings in the enclosure. The Addressable Loop circuits should be connected to the appropriate connector block on the Termination PCB. -
Page 24: Other Connections
11.2 SERIAL PRINTER CONNECTION The Simplicity has an RS232 Serial output that transmits panel events as they occur. It can connect to the Zeta TCP/IP Interface (Ask distributor for more details), or a serial printer. The recommended printer is an Epson LQ300 II+. The serial port on the Simplicity is configured to this printer’s default settings. -
Page 25: Configuring The Simplicity Fire Alarm Panel
Please Wait 12.1.3 REDUCED LOOP SIMPLICITY PANELS Devices Outside For the reduced loop capacity Simplicity panels (EG Simplicity Micro, or Simplicity Plus 64), it is Address Range possible to address a device outside the panels range. Previous versions of simplicity panel... -
Page 26: Labelling The Loop Devices
SIMPLICITY PLUS INSTALLATION MANUAL 12.3 LABELLING THE LOOP DEVICES 1. To add a label, go to configuration menu 2 as described above. Select option 5 to Edit Device. Optical Use Next / Previous to select the first device to edit. Press Enter, and a cursor will appear at the... -
Page 27: Changing A Zone Boundary
001 – 010 ENTER to Change The Simplicity Plus COULD use all addresses in a single zone, but it is good practice to limit a zone to 32 or less detectors (to avoid an unacceptably large zone search area). The minimum number of addresses per zone is 2. -
Page 28: Associated Sounder Base Settings
SIMPLICITY PLUS INSTALLATION MANUAL Simplicity system, we refer to this as the Zonal to Common sounder time. Sounder Operation Select option 3 (Sounder) from the alarm operation menu. This zonal to common sounder time Zonal-Common Time can either be disabled, i.e. alarms stay zonal, or it can be enabled, i.e. all the sounders will start Disabled after the programmed time delay. -
Page 29: Setting Individual I/O Unit Output Operation
SIMPLICITY PLUS INSTALLATION MANUAL Alarm Operation Select Option 3 (Alarms) to bring up the alarm operation Menu. 1: Det 4: Bases 2: MCP 5: I/O Select option 5 (I/O). This brings up the following screen. 3: Sounder I/O Unit Operation Press Prev &... -
Page 30: Setting The Lcd Language
SIMPLICITY PLUS INSTALLATION MANUAL 12.10 SETTING THE LCD LANGUAGE Configuration Menu 2 From Configuration menu 2, Select configure system (option 6). 4:Configure Loops 5:Edit Device Then from the Misc Settings menu, select option 1 (Language). 6:Config System < Pressing Prev / Next will scroll through the available languages. -
Page 31: Protocol
SIMPLICITY PLUS INSTALLATION MANUAL 12.12 PROTOCOL The Simplicity Panel now supports 2 addressable protocols. The Original Zeta Addressable Protocol, and the new Fyreye Mk II Protocol. The New protocol has been introduced to allow future development of our products, but is unfortunately incompatible with the original Protocol. -
Page 32: Alarm Verification
SIMPLICITY PLUS INSTALLATION MANUAL 13. ALARM VERIFICATION The Simplicity now includes an option to use alarm verification. It is intended for use in apartments, and similar buildings, where it is desirable that an alarm from one apartment (or area) would need to be confirmed before the whole system goes into alarm. -
Page 33: Restoring The Panels Default Settings
SIMPLICITY PLUS INSTALLATION MANUAL 14. RESTORING THE PANELS DEFAULT SETTINGS System Menu Because the simplicity now allows several configuration changes, we have also included an 1: Clock 4: Timing option to reset the panel back to its default operation. From Configuration Menu 2, Select... -
Page 34: Viewing Panel Information
SIMPLICITY PLUS INSTALLATION MANUAL 15. VIEWING PANEL INFORMATION 15.1 MENU STRUCTURE To help locate the different features available, the menu structure of the simplicity panel is shown here. MENU LAYOUT MAIN MENU SUB MENU 1 SUB MENU 2 DESCRIPTION CONFIGURATION MENU 1 –... -
Page 35: Viewing Device Status
SIMPLICITY PLUS INSTALLATION MANUAL 15.2 VIEWING DEVICE STATUS On the Simplicity, all loop devices can be viewed from Configuration Menu 1, or viewed & edited from Configuration Menu 2. Enter configuration menu 2 as described above, and select option 5 (Edit Device). -
Page 36: Using The Event Log
SIMPLICITY PLUS INSTALLATION MANUAL Optical If the device is an addressable sounder, or a detector with an associated sounder base attached, Analog: Normal the sounder can be started by pressing the TEST button. The Outline sounder Symbol turns solid Fl 3 Bedroom 303 to show that the Sounder is active. -
Page 37: The Fire Alarm Condition
SIMPLICITY PLUS INSTALLATION MANUAL 16. THE FIRE ALARM CONDITION 16.1 VIEWING A FIRE ALARM EVENT The way the simplicity panel shows fire alarm information has been changed slightly from previous versions of the panel. The LCD screen text has been altered to show the first & last zone entering the alarm condition. -
Page 38: Disablement
(NOTE: This will also enable any points individually disabled in that zone) 17.3 DEVICE DISABLEMENT The Simplicity Plus panel can also disable individual devices (detector, call point, sounder or Optical interface). To do this, enter CONFIGURATION MENU 2 and select EDIT DEVICE. Select the... -
Page 39: Viewing Disablements
SIMPLICITY PLUS INSTALLATION MANUAL 17.4 VIEWING DISABLEMENTS Disablement When disablements have been programmed (either zone or device), the general disablement 1: Zones LED will be lit. To view the disablements, press the GENERAL DISABLEMENTS button, and the 2: Devices screen will show the following: 17.4.1 VIEWING DISABLED ZONES... -
Page 40: Test Mode
SIMPLICITY PLUS INSTALLATION MANUAL 18. TEST MODE 18.1 WHY USE TEST MODE To aid commissioning and assist routine maintenance check, a silent, non-latching test facility is available. When a detector or manual call point is triggered on any zone in Test, the Device will light its LED, When the smoke has cleared, or the call point has been reset, the LED will turn out. -
Page 41: General Fault Finding
On the reduced loop Simplicity panels ( i.e. Simplicity Micro & Simplicity Plus 64), it is possible to address a detector out of the panels range (e.g. a Simplicity Plus 64 would not read a detector set to address 65, but it will now report a device out of its address range to help identify this problem) If the panel reports any double addresses present, investigate these first as they are the easiest to find. -
Page 42: Earth Faults
SIMPLICITY PLUS INSTALLATION MANUAL Earth fault (Earth fault is generally disabled on the PSU because the earth fault is monitored by panel) 19.5 EARTH FAULTS FAULT An EARTH fault indicates that something is shorting to earth (usually through the cable screen). - Page 43 SIMPLICITY PLUS INSTALLATION MANUAL side B, and Loop2 Side A and Loop 2 side B. If both loop LEDs for a loop are off, then this indicates that there is a short on the loop that the isolators couldn’t bypass.
-
Page 44: Standby Battery Requirements
0.45 Zeta Addressable Input Module with SCI ZAI-MI 1.25 Zeta Addressable Input/ Output Module with SCI ZAIO-MI 1.25 Zeta Addressable Input/ Output Module with SCI – ZAIO-MI /230 mains switching Zeta Sounder Control Module ZASC-MI Zone Monitor Unit ZAZM-MI 12.6 13.2... -
Page 45: Standby Battery Calculation
SIMPLICITY PLUS INSTALLATION MANUAL 20.1 STANDBY BATTERY CALCULATION In order to calculate the standby battery size required, the following formula can be used:- Battery Size (Standby time in Amp Hours) = 1.25 x [(T ) + (T x (I Where: = Maximum time in hours required for the alarm [½... -
Page 46: Pcb Termination Connections
SIMPLICITY PLUS INSTALLATION MANUAL 21. PCB TERMINATION CONNECTIONS 21.1 SIMPLICITY PLUS CIE TERMINATION PCB 21.2 CONNECTIONS CONNECTION NO DESCRIPTION RS 485 REPEATER To link to addressable repeater RS232 PRINTER Serial port. Link to printer or TCP-IP reporting module ADDRESSABLE LOOP 1... -
Page 47: Simplicity Plus Power Supply Pcb
SIMPLICITY PLUS INSTALLATION MANUAL 21.3 SIMPLICITY PLUS POWER SUPPLY PCB 21.4 SIMPLICITY PLUS POWER SUPPLY CONNECTIONS CONNECTION NO DESCRIPTION EXT PSU IP External Power input from Switch Mode cage FAULT OP Volt free fault relay, normally energised A-FUSE Fuse for the first 24V output... -
Page 48: Specifications
1 x FAULT RELAY SELV@1A (NORM. ENERG) AUXILIARY FIRE OUTPUT 1 x FIRE RELAY SELV@1A NUMBER OF LOOPS SIMPLICITY PLUS 64 - 1 LOOP SIMPLICITY PLUS 126 - 1 LOOP SIMPLICITY PLUS 252 - 2 LOOPS MAXIMUM NUMBER OF ZONES... - Page 49 Output to fire alarm devices Dependencies on more than one alarm signal Fault signals from points Disablement of addressable points Test condition Other Technical Data: See Doc: “Simplicity Plus Product file” held by the manufacturer PAGE 48 Approved Document No: GLT.MAN-107 Issue 3.16...
- Page 50 Updated interface setting to show all input & Output options Updated language list Changed verification time to minimum of 1 minute Added missing menu items 3.15 25/5/2017 Updated Company name to Zeta Alarms Limited 3.16 21/9/2017 Corrected CPR ref on CE box from 0359-CPR-0145 to 0359- CPR-00145. PAGE 49 Approved Document No: GLT.MAN-107...
Need help?
Do you have a question about the Simplicity Plus and is the answer not in the manual?
Questions and answers