
Related Manuals for Haier HI1MK


Summary of Contents for Haier HI1MK
- Page 1 ® Automatic Ice Maker Machine à Glace Automatique Fabricador de Hielos Automático Installation Instructions- Model # Instructions d'installation- HI1MK Modèle # Instrucciones de instalación- Modelo #...
-
Page 2: Important Safety Instructions
• Do not install water supply tubing in areas where the temperature falls below freezing. • Connect the ice maker to a drinkable water source that is not tied into a water softening system. Chemicals from the softener may damage the ice maker, causing it to malfunction. -
Page 3: Parts Included
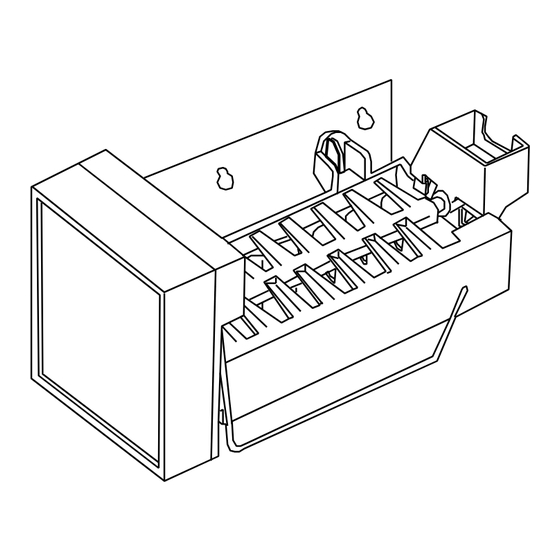
English Parts Included Ice Maker with Power Cord Steel Clamp (Qty-1) Ice Container Plastic Clamp (Qty-2) Plastic Water Supply Tubing 10. Water Valve (Qty-1) with Plastic Nut 11. Water Inlet Tube (Qty-1) Self-Tapping Screws (Qty-2) 12. Hex-Head Screw for Pan Head Screws (Qty-2) -
Page 4: Installation Instructions
Lift the shelf gently and remove. 4. There are 2 plugs on the left side wall and one on the back wall in the freezer compartment that must be removed. The holes are used to mount the ice maker and to pull through the water inlet tube. - Page 5 Bracket (7) Screw (6) 10. Take the 2 pan head screws and screw them half way into the 2 holes on the left wall of the freezer compartment. 11. Insert the electrical power cord plug of the icemaker into the power socket on the rear wall of the freezer compartment.
- Page 6 English 12. Align and fit the fill tube into the filling cup on the ice maker. Now hang and tighten the ice maker on the 2 side wall screws. (See fig. #6) Note: The fill tube may need to be cut for length adjustment.
- Page 7 2. Plug the harness to the supplied water valve. 3. Remove the plastic cap from the bottom of the grommet. Insert the plastic water supply tubing into the inlet as far as it can go. (See fig # 9) (Figure 9)
- Page 8 English 4. Insert the other end of the plastic water tubing into the bottom of the water valve. Tighten the plastic nut, while pushing the tube inside the valve. (See fig # 10) Water Valve (10) (Figure 10) Plastic Nut...
-
Page 9: Water Supply Connection
• A water supply line made of 1/4-inch OD, copper tubing. To determine the length of the copper tubing needed, you will need to measure the distance from the ice maker inlet valve at the back of the refrigerator to your cold water pipe. Then add approximately 7 feet, so the refrigerator can be moved out for service. - Page 10 English 4. Now push the water supply line into the water valve inlet as far as it will go. Slide the ferrule (sleeve) into the valve inlet and finger tighten the compression nut onto valve. Tighten another half-turn with a wrench. Be careful not to over tighten.
- Page 11 Chemicals from a malfunctioning softener can damage the icemaker. To stop the ice maker, lift the wire arm until it clicks and locks in the OFF (raised) position. The ice maker turns OFF automatically when the ice container is full.
-
Page 12: Limited Warranty
12 months labor connecting facilities, including the water line to the ice maker and the water line 12 months parts installation. The warranty commences on the date •Replacement of house fuses or resetting the item was purchased and the original of circuit breakers. - Page 13 IMPORTANTE No regrese este producto a la tienda Si tiene algún problema con este producto, por favor contacte el "Centro de Servicio al Consumidor de Haier" al 1-877-337-3639 (Válido solo en E.U.A). NECESITA UNA PRUEBA DE COMPRA FECHADA PARA EL SERVICIO DE LA GARANTIA...
Need help?
Do you have a question about the HI1MK and is the answer not in the manual?
Questions and answers