Advertisement
Available languages
Available languages
Advertisement
Table of Contents

Subscribe to Our Youtube Channel
Related Manuals for LEGRAND SANUS BSWM3IWP-B1


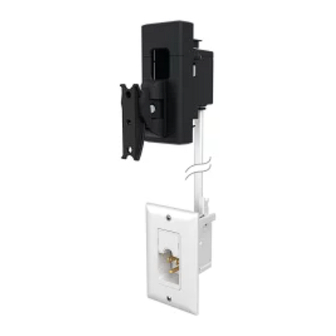
Summary of Contents for LEGRAND SANUS BSWM3IWP-B1
- Page 1 Integrated Wall Mount and Inwall Power for Wireless Speakers BSWM3IWP-B1 Model INSTRUCTION MANUAL Texto en español, página 20 We’ll Make It Stress-Free If you have any questions along the way, just give us a call. 1-800-359-5520 or, chat at SANUS.com/chatSP We’re ready to help!
-
Page 2: Important Safety Instructions
IMPORTANT SAFETY INSTRUCTIONS PLEASE READ ENTIRE MANUAL PRIOR TO USE – SAVE THESE INSTRUCTIONS CAUTION: Avoid potential personal injuries and property damage! ● Please read through these instructions completely to be sure you’re comfortable with this easy install process. ● Do not use this product for any purpose not explicitly specified by manufacturer. ●... -
Page 3: Supplied Parts
Supplied Parts WARNING: This product contains small items that could be a choking hazard if swallowed. Before starting assembly, verify all parts are included and undamaged. If any parts are missing or damaged, do not return the damaged item to your dealer; contact Customer Service. Never use damaged parts! NOTE: Not all parts will be used. - Page 4 Verify Wall Compatibility This product is designed to fit into interior exterior Back Wall walls constructed with: 3 in. Minimum Space into Wall: Stud 1/2 in. Minimum Drywall Thickness: (MAX: 1 in.) Drywall NOTE: The cable Pass- Through Width is 1.75 No Fire Block Stud in the cavity * inch.
- Page 5 Based on your speaker model, follow the correct STEP below Universal (back-mounted) Sonos Era 100 ™ ® Speaker Installation, Speaker Installation, STEP 1 PAGE 6 STEP 2 PAGE 8 go to go to...
- Page 6 STEP 1 Universal (back-mounted) Speaker Assembly for Installing in HIGH Locations (Speaker upside down to access the controls) for Installing in LOW Locations...
- Page 7 Continue with STEP 2 on PAGE 8...
- Page 8 STEP 2 Cut Holes CUTTIN G TEMPLA TE UPPER UPPER MODULE MODULE LOWER MODULE CUTTIN G Up to 8 ft. TEMPLA TE UPPER MODULE Up to 6 ft. LOWER LOWER MODULE MODULE Outlet Height...
- Page 9 STEP 3 Install Upper Module TIP: Use a fish tape, to pull the cables through the wall. NOTE: The module should easily slide into the wall — if needed, shave the opening enough to fit.
- Page 10 Based on your speaker model, follow the correct STEP below Universal (back-mounted) Sonos Era 100 ™ ® Speaker Installation, Speaker Installation, STEP 4 PAGE 11 STEP 5 PAGE 12 go to go to...
- Page 11 STEP 4 Universal Speaker (back-mounted) Installation OPTIONAL Go to STEP 6 on PAGE 16...
- Page 12 STEP 5 Sonos Era 100 ™ Speaker Installation ® for Installing in HIGH Locations (Speaker upside down to access the controls) for Installing in LOW Locations...
- Page 14 for Installing in HIGH Locations (Speaker upside down to access the controls) for Installing in LOW Locations...
- Page 15 Go to STEP 6 PAGE 16...
- Page 16 STEP 6 Install Lower Module DO NOT over OPTIONAL tighten screws...
- Page 17 NOTE: The module should easily slide into the wall — if needed, shave the opening enough to fit.
- Page 18 STEP 7 Connect Cable...
- Page 19 Removal Disconnect the Turn screws to remove modules power cable Loosen ONLY enough to remove module.
-
Page 20: Instrucciones Importantes De Seguridad
Todos los productos eléctricos pueden presentar un posible choque o incendio si mal instalado o utilizado. Productos eléctricos Legrand podrán llevar la marca de un nacionalmente reconocido laboratorio de prueba y deben instalarse de conformidad con el actual local y/o el código eléctrico nacional. -
Page 21: Herramientas Necesarias
Peso máximo Herramientas Necesarias 3,6 kg EXCEDAS (8 lb) Localizador Cinta métrica Lápiz Nivel Destornilladors Sierra para yeso de montantes Piezas y elementos de sujeción suministrados página 3 ADVERTENCIA: Este producto contiene piezas pequeñas que, en caso de ser tragadas, podrían causar asfixia. Antes de comenzar a montar la unidad, verifique que dispone de todas las piezas y que se encuentran en buen estado. - Page 22 Siga el paso a continuación según el estilo de su altavoz página 5 Para instalación de altavoces universales (montados en la parte posterior) (vaya al PASO 1 en la PÁGINA 6) ® ™ Para la instalación del altavoz Sonos Era 100 (vaya al PASO 2 en la PÁGINA 8).
- Page 23 PASO 4 Instalación del altavoz universal (montado en la parte posterior) página 11 Continúe con el PASO 6 en la PÁGINA 16 PASO 5 Instalación del altavoz Sonos® Era 100™ página 12 para instalar en para instalar en Ubicaciones BAJAS Ubicaciones ALTAS (Altavoz al revés para acceder a los controles) Continúe con el PASO 6 en la PÁGINA 16...
- Page 24 SANUS.com | 800-359-5520 Legrand AV Inc. and its a iliated corporations and subsidiaries (collectively, “Legrand”), intend to make this manual accurate and complete. However, Legrand makes no claim that the information contained herein covers all details, conditions, or variations. Nor does it provide for every possible contingency in connection with the installation or use of this product. The information contained in this document is subject to change without notice or obligation of any kind.
Need help?
Do you have a question about the SANUS BSWM3IWP-B1 and is the answer not in the manual?
Questions and answers