
Subscribe to Our Youtube Channel
Related Manuals for Digital Watchdog STAR-LIGHT DWC-V1363TIR


Summary of Contents for Digital Watchdog STAR-LIGHT DWC-V1363TIR
- Page 1 Vandal-Proof Dome Camera DWC-V1363TIR ABOUT MANUAL Before installing and using the camera, please read this manual carefully. Be sure to keep it handy for future reference. 07132012...
- Page 2 PRECAUTIONS Do not open or modify. Do not open the case except during maintenence and installation, for it may be dangerous and can cause damages. Do not put objects into the unit. Keep metal objects and flammable substances from entering the camera. It can cause fire, short-circuits, or other damages.
- Page 3 TABLE OF CONTENTS Introduction Features Parts and Descriptions Dimensions Installation Inside the Box Mounting the Camera 8-12 Connecting to Monitors Adjusting the Camera Lens Adjusting the 3-Axis Gimbal Camera Control Board Module OSD Menu 17-28 Troubleshooting Warranty Information 30-31 Specifications 32-33...
- Page 4 FEATURES* 1/3” CCD 620 TV Lines (B&W), 600 TV Lines (Color) 3.3~12mm Varifocal Auto Iris Lens 100ft Range IR with Intelligent Camera Sync TDN (True Day and Night / IR Cut Filter) Smart DNR (Digital Noise Reduction) DRC (Dynamic Range Compressor) Star-Light (Super Low Light Technology) HME (Highlight Masking Exposure) Programmable Privacy Zones &...
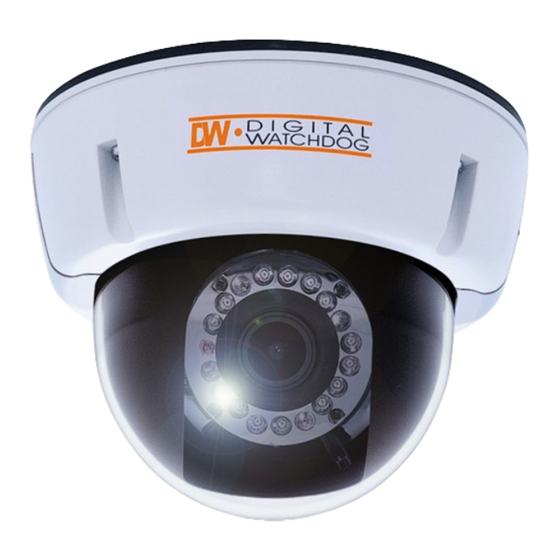
- Page 5 PART & DESCRIPTIONS* Lens Video Output Connector - BNC Power Input Connector 12VDC/ 24VAC Dual Voltage RS-485: BK(D+), WH(D-) Rubber Band Black Dome Insert Bubble Dome Upper Case Assembly Screws T20 M4X16 NPT Plug Bottom Case Rubber Pad Mounting Screws...
- Page 6 DIMENSIONS IN MILLIMETERS (IN)* 91.0(3.58”) 85.0(3.35”) 5.0(0.2”) 103.1(4.06”) 109.6(4.31”) 41.3 (1.63”) 4.5(0.18”) 6.5(0.26”) 145(5.71”)
- Page 7 INSIDE THE BOX* Included with V1 Vandal Dome Camera User Manual Double-Sided TORX-T20 Hex Key Mounting Template L-Key 4 Machine Screw and 4 Dry Wall Anchors Secondary Video-BNC Cable TORX-T20 Hex Key...
- Page 8 MOUNTING INSTALLATION INSTRUCTIONS* Pull wires through and make connections. Adjust the camera (pan, tilt, zoom). See Refer to page 13. Use mounting template to page 14 for details. mount camera with drywall mounts and machine screws. Use the joystick to adjust the OSD menu. Attach the camera housing to the junction See pages 15-17 for details.
- Page 9 JUNCTION BOX INSTALLATION INSTRUCTIONS* Check to see all parts are in Use the dry wall anchors and Insert wires through the the box. machine screws to mount the wall and make the junction box and rubber appropriate connections. gasket to the wall. Attach the camera to the Attach the camera housing junction box using the...
- Page 10 WALL MOUNT INSTALLATION INSTRUCTIONS* Check to see all parts are in Insert the wires from the Attach the camera to the box. camera through the wall the wall mount housing. mount housing. Use the mounting template to Attach the camera housing make pilot holes.
- Page 11 PENDANT MOUNT INSTALLATION INSTRUCTIONS* Check to see all parts are in Attach the top shield to the Slide the wires from the the box. pendant mount. camera through the pendant mount. Attach the camera to the Attach the camera housing to Use the mounting template to pendant mount using the the fixture.
- Page 12 CORNER MOUNT INSTALLATION INSTRUCTIONS* Check to see all parts are in the box. Attach the two compression fittings to the corner bracket. Attach the wall mount to the corner bracket Attach the assembly to a wall corner with dry with the 4 machine screws. wall anchors and machine screws.
- Page 13 CONNECTING TO MONITORS* Use the diagram below to connect to a Monitor or CRT Monitor properly. DC12V / AC24V Video Output BNC Cable Main Monitor Second Video Cable 300mm(11.8”) Field Test Monitor Power Connection: 12VDC & 24VDC Dual Voltage (Auto Polarity Detection and Protection) All cameras are equipped with a second video output for on-site configuration.
- Page 14 ADJUSTING THE CAMERA LENS* Follow the instructions below to make any lens adjustments. Focus Handle Zoom Handle Loosen the zoom and focus handles by rotating them counter-clockwise. Adjust the field of view by moving the handle to the RIGHT (tele) to zoom in or to the LEFT (wide) to zoom out.
- Page 15 ADJUSTING THE 3-AXIS GIMBAL* The Gimbal mechanism yields maximum rotation and placement as shown below. NO IR NO IR Rotation 360 Panning 360 NO IR Tilting 82 Tilting 90...
- Page 16 CAMERA CONTROL BOARD* RIGHT DOWN LEFT SW: Functional Control of On Screen Display Menu CON1 CON1: Second Video Output Connector CON2: RS-485 Connector CON2 CAUTION: Check for polarity when using a 12VDC Power Supply.
- Page 17 MODULE OSD MENU* EXPOSURE COLOR DAY & NIGHT FUNCTION LENS WB MODE D&N MODE MIRROR MANUAL / DC AWC / ATW / MANUAL / PUSHLOCK AUTO / COLOR / B&W MIRROR / OFF BACKLIGHT RED GAIN NIGHT C. SHARPNESS OFF / BLC / HME / DRC 0 ~ 255 0 ~ 100 0 ~ 30...
- Page 18 EXPOSURE LENS Manual mode supports the fixed board lens or the manual iris Manual lens. DC mode supports the auto-iris varifocal lens. NOTE: Both MANUAL and DC mode have FOCUS TARGET. You can adjust the focus by finding the highest number on the FOCUS TARGET. See page 16 for focus information.
- Page 19 EXPOSURE BACKLIGHT BACK LIGHT COMPENSATION User can manually adjust the BLC level in five areas of the scene (TOP, BOTTOM, CENTER, LEFT, RIGHT). MANUAL Increase the BLC levels to make the image brighter. This is recommended. Camera will automatically adjust the BLC zone. BLC levels to choose from include: SMART LOWEST, LOW, MID, HIGH.
- Page 20 EXPOSURE AGC (AUTO GAIN CONTROL) AGC enhances the picture brightness in low light conditions. A higher level AGC setting makes the images brighter; however, it could increase OFF / LOW / MID / HIGH / HIGHEST the amount of noise. STARLIGHT Starlight mode automatically activates slow shutter function when the image is too dark.
- Page 21 COLOR WB MODE Auto White Balance Control mode compensates for color temperature changes between 2000K and 18000K. Auto Tracking White Balance Control mode compensates for color temperature changes between 2500K and 9500K. Users can control the white balance manually by changing RED MANUAL GAIN and BLUE GAIN (see below).
- Page 22 DAY & NIGHT D&N MODE Camera switches between day and night automatically depending AUTO on light level. Camera will stay in color mode when there is enough light. Camera will switch to B&W at night or other low light environments. If AUTO is selected, please define the following settings: *BURST: If ON is selected, the camera provides a color burst signal *in night mode.
- Page 23 FUNCTION MIRROR Flips the image horizontally. MIRROR SHARPNESS Sets the image sharpness. The higher the number, the sharper 0 ~ 30 the image. GAMMA Select the desired gamma level. 0.45 is default setting. 0.45 / 0.60 / 1.0 / MANUAL SLC (SIDE LIGHT COMPENSATION) Increase the brightness on sides of the image.
- Page 24 MOTION The camera can detect the movement and display an alarm on the screen when movement is detected. AREA SET OFF / ON AREA 1 ~ 4 If ON, motion areas can be selected and moved accordingly. Select Areas 1-4 and adjust using controls for TOP, BOTTOM, LEFT, or RIGHT.
- Page 25 PRIVACY You can hide some parts of the screen for privacy masking. A total of 8 different privacy masking zones are available. MASK 1 ~ MASK 8 Select ON or OFF for each mask (MASK 1 through 8). OFF / ON If ON is selected you can set the area to be masked and the shape and color of the mask.
- Page 26 SETUP TITLE If ON is selected, you can display the camera title on the screen. OFF / ON *CLR: Clear the title. *POS: Position the title on the screen. DPC (DEAD PIXEL CANCELLATION) DPC automatically removes defective pixels in real time. If AUTO is selected, you can define the following settings: AUTO *WHITE THR: Cancels the white defective pixels.
- Page 27 SETUP MONITOR MODE 1 is the default. If the displayed image is not good enough, try MODE 2. MODE 1 MODE 2 LANGUAGE The camera supports the following languages: ENGLISH, CANTONESE, MANDARIN, JAPANESE, GERMAN, FRENCH, ITALIAN, RUSSIAN, SPANISH, AND DUTCH. OSD COLOR The following colors are available for the OSD menu: BLUE, GREEN, CYAN, RED, MAGENTA, YELLOW, PURPLE, and GRAY.
- Page 28 EXIT EXIT Save the current settings and exit the OSD menu. SAVE & EXIT Exit the OSD menu without saving the changes. EXIT...
- Page 29 TROUBLESHOOTING Before sending your camera for repair, check the following or contact our technical specialist. FOR NO VIDEO Check the coaxial cable and make sure it is connected securely. Check the lens’ iris adjustment at the camera’s OSD menu. Check the power supply and make sure the camera has the proper voltage and current. FOR OUT-OF-FOCUS VIDEO Check the clear dome cover and the lens for dirt or fingerprints.
- Page 30 WARRANTY INFORMATION* Digital Watchdog (referred to as “the Warrantor”) warrants the Digital Watchdog Camera against defects in materials or workmanship as follows: LABOR: For the initial five (5) years and one (1) year on IR LED from the original purchase date, if the camera is determined to be defective, the Warrantor will repair or replace the unit with a new or refurbished product at its option at no charge.
- Page 31 This warranty gives you specific legal rights, and you may also have other rights that vary from state-to-state. If the problem is not handled to your satisfaction, then write to the following address: Digital Watchdog, Inc. ATTN: RMA Department 5436 W. Crenshaw Street...
- Page 32 SPECIFICATIONS* DWC-V1363TIR VIDEO Image Sensor 1/3" CCD Total Pixels 811 (H) x 508 (V), 411K Pixels Effective Pixels 768 (H) x 494 (V) Frequency 15.734KHz (H), 59.95Hz (V) Synchronization Internal or Line Lock Horizontal Resolution 620 TV Lines [B&W], 600 TV Lines [Color] Minimum Illumination F1.2 (30IRE): 0.14 Lux [Color] F1.2 (30IRE): 0.0 Lux [B&W]...
- Page 33 OPERATIONAL White Balance AWC / ATW / MANUAL / PUSHLOCK Privacy Zones OFF / ON (8 Programmable Zones) Language ENGLISH / GERMAN / JAPANESE / MANDARIN / CANTONESE RUSSIAN / FRENCH / SPANISH / ITALIAN / DUTCH ENVIRONMENTAL Operating Temperature C ~ 55 C (14 F ~ 131...
- Page 34 MEMO*...
- Page 35 MEMO*...
- Page 36 5436 W Crenshaw St. Tampa, FL 33634 Tel : 866-446-3595 / 813-888-9555 Fax : 813-888-9262 www.Digital-Watchdog.com technicalsupport@dwcc.tv Technical Support Hours : Monday-Friday 8:30am to 8:00pm EST...
Need help?
Do you have a question about the STAR-LIGHT DWC-V1363TIR and is the answer not in the manual?
Questions and answers