Advertisement
Available languages
Available languages
Quick Links
FR: INSTRUCTIONS D'ASSEMBLAGE
EN: ASSEMBLY INSTRUCTION
FR: IMPORTANT: A LIRE ATTENTIVEMENT ET A CONSERVER POUR VOUS Y
REFRERER ULTERIEUREMENT
EN: IMPORTANT, RETAIN FOR FUTURE REFERENCE: READ CAREFULLY.
60MIN
IN240500177V01_US_CA
A91-350V00
Advertisement

Subscribe to Our Youtube Channel
Related Manuals for Soozier A91-350V00


Summary of Contents for Soozier A91-350V00
- Page 1 IN240500177V01_US_CA A91-350V00 60MIN FR: INSTRUCTIONS D’ASSEMBLAGE EN: ASSEMBLY INSTRUCTION FR: IMPORTANT: A LIRE ATTENTIVEMENT ET A CONSERVER POUR VOUS Y REFRERER ULTERIEUREMENT EN: IMPORTANT, RETAIN FOR FUTURE REFERENCE: READ CAREFULLY.
-
Page 3: Important Safety Information
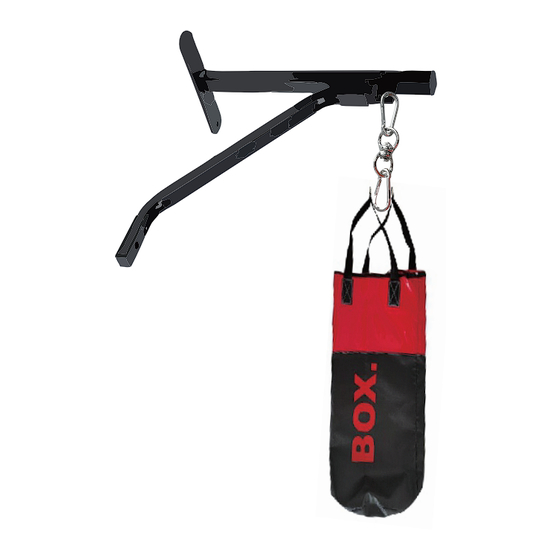
Important Safety Information Please keep this manual in a safe place for reference. 1. It is important to read this entire manual before assembling and using the equipment. Safe and efficient use can only be achieved if the equipment is assembled, maintained and used properly. - Page 4 2. Insert the non perforated end of the bent 1. Hanger accessories include: 2 brackets, bracket into the straight bracket hole. 3 expansion bolts. 3. Fix the assembled hanger to the wall by 4.Remove the hanger and drill three holes in previously marked places with drill 1/2 hand temporary and make marks for top -inch.
- Page 5 Renseignements importants en matière Veuillez conserver ce manuel dans un endroit sû r pour pouvoir vous y ré fé rer ulté rieurement. 1. Il est important de lire entièrement ce manuel avant d’assembler et d’utilis ation de l’équipement. Utilisation sûre et efficace n’est possible que si l’équipement est assemblé, entretenu est utilisé...
-
Page 6: Étapes D'installation
Étapes d'installation 1. Les accessoires de suspension compren- 2. Insérez l'extrémité non perforée du support nent : 2 supports, 3 boulons d'expansion. plié dans le trou du support droit. 3. Fixez le support assemblé temporairement 4. Retirez le support et percez trois trous aux endroits précédemment marqués avec une au mur à...
Need help?
Do you have a question about the A91-350V00 and is the answer not in the manual?
Questions and answers