Advertisement
Available languages
Available languages
Quick Links
INSTALLATION INSTRUCTIONS FOR PART 95-6523
Ram Promaster 2014-up
KIT FEATURES
• Double DIN radio provision
• Custom texture
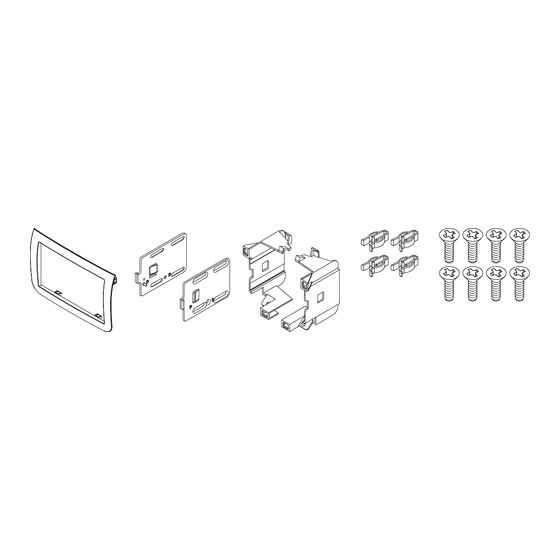
KIT COMPONENTS
• A) Radio trim panel • B) Radio brackets • C) Radio mounting brackets • D) (4) White plastic panel clips
• E) (8) 5mm x 12mm Phillips Screws
A
B
WIRING & ANTENNA CONNECTIONS (sold separately)
Wiring Harness: • 70-1784 or XSVI-6523-NAV
Antenna Adapter: • 40-VW10 or 40-EU10
METRA. The World's best kits.
APPLICATIONS
95-6523
C
D
1-800-221-0932
™
Dash Disassembly
– Ram Promaster 2014-up ...................................... 2
Kit Assembly
– Double DIN radio provision ................................... 3
TOOLS REQUIRED
• Panel removal tool • Phillips screwdriver
E
• 86-5618 radio removal tool
• 86-3528 radio removal tool
CAUTION: Metra recommends disconnecting the
negative battery terminal before beginning any
installation. All accessories, switches, and especially
air bag indicator lights must be plugged in before
reconnecting the battery or cycling the ignition.
NOTE: Refer to the instructions included with the
aftermarket radio.
metraonline.com
Table of Contents
© COPYRIGHT 2014 METRA ELECTRONICS CORPORATION
Advertisement

Subscribe to Our Youtube Channel
Related Manuals for Metra Electronics 95-6523


Summary of Contents for Metra Electronics 95-6523
- Page 1 INSTALLATION INSTRUCTIONS FOR PART 95-6523 APPLICATIONS Table of Contents Ram Promaster 2014-up 95-6523 Dash Disassembly – Ram Promaster 2014-up ........2 Kit Assembly – Double DIN radio provision ........3 KIT FEATURES • Double DIN radio provision • Custom texture KIT COMPONENTS •...
- Page 2 95-6523 Dash Disassembly With radio delete or Single DIN factory radio: 1. Using Metra’s 86-5618 radio removal tools pull the factory radio from the dash. 2. Remove (2) Phillips screws in bottom of dash opening. 3. Unclip and remove the factory radio trim panel.
- Page 3 95-6523 Kit Assembly Double DIN radio provision 4. Attach the radio brackets to the aftermarket radio using the 1. Attach the (4) panels clips to the screws supplied with the radio or radio trim panel. (Figure A) the supplied (8) Phillips screws.
- Page 4 INSTALLATION INSTRUCTIONS FOR PART 95-6523 NOWLEDGE IS OWER Enhance your installation and fabrication skills by enrolling in the most recognized and respected mobile electronics school in our industry. Log onto www.installerinstitute.com or call 800-354-6782 for more information and take steps toward a better tomorrow.
- Page 5 INSTRUCCIONES DE INSTALACIÓN PARA LA PIEZA 95-6523 AplicAciones Indice Ram Promaster 2014 y mas 95-6523 Desmontaje del tablero – Ram Promaster 2014 y mas ......... 2 Ensamble del kit – Provisión de radio doble DIN ........3 cArActerísticAs del kit •...
- Page 6 95-6523 Desmontaje del tablero Sin radio o con radio de fábrica de DIN sencillo: 1. Usando las herramientas de remoción del radio 86-5618 saque el radio de fábrica del tablero. (Figura A) 2. Quite los (2) tornillos Phillips de abajo de la apertura del tablero.
- Page 7 95-6523 Ensamble del kit Provisión de radio doble DIN 4. Coloque los soportes del radio en el radio de mercado secundario usando los 1. Una los (4) ganchos de panel a la tornillos suministrados con el radio o los moldura del radio. (Figura A) (8) tornillos Phillips suministrados.
- Page 8 INSTRUCCIONES DE INSTALACIÓN PARA LA PIEZA 95-6523 EL CONOCIMIENTO ES PODER NOWLEDGE IS OWER Mejore sus habilidades de instalación y fabricación Enhance your installation and fabrication skills by inscribiéndose en la escuela de dispositivos electrónicos enrolling in the most recognized and respected mobile electronics school in our industry.
Need help?
Do you have a question about the 95-6523 and is the answer not in the manual?
Questions and answers