
Related Manuals for Altimium SCA61MV-4K


Summary of Contents for Altimium SCA61MV-4K
- Page 1 User Manual SCA61MV-4K 6x1 4K Presentation Switcher with HDBaseT All Rights Reserved Version: SCA61MV-4K_2023V1.1...
-
Page 2: Table Of Contents
1. Product Introduction ....................1 1.1. Features ......................1 1.2. Package List ..................... 1 2. Specification ....................... 2 2.1. SCA61MV-4K Switcher ..................2 2.2. TP412R-4K Receiver ..................4 3. Panel Description ......................5 3.1. Switcher Front Panel ..................5 3.2. Switcher Rear Panel ..................6 3.3. - Page 3 7.1. System Commands ..................24 7.2. Signal Switching Commands ................25 7.3. Audio Setting Commands ................26 7.4. Function Setting Commands ................27 7.5. CEC Commands ..................... 31 7.6. Special Commands ..................33 8. Firmware Upgrade ....................35 Altimium www.altimium.com...
-
Page 4: Product Introduction
Supports multi-view and up to 16 modes can be selected. ⚫ Controllable via front panel buttons, GUI, IR remote, RS232 and CEC. ⚫ 1.2. Package List SCA61MV-4K (NR) Switcher TP412R-4K Receiver 1x 6x1 4K Presentation Switcher 1x HDBaseT Receiver ⚫... -
Page 5: Specification
6x1 4K Presentation Switcher with HDBaseT 2. Specification 2.1. SCA61MV-4K Switcher Video Input Video Input (4) HDMI IN (1~4), (1) DP, (1) USB-C Video Input Connector (4) Type-A female HDMI, (1) DisplayPort, (1) Type-C USB HDMI: Up to 4K@30Hz 4:4:4... - Page 6 -25℃ ~ +70℃ Relative Humidity 10% ~ 90% External Power Supply Input: AC 100~240V, 50/60Hz; Output: 24V DC 5A Power Consumption 90w (Max) USB-C Power Charging 60w (Max) Dimension (W*H*D) 250mm x 44mm x 200mm Net Weight 1.6KG Altimium www.altimium.com...
-
Page 7: Tp412R-4K Receiver
-5℃ ~ +55℃ Storage Temperature -25℃ ~ +70℃ Operating Humidity 0% ~ 90% Input Power: 24VDC 1.25A or Power over HDBaseT (PoH); Power Supply AC Adaptor Input Power: 100~240VAC, 50/60Hz Dimension (W*H*D) 115mmx16.2mm x109mm Net Weight (g) 196g Altimium www.altimium.com... -
Page 8: Panel Description
Press the volume knob to select microphone or source audio control. ⚫ Rotate the knob to increase or decrease the volume of the selected audio. ⚫ Press and hold the knob at least 3 seconds to mute the selected audio, rotate ⚫ the knob to unmute. [在此处键入] Altimium... -
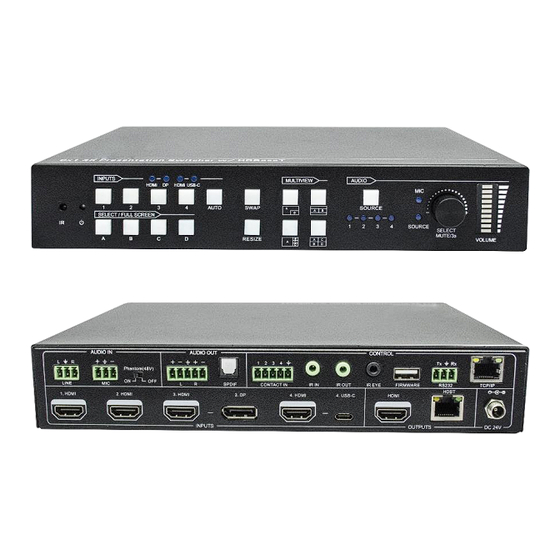
Page 9: Switcher Rear Panel
IR EYE: Connects to IR receiver for local switcher control. ⚫ FIRMWARE: Type-A USB for firmware upgrade. ⚫ RS232: 3-pin terminal block for RS232 control. ⚫ TCP/IP: RJ45 port to control the switcher via GUI. ⚫ ⑥ DC 24V: DC connector for power adapter connection. Altimium www.altimium.com... -
Page 10: Receiver Front And Rear Panel
⑥ IR OUT: Connects to IR emitter for IR pass-through. ⑦ HDMI Output: Connect with HDMI display. ⑧ HDBaseT input: Connect to the HDBT OUT port on the transmitter via CAT5e/ CAT6a cable. ⑨ DC 24V: DC connector for power adapter connection. Altimium www.altimium.com... -
Page 11: System Connection
6x1 4K Presentation Switcher with HDBaseT 3.4. System Connection Altimium www.altimium.com... -
Page 12: Front Panel Control
Press SWAP button to cycle swap the video source of window display in anticlockwise, the SWAP LED lights once when press its button once. Example: In Multi-view Mode SWAP SWAP SWAP Example: In Full Screen Mode SWAP SWAP SWAP Altimium www.altimium.com... -
Page 13: Window Size Setting
Example: Switch Input 2 to Windows A: Press INPUT 2 (The input 2 LED illuminates blue.) Press Windows A (The input 2 and windows A LEDs illuminate blue). Auto Switching Press AUTO button to enable or disable auto-switching mode. Note that auto switching Altimium www.altimium.com... -
Page 14: Switching Status Inquiry
Press the volume knob to select microphone or source audio control. Rotate the knob to increase or decrease the volume of the selected audio. Press and hold the knob at least 3 seconds to mute the selected audio, rotate the knob to unmute. Altimium www.altimium.com... -
Page 15: Ir Remote Control
Mute modes can be set via GUI. Source Mute ⑤ AUDIO SOURCE: Four buttons for audio source selection. ⑥ VOLUME: Microphone audio: Mute, volume up and ⚫ volume down. Source audio: Mute, volume up and volume ⚫ down. Altimium www.altimium.com... -
Page 16: Gui Control
192.168.0.178 Subnet Mask: 255.255.255.0 Type 192.168.0.178 in the internet browser, it will enter the below log-in webpage: Username: admin Password: admin Type the user name and password, and then click Login to enter the section for video switching. Altimium www.altimium.com... -
Page 17: Control Tab
Please find 4.5 Video Signal Switching for more details. Click “Power Off” to enter system standby mode. ⚫ 6.1.2. Display Control Display: Click “On” or “Off” to power on or off the display device. ⚫ Altimium www.altimium.com... -
Page 18: Audio Control
Audio Out Delay: Set the delay time of audio output to 0~150ms. ⚫ MIC: Turn on or off microphone input. ⚫ MIC Volume: Volume bar, volume up, volume down and mute buttons for ⚫ microphone audio control. Altimium www.altimium.com... -
Page 19: Multiview Tab
Layout 5~Layout 8, Layout 9~Layout 12 can be adjusted window size. SWAP: Click the button to cycle swap the video source of window display in ⚫ anticlockwise. Click gear icon to enter the below interface to select input souce for each window. ⚫ Altimium www.altimium.com... -
Page 20: Display Setting Tab
Window Select: Select the input source for each window, and then adjust ⚫ window size by setting start position and end position. Click “Save” to save the user-defined layout. 6.3. Display Setting Tab Automatic Display Control: Enable or disable the function to automatically ⚫ control display device. Altimium www.altimium.com... -
Page 21: Resolution Tab
Trigger: “Display On” -> Wait “Delay” ->Send “Display Input Select”. ⚫ 6.4. Resolution Tab Select the output resolution for HDMI and HDBaseT outputs. ⚫ Select “Auto for Rx” that the output resolution follows the display device. ⚫ Altimium www.altimium.com... -
Page 22: Cec Tab
6.5.1. Source Control Select the HDMI input source which needs to be control, and then click function ⚫ buttons. 6.5.2. Display Control Select the output display device which needs to be control, and then click function ⚫ buttons. Altimium www.altimium.com... -
Page 23: User-Defined Cec Command
Select input source or display device, and then type CEC command in the ⚫ corresponding Trigger 1 or Trigger 2 box to be sent to control the selected device. 6.6. EDID Tab 6.6.1. EDID Setting Select the compatible built-in EDID for the selected input source. ⚫ Altimium www.altimium.com... -
Page 24: Edid Upload
Step 2: Click the user-defined box, and then select the EDID file (.bin). Step 3: Click “Apply” to upload the user-defined EDID. 6.7. Network Tab Static IP or Dynamic Host Configuration Protocol (DHCP). ⚫ Modify the static IP Address, Subnet Mask, and Gateway. ⚫ Altimium www.altimium.com... -
Page 25: Tags Tab
6x1 4K Presentation Switcher with HDBaseT 6.8. Tags Tab Modify the multiview layout labels. ⚫ 6.9. Security Tab Modify the login password. ⚫ Lock or unlock the front panel buttons. ⚫ Altimium www.altimium.com... -
Page 26: Additional Tab
“Administration” in the source menu to get to “Upload Firmware” as shown below: Select the desired update file and press “Apply”, it will start upgrading then. Note: Please don’t do anything during the upgrade process to avoid upgrade failure. Altimium www.altimium.com... -
Page 27: Rs232 Control
>SetHelp SetAV <Select the input source >SetAV Get the command details. InParam,OutParam >SetHelp [Param] [Param] = Any command. InParam = 1~6 [Param] = Null (All commands) 1 - HDMI 1 2 - HDMI 2 3 - HDMI 3 Altimium www.altimium.com... -
Page 28: Signal Switching Commands
7.2. Signal Switching Commands Command Example and Command Description Feedback Switch input source to output window. [InParam] = 1 ~ 6 >SetAV >SetAV 3 1 - HDMI 1 [InParam],[OutParam] >SetAV 1,A 2 - HDMI 2 3 - HDMI 3 Altimium www.altimium.com... -
Page 29: Audio Setting Commands
Dis - Unmute (Default) <MicAudioMute False >GetMicAudioMute Get the microphone audio mute status <MicAudioMute False >SetMicVOL 6 Set the microphone audio volume to >SetMicVOL [Param] [Param]. [Param] = 0~60 (Default: 60) <MicVOL 6 >GetMicVOL Get the microphone audio volume. <MicVOL 6 Altimium www.altimium.com... -
Page 30: Function Setting Commands
<AudioDelay 20 7.4. Function Setting Commands Command Example and Command Description Feedback >SetRS232Baudrate 5 Set the baud rate of RS232 port to [Param]. >SetRS232Baudrate [Param] = 1 ~ 5 [Param] 1 - 115200 <RS232Baudrate 5 2 - 57600 Altimium www.altimium.com... - Page 31 5 - HDMI 4 [Param1],[Param2] 6 - USB-C 4 <InPortEdid 1,1 [Param2] = 1 ~ 5 1 - 1920x1080 60HZ PCM 2CH 2 - 3840x2160 30HZ PCM 2CH (Default) 3 - BYPASS HDMI 4 - BYPASS HDBT 5 - USER Altimium www.altimium.com...
- Page 32 19 - USER CONFIG 3 20 - USER CONFIG 4 >GetMvMode Get multiview mode <MvMode 1 <Video OUT A B C D >SetSwapSrouce Swap input source of window. IN 2 5 1 3 <AudioSource 1 >SetResizeWin Resize display windows. <ResizeWin Altimium www.altimium.com...
- Page 33 Off command. >SetOffMsgLoopDelayTim Set the delay time of sending Display Off >SetOffMsgLoopDelay command. Time [Param] [Param] = 5 ~ 100 (1=100ms) (Default: 10) <OffMsgLoopDelayTime 5 >GetOffMsgLoopDelay Get the delay time of sending Display Off <OffMsgLoopDelayTime 5 Time command. Altimium www.altimium.com...
-
Page 34: Cec Commands
Send CEC BACK command to source [Param] device. [Param] = 1 ~ 4 (HDMI 1~4) <CecSrcBack1 >SetCecSrcEnter 1 >SetCecSrcEnter Send CEC ENTER command to source [Param] device. [Param] = 1 ~ 4 (HDMI 1~4) <CecSrcEnter 1 >SetCecSrcOn 1 Altimium www.altimium.com... - Page 35 <CecDisplayVol+ 1 [Param] = 1 ~ 2 (1 - HDMI, 2 - HDBT) Send CEC VOLUME DOWN command to >SetCecDisplayVol- 1 >SetCecDisplayVol- display device. [Param] <CecDisplayVol- 1 [Param] = 1 ~ 2 (1 - HDMI, 2 - HDBT) Altimium www.altimium.com...
-
Page 36: Special Commands
Set the HEX “Power On” command "XX XX" to be sent to display device when >SetPowerOnSendHex >SetPowerOnSendHex_5: power on the switcher. _[Param]:XX XX 30 31 32 33 [Param] = 1~5 (Baud rate of RS232 port) 1 - 115200 Altimium www.altimium.com... - Page 37 2 - 57600 aram]:XX XX 3 - 38400 <Baudrate: 9600 4 - 19200 <Enter sleep to send 5 - 9600 HEX:41 42 43 44 XX XX= HEX data to be sent (X = 0~9, A~F and up to 20 XX). Altimium www.altimium.com...
-
Page 38: Firmware Upgrade
(.bin) should be confirmed again, and then follow the above steps to update again. 6) Remove the type-A USB cable after firmware upgrade. 7) After firmware upgrade, the switcher should be restored to factory default by sending command. Altimium www.altimium.com...
Need help?
Do you have a question about the SCA61MV-4K and is the answer not in the manual?
Questions and answers