
Related Manuals for Nautilus Hyosung MONiMAX7600TA System


Summary of Contents for Nautilus Hyosung MONiMAX7600TA System
- Page 1 Installation Manual MONiMAX7600TA System V01.00.02 (2015.05.11) © 2012 Nautilus Hyosung Inc. All Rights Reserved.
- Page 2 Added the Minimum Installation & Service Clearance Chapter3 V01.00.02 2015/05/11 Added the approximate weight of MX7600TA Chapter3 © 2012 Nautilus Hyosung All Rights Reserved. The content of this specification is protected by copyright laws. 2015.05.11. 3rd Release © 2012 Nautilus Hyosung Inc. All Rights Reserved.
-
Page 3: Table Of Contents
Removing the Protective Material from the main body of Cash & Check In Module ......A-1 Removing the locking section from the main body of Cash & Check In Module ........A-2 Separating the Cassette Section ......................A-3 Installing Section............................. A-4 Notes ............................Notes-1 © 2012 Nautilus Hyosung Inc. All Rights Reserved. -
Page 4: Chapter1. Preface
► If any question or installation error occurs while preparing for and installing MX7600TA in compliance with this manual, please contact maintenance staffs of Nautilus Hyosung. For the contact of maintenance staffs of Nautilus Hyosung, see the E-mail addresses and telephone numbers provided separately. -
Page 5: Conventions
Installation Manual Chapter1.Preface improvement by Nautilus Hyosung. It is the policy of Nautilus Hyosung Inc to improve products as new technology, components, software, and firmware become available. Therefore Nautilus Hyosung Inc. reserves the right to change specifications without notice. Conventions ►... - Page 6 Recognition Module REJECT Reject Module RT/A6 Retract & A6 Cassette Switch Separator Control Module Sensor and Indications Unit Service Provider Slip Printer (Receipt Printer) Text Terminal Unit (OPL or SPL) Vacuum Fluorescent Display © 2012 Nautilus Hyosung Inc. All Rights Reserved.
-
Page 7: Safety Precautions (English)
▪ Do not touch the equipment when it is running. ▪ The equipment can get extremely hot and may cause a burn. ▪ Make sure to close the cover before running the equipment. © 2012 Nautilus Hyosung Inc. All Rights Reserved. - Page 8 TYPE. DISPOSED OF USED BATTERIES ACCORDING TO THE INSTRUCTIONS 3. FOR PLUGGABLE EQUIPMENT, THE SOCKET-OUTLET SHALL BE INSTALLED NEAR THE EQUIPMENT AN SHALL BE EASILY ACCESSIBLE 4. THE EQUIPMENT IS TO BE SECURED TO THE BUILDING STRUCTURE BEFORE OPERATION © 2012 Nautilus Hyosung Inc. All Rights Reserved.
-
Page 9: Précautions Pour La Sécurité (French)
• Ne pas retirer le couvercle. Seul le technicien d'entretien est autorisé à ouvrir le couvercle. • Ne pas toucher. Vous pouvez avoir un choc électrique. • Assurez-vous d'éteindre l'appareil lors de l'entretien de l'équipement. © 2012 Nautilus Hyosung Inc. All Rights Reserved. - Page 10 2. RISQUE D'EXPLOSION SI LA BATTERIE EST REMPLACEE PAR UN TYPE INCORRECT. DISPOSER POUR UTILISATION DES BATTRIES SELON LES INSTRUCTIONS 3. POUR LES APPAREILS RACCORDES, LA PRISE DOIT ETRE INSTALLEE PRES D’EQUIPEMENT POUR ÊTRE FACILEMENT ACCESSIBLE © 2012 Nautilus Hyosung Inc. All Rights Reserved.
-
Page 11: Related Document
► The related documents are listed as follows. If needed, please contact staffs of our technical support team and maintenance team. ▪ Operator Manual ▪ Service Manual ► For the contact of maintenance staffs of Nautilus Hyosung, see the E-mail addresses and telephone numbers provided separately. © 2012 Nautilus Hyosung Inc. All Rights Reserved. -
Page 12: Chapter2. Introduction
4. A bank customer and a teller can easily interact on a touch screen, just like talking, through Nautilus Hyosung’s intuitive and easy UI. 5. Supports expanded options as well as basic functions of deposit/withdrawal of cash/check. 6. Allows easy and quick installation and maintenance. © 2012 Nautilus Hyosung Inc. All Rights Reserved. -
Page 13: System Identification Label
Installation Manual Chapter2. Introduction System Identification Label ▶ The System Label below shows the layout of the product identification label which is fixed inside the side box of the ATM © 2012 Nautilus Hyosung Inc. All Rights Reserved. -
Page 14: Chapter3. Installation Information
4. Space required for servicing the machine should be considered before installation. ► Temperature & Humidity In Storage -5°C ~ 50°C (23°F ~ 122°F) Temperature Operating -10°C ~ 40°C (14°F ~ 104°F) In Storage 10% ~ 90% Humidity Operating 25% ~ 86% © 2012 Nautilus Hyosung Inc. All Rights Reserved. -
Page 15: Packing Dimensions
► Packaging Dimensions In some cases it may be necessary to store the ATM (in its box) before it is installed. See figure below for information on the dimensions of a boxed Monimax7600 ATM. © 2012 Nautilus Hyosung Inc. All Rights Reserved. -
Page 16: Weight & Dimensions
Installation Manual Chapter3. Installation Information Weight & Dimensions ► Approximate Weight: 820kg (1,807.79Ibs). ► Dimensions of MX-7600TA ATM with the 10inch sleeve © 2012 Nautilus Hyosung Inc. All Rights Reserved. - Page 17 Installation Manual Chapter3. Installation Information ▶ Dimensions of MX-7600TA ATM with the 15inch sleeve © 2012 Nautilus Hyosung Inc. All Rights Reserved.
-
Page 18: Fascia Item Locations For Voice Guidance
Installation Manual Chapter3. Installation Information Fascia Item Locations for Voice Guidance ► Fascia Item Locations for Voice Guidance. © 2012 Nautilus Hyosung Inc. All Rights Reserved. -
Page 19: Recommended Installation And Service Clearance
MX-7600TA ATM with the 10inch sleeve. <Note!> Hyousng recommends it is more convenient for your service personnel to have enough maintenance space as described below to service this ATM machine © 2012 Nautilus Hyosung Inc. All Rights Reserved. - Page 20 MX-7600TA ATM with the 15inch sleeve. <Note!> Hyousng recommends it is more convenient for your service personnel to have enough maintenance space as described below to service this ATM machine © 2012 Nautilus Hyosung Inc. All Rights Reserved.
-
Page 21: Minimum Installation And Service Clearance
Installation Manual Chapter3. Installation Information Minimum Installation and Service Clearance ► Minimum Installation and Service Clearance Area – Areal View © 2012 Nautilus Hyosung Inc. All Rights Reserved. -
Page 22: Exterior Wall
- After installation TTW, the gap between collar and wall will be waterproofed by using of silicon. - “The minimum maintenance space” should be secured in the rear of the TTW. - All the measurements shown on the plan, ±5mm (0.2 inch) tolerance should be kept. © 2012 Nautilus Hyosung Inc. All Rights Reserved. - Page 23 - “The minimum maintenance space” should be secured in the rear of the TTW. - All the measurements shown on the plan, ±5mm (0.2 inch) tolerance should be kept. 3-10 © 2012 Nautilus Hyosung Inc. All Rights Reserved.
-
Page 24: Chapter4. System Installation
4. Verify the contents carefully with the packing list to be sure all items listed are included. Notify your distributor of any shortages. 5. If only the palette needs to be removed, lift the whole machine from the bottom and set it aside. © 2012 Nautilus Hyosung Inc. All Rights Reserved. - Page 25 ▪ Firmly close the vault door and lock the door by turning the knob completely. ▪ Only experienced staff members should move the heavy machine. ▪ Do not tilt the ATM when moving. Equipment locking bracket © 2012 Nautilus Hyosung Inc. All Rights Reserved.
-
Page 26: Bolting Down The Mx7600Ta
5. Place the MX7600TA on the bolt location sheet, matching the mounting holes of the unit with the anchors. 6. Firmly tighten the mounting bolts in the anchors. ► Following diagram is the Anchor bolts Location Sheet Sample for the MX7600TA ATM with the 10inch sleeve. © 2012 Nautilus Hyosung Inc. All Rights Reserved. - Page 27 Installation Manual Chapter4. System Installation ► Following diagram is the Anchor bolts Location Sheet Sample for the MX-7600TA ATM with the 15inch sleeve. © 2012 Nautilus Hyosung Inc. All Rights Reserved.
-
Page 28: System Positing
Installation Manual Chapter4. System Installation System Positing ▶ Position equipment through the opening in the wall and adjust its position. © 2012 Nautilus Hyosung Inc. All Rights Reserved. -
Page 29: Checking The Location Of The Opening In The Wall To Estimate Whether The Collar Can Be Installed
12.10mm [0.48inch] 26.70mm [1.05inch] <Note!> In case that the wall clearances are less that above dimensions, just take out the collar locking bracket and put it together again after installing the machine!! © 2012 Nautilus Hyosung Inc. All Rights Reserved. - Page 30 12.10mm [0.48inch] 26.70mm [1.05inch] <Note!> In case that the wall clearances are less that above dimensions, just take out the collar locking bracket and put it together again after installing the machine!! © 2012 Nautilus Hyosung Inc. All Rights Reserved.
-
Page 31: Inserting The Collar Wing
Collar Stop Bracket 2. Lift the collar wing so that the pin at the back of the bezel fits into the hole. 3. Push the collar wing in and then push it downward completely. © 2012 Nautilus Hyosung Inc. All Rights Reserved. - Page 32 ▪ Seal both the top and the sides of the collar with silicone not to be absorbed with water. ▪ Remove excess silicone ▪ Do apply silicone to the bottom of the collar for drainage. © 2012 Nautilus Hyosung Inc. All Rights Reserved.
-
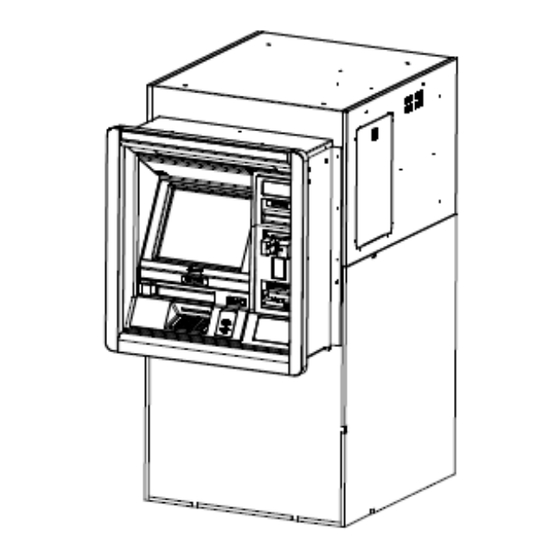
Page 33: The External Appearance After The Completion Of Installation
Installation Manual Chapter4. System Installation The external appearance after the completion of installation 4-10 © 2012 Nautilus Hyosung Inc. All Rights Reserved. -
Page 34: Appendix
▶ Bundle Section 1. Remove the tape from the Bundle Door. 2. Lift up the door and remove the Bubble Bag inside. ▶ Reject Section Remove a tape from the Reject Section. © 2012 Nautilus Hyosung Inc. All Rights Reserved. -
Page 35: Removing The Locking Section From The Main Body Of Cash & Check In Module
2. Move the location of the Screw “C” fastened on the Body Section. Moving the location of the screw fixing the guide on Escrow Section ▶ Transport Section of BM2 Disassemble the green screw. Removing the screw fixing the transport section of BM2 © 2012 Nautilus Hyosung Inc. All Rights Reserved. -
Page 36: Separating The Cassette Section
3. Open the door with the key and remove the tape from the fixing section of upper Push Plate and (2 points) and door (1 point). <Procedure to remove the protective material from the cassette section> © 2012 Nautilus Hyosung Inc. All Rights Reserved. -
Page 37: Installing Section
<Procedure to remove the protective material from the RT/A6 Cassette Section> Installing Section ► Installing the Cash & Check & RT/A6 Cassette Section Insert and push the Cash & Check & RT/A6 cassette in body module completely. Then it is locked automatically. © 2012 Nautilus Hyosung Inc. All Rights Reserved. - Page 38 1. Pulling the green knob until stopping (①), at the same time rotating right (②) and pulling it completely. 2. After opening the green grip (③), insert the ink cartridge in the cartridge adaptor (④). © 2012 Nautilus Hyosung Inc. All Rights Reserved.
- Page 39 (Before mounting it, see the ink cartridge installation guide on the packing bag) 4. Push the green knob completely to the left arrow direction (⑤) to sound the click of the latch, and then it is locked automatically. © 2012 Nautilus Hyosung Inc. All Rights Reserved.
-
Page 40: Notes
Installation Manual Notes Notes Notes-1 © 2012 Nautilus Hyosung Inc. All Rights Reserved.
Need help?
Do you have a question about the MONiMAX7600TA System and is the answer not in the manual?
Questions and answers