
Related Manuals for Nautilus Hyosung MONiMAX7800I


Summary of Contents for Nautilus Hyosung MONiMAX7800I
- Page 1 Operator Manual MONiMAX7800I System V01.00.00 (2016. 11. 17) © 2016 Nautilus Hyosung Inc. All Rights Reserved.
- Page 2 Version Date Description of Change Chapter V01.00.00 2016/11/17 New Publication © 2016 Nautilus Hyosung All Rights Reserved. The content of this specification is protected by copyright laws. 2016. 11. 17. 1st Release © 2016 Nautilus Hyosung Inc. All Rights Reserved.
-
Page 3: Table Of Contents
Remove jam from BC ····································································································· 4-10 Remove jam from ALG ···································································································· 4-11 Remove jam from Recog Transport Section ········································································· 4-12 Remove jam from the B2 Upper Transport Path of BM2 ························································· 4-13 © 2016 Nautilus Hyosung Inc. All Rights Reserved. - Page 4 How to load the receipt paper ........................6-2 How to clear jamming in receipt printer ......................6-4 Chapter7. Coin Dispenser ......................7-1 Replenishing the Coin Dispenser ......................... 7-1 Clearing a coin jam ............................7-3 Chapter8. ID Scanner ........................8-1 © 2016 Nautilus Hyosung Inc. All Rights Reserved.
-
Page 5: Chapter1. Preface
This manual details how the customers replenish the notes, paper and coins and how they remove the jam at the MX7800I. Audience ▶ Customers and staffs of Nautilus Hyosung who use and operate the MX7800I in each branches of bank. Support Information ▶... -
Page 6: Terminologies
Chapter1. Preface Operator Manual components, software, and firmware become available. Therefore Nautilus Hyosung reserves the right to change specifications without notice. Other company names and product names described in this document are trademarks or reigstered trademarks of each company. For the section of that product, the whole section or a necessary part of relevant document is quoted. - Page 7 Recognition Module REJECT Reject Module RT/A6 Retract & A6 Cassette Switch Separator Control Module Sensor and Indications Unit Service Provider Slip Printer (Receipt Printer) Text Terminal Unit (OPL or SPL) Vacuum Fluorescent Display © 2016 Nautilus Hyosung Inc. All Rights Reserved.
-
Page 8: Safety Precautions
4. The equipment is to be secured to the building structure before operation 5. A security container shall be permitted to optionally be provided with a secondary lock, but improper use of the secondary lock feature will reduce the security level of the ATM. © 2016 Nautilus Hyosung Inc. All Rights Reserved. - Page 9 ▪ If the above-mentioned abnormalities occur, immediately turn off the power, unplug the equipment and contact the service center. ▪ If you ignore these symptoms, the equipment may catch on fire or cause electric shock. © 2016 Nautilus Hyosung Inc. All Rights Reserved.
-
Page 10: Related Document
▶ The related documents are listed as follows. If needed, please contact staffs of our technical support team and maintenance team. ▪ Installation Manual ▪ Service Manual For the contact of maintenance staffs of Nautilus Hyosung, see the E-mail addresses and telephone numbers provided separately. © 2016 Nautilus Hyosung Inc. All Rights Reserved. -
Page 11: Chapter2. Introduction
Nautilus Hyosung’s intuitive and easy UI. Supports expanded options such as coin dispenser, RF (NFC), and ID scan, as well as basic functions of deposit/withdrawal of cash/check. Allows easy and quick installation and maintenance. © 2016 Nautilus Hyosung Inc. All Rights Reserved. -
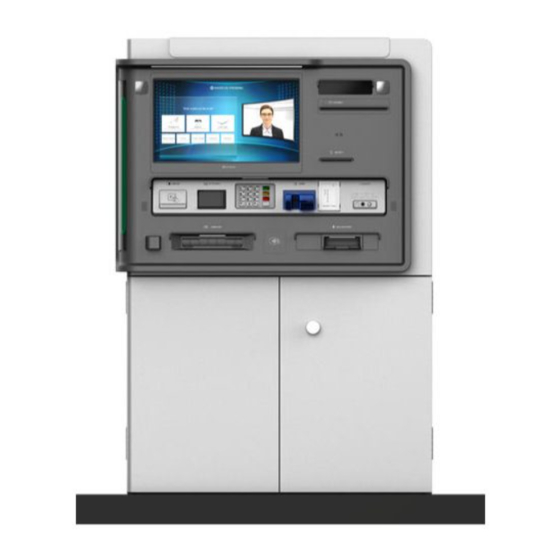
Page 12: The Exterior Overview
Printer Slot Card Reader Slot Earphone Jack Cash & Check In Module Slot (Cash/Check Deposit) Cash Advertisement RF Reader Dispenser Slot Display (Encryption (Contactless (Cash Out) PIN Pad) Card Reader) © 2016 Nautilus Hyosung Inc. All Rights Reserved. -
Page 13: Basic Features
Green/Red Pin-Pad PCI 3.0 EPP (PCI Poly-Carbonate Customer Compliant) Button Input Method Function Key Touch Screen IR Touchscreen 10.1” TFT LCD, Display Module Supervisor 200cd/m Operation Input Method Touch Screen Res Touchscreen © 2016 Nautilus Hyosung Inc. All Rights Reserved. - Page 14 Criteria for Deposit Cassettes 2,000 checks/1 cassette New Notes & Checks Reject 50 Mixed Notes and Cassettes Checks Article6 10 Mixed Notes and Cassettes Checks Escrow 50 Mixed Notes and Checks /1 transaction © 2016 Nautilus Hyosung Inc. All Rights Reserved.
- Page 15 4 sorts 1, 5,10, 25 cents (SCH2) Dispensing Capacity 1cent 658ea, 5cent 449ea, 10cent 847ea, 25cent 355ea Contactless Audio guidance Beeper Card Reader Transaction Interface 13.56MHz ISO14443 (VivoPay) Type A,B, NFC and MiFare © 2016 Nautilus Hyosung Inc. All Rights Reserved.
- Page 16 Video Banking 1920X1080P(30Hz) Audio guidance Sound Card On-Board Additional ADA Audio guidance Available(/w Earphone function jack cover/plug) Battery System Battery Alarm Battery Dimension Option & Heater 3 Heater Environment (Upper/Bottom Left/Bottom Right) © 2016 Nautilus Hyosung Inc. All Rights Reserved.
-
Page 17: Devices Of Mx7800I
3 Port Use for Coin USB Ports 12 Ports USB2.0 7Port HUB Main Board 12 Ports Onboard On-Board Dual VGA (DVI, Intel Q61 express chipset HDMI) VGA CARD GT520 (nVIDIA) 10/100/1000Mbps On-Board © 2016 Nautilus Hyosung Inc. All Rights Reserved. -
Page 18: Customer Display & Keypad
Viewable) Display Auto Sensing External Day & Night (2 Step) Brightness (Day : 1500cd, Night : 800cd) Bright Input Method Touch Screen IR Touchscreen Customer Display (with touch screen) (Encryption PIN Pad) © 2016 Nautilus Hyosung Inc. All Rights Reserved. -
Page 19: Advertisement Display
Operator Manual Chapter2. Introduction Advertisement Display ►Basic Specification Item Specification Remarks (Option) 32” TFT LCD, 300c d/m Display Module © 2016 Nautilus Hyosung Inc. All Rights Reserved. -
Page 20: Teller Display
Chapter2. Introduction Operator Manual Teller Display ►Basic Specification Item Specification Remarks (Option) 10.1” TFT LCD, Display Module 200cd/m Input Method Touch Screen Res Touchscreen 2-10 © 2016 Nautilus Hyosung Inc. All Rights Reserved. -
Page 21: Cash Dispenser Unit (Cdu)
Reject Type Note by Note Reject (300 bills Reject / Retract BOX Max) Retract Bundle Retract (100 bills Max) Number of Near-End 500 Notes Max 100 to 500, 5 Step Sensing © 2016 Nautilus Hyosung Inc. All Rights Reserved. 2-11... -
Page 22: Card Reader
The dip card reader cannot retract, capture, or retain cards. Item Specification Remarks (Option) Type Sankyo MCR (DIP TYPE) USB, Anti-Skimming Magnetic Stripe ISO 1,2 Read IC card Support Support 2-12 © 2016 Nautilus Hyosung Inc. All Rights Reserved. -
Page 23: Receipt Printer (Spr)
80mm Max Paper Type Thermal Roll Paper Specification Width Max. 80mm Max. 210Φ Outer Diameter Paper Roll Capacity 5,000 Transaction/Roll Depends on Format Black Mark Paper Support None Black Mark Paper Option © 2016 Nautilus Hyosung Inc. All Rights Reserved. 2-13... -
Page 24: Cash & Check In Module (Ccim)
7 Sheets : - Seconds 50 Sheets : - Seconds Image scanning Double side scanning 200 dpi MICR CMC-7, E13-B Endorsement Print Double side printing, Ink jet Shutter Type Automatic Shutter 2-14 © 2016 Nautilus Hyosung Inc. All Rights Reserved. -
Page 25: Power Supply
► The power supply unit converts AC power to DC power and provides the voltage to various modules within the system. The power supply unit allows the user to turn on/off the system, enter power-failure mode, and perform other sequences. © 2016 Nautilus Hyosung Inc. All Rights Reserved. 2-15... -
Page 26: Coin Dispenser
ATM transactions to a precise amount. ► Basic Specification Item Specification Remarks (Option) Denomination 4 sorts 1, 5,10, 25 cents Dispensing Capacity 1cent 658ea, 5cent 449ea, 10cent 847ea, 25cent 355ea 2-16 © 2016 Nautilus Hyosung Inc. All Rights Reserved. -
Page 27: Rf Reader
Item Specification Remarks (Option) Audio guidance Beeper Transaction Interface 13.56MHz ISO14443 Type A,B, NFC and MiFare Payment American Express-Express Pay Applications Discover Zip, JCB J/speedy Mastercard PayPass Mstripe Visa payWave MSD © 2016 Nautilus Hyosung Inc. All Rights Reserved. 2-17... -
Page 28: Id Scan
Chapter2. Introduction Operator Manual ID Scan ► Basic Specification Item Specification Remarks (Option) ID Scanner ID Card 2D Barcode 2-18 © 2016 Nautilus Hyosung Inc. All Rights Reserved. -
Page 29: Video Banking
Operator Manual Chapter2. Introduction Video Banking ► Basic Specification of Web Cam Remarks Sample Picture Item Specification (Option) Web Cam Logitech C615 Use External 1920X1080P (30Hz) Microphone Speaker © 2016 Nautilus Hyosung Inc. All Rights Reserved. 2-19... -
Page 30: Safety & Security
Chapter2. Introduction Operator Manual Safety & Security Item Specification Sample Picture Safety UL 291 Level-1 (Front Access) Locking device Cencon Lock Alarm Seismic + Heat Sensor Security Terminal Block (External I/F) 2-20 © 2016 Nautilus Hyosung Inc. All Rights Reserved. - Page 31 Specification Sample Picture Camera CCD 2EA (FACE,HAND) Panorama(180°) 1EA Camera I/F Video Port /w Pig Tail for internal Cam Video Power /w Pig Tail for Anti-Skimming Option Device Mirror Awareness Mirror © 2016 Nautilus Hyosung Inc. All Rights Reserved. 2-21...
-
Page 32: Additional Function
Chapter2. Introduction Operator Manual Additional Function Item Specification Sample Picture Audio Sound Card On-Board Guidance (Voice PCBA) ADA Audio Volume Control Support Guidance (ADA Volume Control PCBA) 2-22 © 2016 Nautilus Hyosung Inc. All Rights Reserved. -
Page 33: Chapter3. For The Beginning Operator
1. Open the lower front door with key. 2. Insert the key into the lock on the upper front hatch and turn the key clockwise Then open the upper front hatch pulling it upward. © 2016 Nautilus Hyosung Inc. All Rights Reserved. -
Page 34: Opening The Security Enclosure
1. Unlock the security door, refer to the relevant instructions detailed under “Opening/ Closing The Security Enclosure (Security Door)” for the configuration of MX7800I 2. Turn and pull the Handle. Cencon Lock Handle © 2016 Nautilus Hyosung Inc. All Rights Reserved. -
Page 35: Accessing The Teller Display
Accessing the Teller Display ► To open, pull the handle and open the teller display. (refer to pictures below) <Note!> Before closing the fascia, be sure to return the teller display to its original position. © 2016 Nautilus Hyosung Inc. All Rights Reserved. -
Page 36: Switching Power On/Off
The system turning-on process is as follows, 1. Press the standby switch to “ON” side (1) (Main power switch should be turned “ON” (2)) 2. The system will be turn on automatically © 2016 Nautilus Hyosung Inc. All Rights Reserved. -
Page 37: Switching Power Off
3. The operating system will shut down then power will turn off. WARNING: Do NOT operate Main Switch when you would like to turn off the power. It may cause damage to operate system or destabilize control electronics in ATM. © 2016 Nautilus Hyosung Inc. All Rights Reserved. -
Page 38: Power Supply Status
<System Off> procedure starts and only [AC IN] LED is turned on. ▪ In case power failure occurs during normal system operation, the system will enter <Power Failure Mode> and only [DC OUT] will be turned off. © 2016 Nautilus Hyosung Inc. All Rights Reserved. -
Page 39: Opening/Closing The Security Enclosure (Security Door)
CW = Clockwise; CCW = Counter Clockwise 2. Enter the factory combination of 50-25-50 by sequentially pressing those six buttons. The LCD will display the entered number. © 2016 Nautilus Hyosung Inc. All Rights Reserved. - Page 40 5. Turn the handle to the left (CCW) and open the security door. 7. Turn the dial a minimum of one complete rotation to the left (CCW) to extent the bolt. © 2016 Nautilus Hyosung Inc. All Rights Reserved.
- Page 41 The best thing to do in analyzing the lock level is to write down the entire string and then pick out the portions of it that are significant to you, or if you are experiencing a problem with the lock, report the entire string to the Tech Support group. © 2016 Nautilus Hyosung Inc. All Rights Reserved.
- Page 42 Select and enter the new combination. “CnF” (confirm new Factory combination) will be displayed 11. Cnf Enter New Combination POC Enter new combination again to confirm. POC (Pull Out Change key) will be 3-10 © 2016 Nautilus Hyosung Inc. All Rights Reserved.
- Page 43 15. OPr Retract Bolt Turn the Dial to the right (CW) to retract the bolt. 16. Close Door 17. Extend Bolt Turn the Dial to the left (CCW) to extend the bolt. © 2016 Nautilus Hyosung Inc. All Rights Reserved. 3-11...
-
Page 44: Environment
Operator Manual Environment General Guidelines to Environmental Exposure ► Minimize the effects of the environment on the Monimax7800I island ATM by adhering to the guidelines in this section. The following environmental factors can negatively effect device operation in the island ATM. -
Page 45: Heater
4. Main PCB Main PCB is composed of AC Power circuit, LED Display and DC Power circuit (No. 1 Pin : +24Vdc 0.2A for DC FAN, No. 2 Pin : GND) © 2016 Nautilus Hyosung Inc. All Rights Reserved. 3-13... -
Page 46: Chapter4. Cash & Check In Module (Ccim)
In case of the transaction cancellation, cash and check in reject section is ejected to the customer in a lump by the command of higher rank. BC (Bill Checker) This section verifies the image data on both sides of cash for identification Reject Section © 2016 Nautilus Hyosung Inc. All Rights Reserved. - Page 47 Cash and check received are stored in the cassette by sheets. The cassettes can be mounted or demounted from the unit with the key. And also cassette’s door can be opened using the key. © 2016 Nautilus Hyosung Inc. All Rights Reserved.
-
Page 48: Basic Specification Of Cash & Check In Module
USB1.1 (Full-Speed) USB2.0 HUB Interface Control TM Use External Storage, Program Loading on flash Memory by SP Remote Download It is the reference value when the thickness of bill used is 0.1mm. © 2016 Nautilus Hyosung Inc. All Rights Reserved. -
Page 49: Specification Of External Appearance
(Cash&Check) Height: 310 ± 2 (mm) Weight 4.5Kg(except Cash&Check weight) RT/A6 Dimensions Width: 274 ± 2 (mm) Cassette Length: 169 ± 2 (mm) Height: 62 ± 2 (mm) Weight 1.1Kg(except Cash&Check weight) © 2016 Nautilus Hyosung Inc. All Rights Reserved. -
Page 50: Cash & Check Conditions
Operator Manual Chapter4. Cash & Check In Module (CCIM) Cash & Check Conditions ▶ Please refer to “Bill Conditions” in Chapter5. Cash Dispenser © 2016 Nautilus Hyosung Inc. All Rights Reserved. -
Page 51: How To Remove Jam From Each Section
BOTTOM Module includes CASH CASSETTE Module and CHECK CASSETTE Module. Zone Abbreviation Description ① BUNDLE Bulk Note Separation Module ② Separator Control Module ③ Bill Checker ④ Alignment Module ⑤ RECOG Recognition Module © 2016 Nautilus Hyosung Inc. All Rights Reserved. - Page 52 B4 GUIDE B4 Guide of Body Module1 ⑫ ESCROW Escrow Module ⑬ RT/A6 Retract & A6 Cassette ⑭ CASSETTE1 Cash Cassette ⑮ CASSETTE2 Check Cassette ► Open Status of Unit Transport Path © 2016 Nautilus Hyosung Inc. All Rights Reserved.
-
Page 53: Remove Jam From Bundle Module
1. After opening the Bundle Module and SCM, remove a jammed note. If necessary, turn the green Knob 1 to move the note to easily remove the jammed note. Removing jam from Bundle Module. Removing jam from Bundle Module. © 2016 Nautilus Hyosung Inc. All Rights Reserved. -
Page 54: Remove Jam From The First Transport Path
3. After checking if the jammed bill is removed, completely close the First Transport Path pushing the lock lever in the yellow arrow direction as shown in the picture. Opening SCM to remove jam. Closing SCM after removing jam. © 2016 Nautilus Hyosung Inc. All Rights Reserved. -
Page 55: Remove Jam From Bc
3. After checking if the jammed Note is removed, completely close the BC section by pushing the lock lever in the yellow arrow direction as shown in the picture. Opening BC (Zone ③) to remove jam. Closing BC after removing jam. 4-10 © 2016 Nautilus Hyosung Inc. All Rights Reserved. -
Page 56: Remove Jam From Alg
Note as shown in the picture below. 3. After checking if the jammed Note is removed, completely close the ALG section. Opening Zone ④ to remove jam. Turning the green knob to remove jam. © 2016 Nautilus Hyosung Inc. All Rights Reserved. 4-11... -
Page 57: Remove Jam From Recog Transport Section
Note as shown in the picture below. 3. After checking if the jammed Note is removed, completely close the Recog Transport Section. Pushing the lock lever to open Zone ⑤. Opening or Closing Zone ⑤. 4-12 © 2016 Nautilus Hyosung Inc. All Rights Reserved. -
Page 58: Remove Jam From The B2 Upper Transport Path Of Bm2
3. After checking if the jammed Note is removed, completely close Zone ⑥ as shown in the picture. Pushing the lock lever to open Zone ⑥. Opening or Closing Zone ⑥. © 2016 Nautilus Hyosung Inc. All Rights Reserved. 4-13... -
Page 59: Remove Jam From The B2 Upper Transport Path Of Bm2
3. After checking if the jammed Note is removed, completely close Zone ⑥ as shown in the picture. Pushing the lock lever to open Zone ⑥. Opening or Closing Zone ⑥. 4-14 © 2016 Nautilus Hyosung Inc. All Rights Reserved. -
Page 60: Remove Jam From B2 Reject Transport Section
Section as shown in the picture. 4. If it is necessary to remove the inside jam of ALG, open the ALG guide as shown in the picture. Pushing the lock lever. Opening Zone ⑦-1, ⑦-2. © 2016 Nautilus Hyosung Inc. All Rights Reserved. 4-15... -
Page 61: Remove Jam From B3 Transport Section
Note as shown in the picture below. 3. After checking if the jammed Note is removed, completely close Zone ⑧ as shown in the picture. Opening Zone ⑧ Closing Zone ⑧ 4-16 © 2016 Nautilus Hyosung Inc. All Rights Reserved. -
Page 62: Remove Jam From Reject Section
Note as shown in the picture below. 3. After checking if the jammed Note is removed, completely close the door. Removing jam from Reject Section. © 2016 Nautilus Hyosung Inc. All Rights Reserved. 4-17... -
Page 63: Remove Jam From B3 Escrow Transport Section
3. After checking if the jammed Note is removed, push the green button and completely close Zone ⑩ as shown in the picture. Opening Zone ⑩ Closing Zone ⑩ 4-18 © 2016 Nautilus Hyosung Inc. All Rights Reserved. -
Page 64: Remove Jam From B4 Transport Section
3. After checking if the jammed Note is removed, push the green button and completely close Zone ⑪ as shown in the picture. Opening Zone ⑪ Closing Zone ⑪ © 2016 Nautilus Hyosung Inc. All Rights Reserved. 4-19... -
Page 65: Remove Jam From Escrow
5. And then come out one note from the escrow module. And remove the note as shown in lower figure. If necessary, repeat it to end. Finally turn the Lock Lever8 to “CLOSED” position. Removing jam from Escrow Removing note from Escrow 4-20 © 2016 Nautilus Hyosung Inc. All Rights Reserved. -
Page 66: Remove Jam From Rt/A6 Cassette
4. After removing jam, close the door and turn the key to the left. And then it is locked. 5. To mount RT/A6 Cassette, turn the key to the left and remove it. Then mount the RT/A6 Cassette. (Auto-locking mounting) Moving BM3 Separating Retract BOX Removing jam from Retract © 2016 Nautilus Hyosung Inc. All Rights Reserved. 4-21... - Page 67 Chapter4. Cash & Check In Module (CCIM) Operator Manual Opening or closing the door of Retract BOX Removing jam from Retract Section 4-22 © 2016 Nautilus Hyosung Inc. All Rights Reserved.
-
Page 68: Remove Jam From Cassette
3. After removing jam, close the door and turn the key to the left. And then it is locked. 4. To mount the Cassette, turn the key to the left and remove it. Then it is mounted automatically. Front View of Cassette Section. Separating the Cassette. © 2016 Nautilus Hyosung Inc. All Rights Reserved. 4-23... - Page 69 Turning the key to the right to open the door and turning the key to the left to close the door. Pressing the green lever to drop down the Push Plate. 4-24 © 2016 Nautilus Hyosung Inc. All Rights Reserved.
-
Page 70: How To Change Prt Maintenance Module
※ After replacing Ink Cartridge, you have to reset "PRT Cartridge Count". And you may need to replace Ink Head Cleaner Felt if necessary Installing Ink Cartridge © 2016 Nautilus Hyosung Inc. All Rights Reserved. 4-25... -
Page 71: How To Reset Prt Cartridge Count
3. Press the green button on PRT capping module installed BM3 for 3 seconds as shows the picture (Pressing the green button). 4. Push down DIP Switch 1 DIP Switch 1 Pressing the green button 4-26 © 2016 Nautilus Hyosung Inc. All Rights Reserved. - Page 72 4.5 million, it will be displayed in red. And you have to replace the Ink Cartridge. < Note! > Ink Count Clear is Available since V01.00.54 of VDM and V02.00.35 of firmware. © 2016 Nautilus Hyosung Inc. All Rights Reserved. 4-27...
-
Page 73: How To Replace Ink Head Cleaner Felt
3. After replacing the new one by removing the tape, assemble the felt unit in the reverse process Dissembling the Felt Unit Replacing Ink Head Cleaner Felt 4-28 © 2016 Nautilus Hyosung Inc. All Rights Reserved. -
Page 74: Chapter5. Cash Dispenser
2. Bill has sufficient life or sizing to be handled easily 3. Bill which can be manually held straightly when one end is held by a hand and the bill is slightly curved vertically. © 2016 Nautilus Hyosung, Inc. All Rights Reserved. -
Page 75: Unacceptable Condition
Operator Manual Unacceptable condition ▶ 1. Bill with serious wrinkles, torn or broken section wherein paper fiber is broken and separation begins. ▪ Wrinkle Wrinkle ▪ Torn Torn ▪ Broken section Broken Section © 2016 Nautilus Hyosung, Inc. All Rights Reserved. - Page 76 4. Bill ragged and cannot be held straightly when one end is supported by a hand 20mm (0.79inch) 35mm (1.38inch) When the bill is held by 20mm (0.79inch) and the straightness of the bill is 35mm (1.38inch) or less, it cannot be used © 2016 Nautilus Hyosung, Inc. All Rights Reserved.
- Page 77 Chapter5. Cash Dispenser Operator Manual 5. Bill with cellophane tape, scotch tape, etc Tape 6. Bill with folds Fold 7. Gradually curved bill (bills tied by hand seal, etc) Band seal © 2016 Nautilus Hyosung, Inc. All Rights Reserved.
- Page 78 Operator Manual Chapter5. Cash Dispenser 8. Bill with folded lines Case 1 Case 2 Case 3 <Note!> Bill distortion should not exceed 10 mm (0.39inch). © 2016 Nautilus Hyosung, Inc. All Rights Reserved.
-
Page 79: How To Replenish The Cash Cassette
2. Place the cash cassette on a flat level platform and turn the green lever clockwise to unlock a cassette cover. Then lift up the cassette cover. <Note!> 1) Completely open the cassette cover as picture below when replenishing a cash cassette. © 2016 Nautilus Hyosung, Inc. All Rights Reserved. - Page 80 3. Pull black push-plate back completely until it is locked against the cash plate latch. 4. Pull the Push-Plate after pressing the Green Color Button ( 5. Set the bills and push the Push-Plate to the location where the bills are set. © 2016 Nautilus Hyosung, Inc. All Rights Reserved.
- Page 81 6. Turn the green lever clockwise and completely close the cassette cover. <Note!> 1) If you have the key type cassette, close the cassette cover using the key like the picture below. © 2016 Nautilus Hyosung, Inc. All Rights Reserved.
- Page 82 7. Holding a cassette handle with one hand and supporting the cassette from the bottom with the other hand, place the cassette carefully on the set guide of the CDU and push it completely until it is locked in place. © 2016 Nautilus Hyosung, Inc. All Rights Reserved.
-
Page 83: How To Empty The Reject/Retract Box
1. Push the lever (A) and holding a Reject/Retract Box handle (B) with the other hand pull out slightly, and support the Reject/Retract Box from bottom with the hand pushed the lever (A), and pull out to the end of the cassette. 5-10 © 2016 Nautilus Hyosung, Inc. All Rights Reserved. - Page 84 3. Remove both rejected and retracted bills from the box. Push the edge of transparent component when remove retracted bills. PRE CAUTION: Don’t recycle rejected bills any more. Doing so will cause not only the same reject © 2016 Nautilus Hyosung, Inc. All Rights Reserved. 5-11...
- Page 85 4. Use the reverse order of 1)~3) to put Reject/Retract Box together into cash dispenser again. The Reject/Retract Box must be fully inserted. Otherwise, it will happen problems and the error code will display at monitor promptly. 5-12 © 2016 Nautilus Hyosung, Inc. All Rights Reserved.
-
Page 86: How To Clear Jamming In Cash Dispenser
Any branch personnel should not attempt to remove any jams without first powering down the ATM. 2. Undock the CDU and slide out completely. Then perform the following steps for each case to clear the obstruction. © 2016 Nautilus Hyosung, Inc. All Rights Reserved. 5-13... -
Page 87: Remove Jam From The Upper Horizontal Transport Path
1. Pull the lever with both hands while pressing it inward and then remove the bill. 2. Pull the lever with both hands while pressing it inward (see the picture of 1)) and lift up E part as the below picture. Then remove the jammed bill. 5-14 © 2016 Nautilus Hyosung, Inc. All Rights Reserved. - Page 88 3. Put down the E part and press the D part in the direction of arrow until it fixes. CAUTION: DO NOT put down the E part after first closing the D part. © 2016 Nautilus Hyosung, Inc. All Rights Reserved. 5-15...
-
Page 89: Remove Jam From The Vertical Transport Path
1. Pull the green lever of the bottom with lifting it up and open the part. Then remove the bill. 2. Press the lever with hand as the below picture until the F part fixes. 5-16 © 2016 Nautilus Hyosung, Inc. All Rights Reserved. -
Page 90: Remove Jam From The Carriage
1. Rotate the carriage by turning the knob (G) and remove the jammed bill. 2. After removing the jammed bill, turn the knob ( ) and return the carriage to the original position. © 2016 Nautilus Hyosung, Inc. All Rights Reserved. 5-17... -
Page 91: Remove Jam From The Transport Path Of The Main Body
2. Lift up the carriage with hand and move it to the throat. 3. Turn the knob (G) and move the jammed bill to the location to clear it easily. Then remove the jammed bill. 5-18 © 2016 Nautilus Hyosung, Inc. All Rights Reserved. -
Page 92: Remove Jam From The Transport Path Of Rj/Rt Box
Remove jam from the transport path of RJ/RT box ▶ Remove jam from the transport path of RJ/RT box 1. Demount the Reject/Retract Box. (Refer to “How to empty the Reject/Retract Box.”) 2. Remove the jammed bills. © 2016 Nautilus Hyosung, Inc. All Rights Reserved. 5-19... -
Page 93: Remove Jam From The Separation Part
Remove jam from the separation part ▶ Remove jam from the separation part 1. Demount the cassette. (Refer to “How to replenish the Cash Cassette.”) 2. Remove the jammed bill as shown in below picture 5-20 © 2016 Nautilus Hyosung, Inc. All Rights Reserved. -
Page 94: Remove Jam From The Transport Path Of Reject
2. If turning the Knob (H) counterclockwise, the jammed bill will move in the direction of the Transport Path. 3. If turning the Knob (H) clockwise, the jammed bill will move in the direction of the RJ/RT Box. © 2016 Nautilus Hyosung, Inc. All Rights Reserved. 5-21... -
Page 95: How To Reset Main Board
Chapter5. Cash Dispenser Operator Manual How to Reset Main Board ▶ How to Reset Main Board 1. Press the hole in the red circle with a stick and reset. 5-22 © 2016 Nautilus Hyosung, Inc. All Rights Reserved. -
Page 96: How To Set The Cassette For Each Denomination
Push Plate and take it out with the other hand. Also take out the Push Plate on the other side in the same way. 3. Completely take out the Push Plate and gently place it inside the box. © 2016 Nautilus Hyosung, Inc. All Rights Reserved. 5-23... - Page 97 5. After taking out the Hook Part, push the Guide in the direction of yellow arrow and take it out. 6. Remove current 6 LOWER NOTE SPACER as shown in below. Press HOOK in the green arrow and pull up the Spacer. 5-24 © 2016 Nautilus Hyosung, Inc. All Rights Reserved.
- Page 98 Recommended spacer for note size 8. For the desired denomination size, mount the Guide matching it with the white line. Press it until clicking sounds. (Mount the remaining guide in the same way.) © 2016 Nautilus Hyosung, Inc. All Rights Reserved. 5-25...
- Page 99 Operator Manual 9. Vertically insert two kinds of Shaft and turn the hand holding the Push Plate. 10. Then check whether A Shaft matches the white arrow. (The other side is same.) 5-26 © 2016 Nautilus Hyosung, Inc. All Rights Reserved.
-
Page 100: Cassette Cover Guide Setting For The Vertical Size Of Each Denomination
2. Also unfasten the Hook on the other side in the arrow direction and completely take out the Guide pulling it in the C direction. 3. Remove 6 Upper note SPACER. Then lift up HOOK and pull out Spacer from guide © 2016 Nautilus Hyosung, Inc. All Rights Reserved. 5-27... - Page 101 However, be sure to push it after matching the height of the other side of the Guide. 6. After also matching the other side of the Guide with the height of the desired bill size, push it with both hands until the Hook is caught. 5-28 © 2016 Nautilus Hyosung, Inc. All Rights Reserved.
-
Page 102: Change Note Index
1. After change, Change the denomination label 2. After adjust cassette have to change assigned denomination value in Supervisor mode. <Note!> To assign new denomination in supervisor mode, please contact software develops part or Technical Support Center. © 2016 Nautilus Hyosung, Inc. All Rights Reserved. 5-29... -
Page 103: Chapter6. Receipt Printer
8. Make sure the paper is rolled evenly. 9. Miscellaneous: If the paper comes in contact with carbon copy paper or if the paper surface is scratched with a metallic object, de-coloring may occur. © 2016 Nautilus Hyosung Inc. All Rights Reserved. -
Page 104: How To Load The Receipt Paper
4. Have receipt paper go down the white tension bar as shown in the picture and then pull it forward. 5. Push the receipt paper inside the supporting bracket, as shown in the picture. Then it will be set automatically if turning on the power © 2016 Nautilus Hyosung Inc. All Rights Reserved. - Page 105 1. Refer to diagram stickers placed on either side of the center section of the thermal printer. 2. A test receipt will print. Remove the test receipt from the printer after it finishes printing. © 2016 Nautilus Hyosung Inc. All Rights Reserved.
-
Page 106: How To Clear Jamming In Receipt Printer
3. Search for jammed paper and carefully remove it. Rotate the green wheel clockwise or counterclockwise to assist in removing jammed paper 4. Push the green lever to lock it back in place. Listen for a click. © 2016 Nautilus Hyosung Inc. All Rights Reserved. - Page 107 Operator Manual Chapter6. Receipt Printer 5. Reinsert the paper back into printer. Run diagnostics if necessary. © 2016 Nautilus Hyosung Inc. All Rights Reserved.
-
Page 108: Chapter7. Coin Dispenser
2. Open the cover of coin hopper and pour the container into the coin hopper using a pre- filled container of coins. <Note!> Be sure to check the denomination label on the coin hopper when replenishing coins. © 2016 Nautilus Hyosung Inc. All Rights Reserved. - Page 109 ▪ If coin dust accumulates in the hopper during use, it may cover the outlet sensor, and causes the malfunction. 3. Repeat the procedure for the other three coin hoppers in the coin dispenser. 4. Push the coin dispenser’s servicing tray back to its docked position. © 2016 Nautilus Hyosung Inc. All Rights Reserved.
-
Page 110: Clearing A Coin Jam
4. Clear the jammed coin by either: ▪ Rotate the disk manually, first counter clock wise, and then clock wise to free the coin or ▪ Push the coin back in using another coin. © 2016 Nautilus Hyosung Inc. All Rights Reserved. - Page 111 Operator Manual 5. Remove any debris from the disk bed assembly. 6. Clean the exit window opto with a clean dry cloth. 7. Re-assemble, as described. 8. Refill and test the hopper. © 2016 Nautilus Hyosung Inc. All Rights Reserved.
-
Page 112: Chapter8. Id Scanner
ID Scanner since damage can occur to the coating when the stickers or films are subsequently removed. Do not use any of the following for cleaning CONTURAN® : Strongly alkaline caustic solutions e.g. Hydrofluoric acid Acids Cleaners containing fluorides © 2016 Nautilus Hyosung Inc. All Rights Reserved. Memo-1... - Page 113 In the event of non-observance of these cleaning instructions, Nautilus Hyosung accepts no liability. <Note!> If the suggested cleaning methods do not work, please consult Nautilus Hyosung: In the event of non-observance of these cleaning instructions, Nautilus Hyosung accepts no liability © 2016 Nautilus Hyosung Inc. All Rights Reserved.
Need help?
Do you have a question about the MONiMAX7800I and is the answer not in the manual?
Questions and answers